
 Facebook
 Twitter
 Pinterest
 Copy Link
9 Must-Haves for Low-Maintenance Kitchen Cabinets
Save valuable elbow grease and time with these ideas for easy-to-maintain cabinets.
The heart of the home may also be the toughest room to keep clean. Every surface in your kitchen is susceptible to crumbs, dirt, stains and splatters. This is especially true of cabinets. Fortunately, there are practical ways to keep your cabinet maintenance on the lighter side. With ideas like choosing fewer decorative details and picking the right color, these nine tips will make your cabinets easier to maintain.
1. Choose a door style with minimal detail. Raised-panel door styles have nooks and crannies that are magnets for dust and dirt. Shaker-style and slab door fronts don’t, so you won’t have to spend time scrubbing every recess of your door fronts.
If you’re designing a traditional kitchen and want a more decorative door style, select a stain or paint that has a glaze. The glaze will fill the doors’ cracks and corners and better hide the dust and dirt that your cabinet doors will collect.
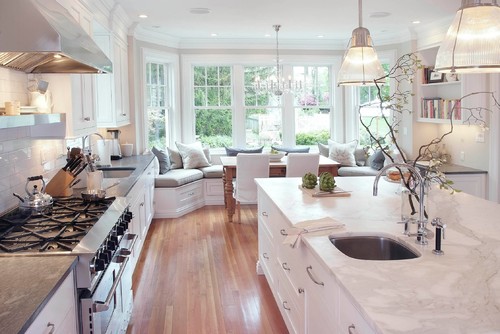
2. Opt for flush cabinet ends. You normally have two options for finishing the ends of your cabinets: flush ends or matching ends. Flush ends (above) are plywood ends that match the color of your cabinets. They are smooth and sleek, which means you can run a cloth over it with a few swipes. They can certainly speed up cleaning.
Matching ends feature a panel with the same style as the door fronts, and while they can bring elegance and character to your kitchen, you face the same maintenance issues with matching ends as you do with raised-panel doors. There’s simply more to scrub.

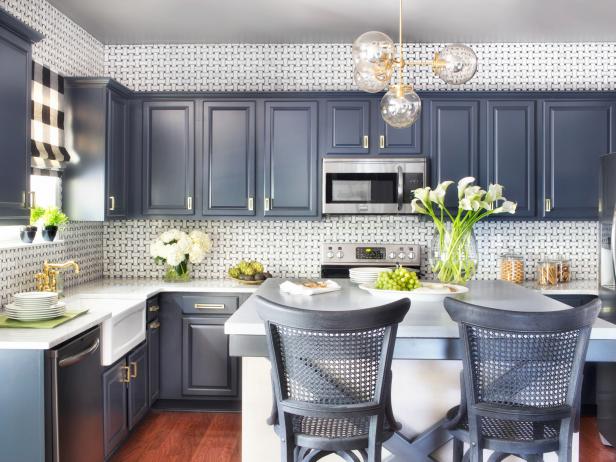
3. Cut the trimmings. Designer details like crown molding, corbels, decorative legs and light rail molding add more to love but also more to clean, especially ornate styles.
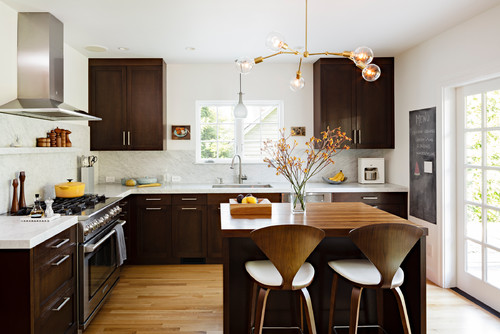
There are other designer touches you can use that require less maintenance. Try a colorful cabinet paint, eccentric lighting or colored bar stools, like in this modern kitchen.
4. Pick a stain instead of a paint. Stains and paints have pros and cons. They can both show crumbs and fingerprints, and paint definitely shows food stains and splatters.
That said, a stain is easier to touch up than paint. You can give a scratched cabinet stain a quick spruce-up with a matching permanent marker. It’s often harder with paint for two reasons. First, it’s hard to find a marker that closely matches a specific paint. Often a touch-up kit from the cabinet manufacturer is needed. Second, paint doesn’t take touch-ups the same way that stains do. You’re more likely to notice a touch-up on paint.
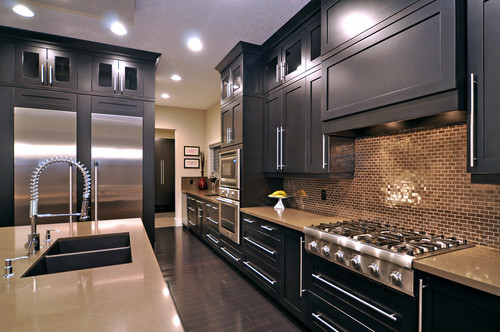
5. Go for a grain with a dark stain. If you’re set on a dark cabinet stain, select a wood species that features the grain, such as oak or hickory. Grains don’t show scratches, stains and crumbs as much as a clean wood species like maple does. It’s also harder to tell that a cabinet stain has been touched up when the surface has grains.
6. Invest in hardware. If you want fewer fingerprints and less wear and tear on your door fronts, purchase door pulls and knobs for all of your cabinets. They help preserve the integrity of your cabinets’ surfaces.
Steer clear of stainless steel and chrome hardware. They show fingerprints and water spots and are harder to clean. Oil-rubbed bronze, satin bronze, polished nickel, brushed nickel and white hardware are the cream of the crop as far as easy maintenance goes. Choose the look that best suits the style of your kitchen.
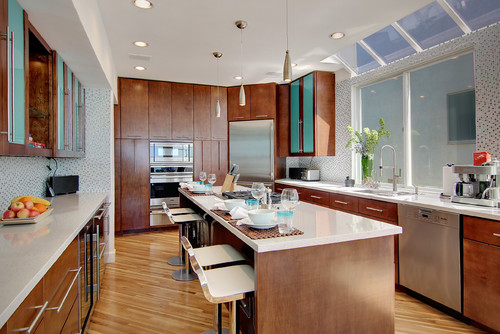
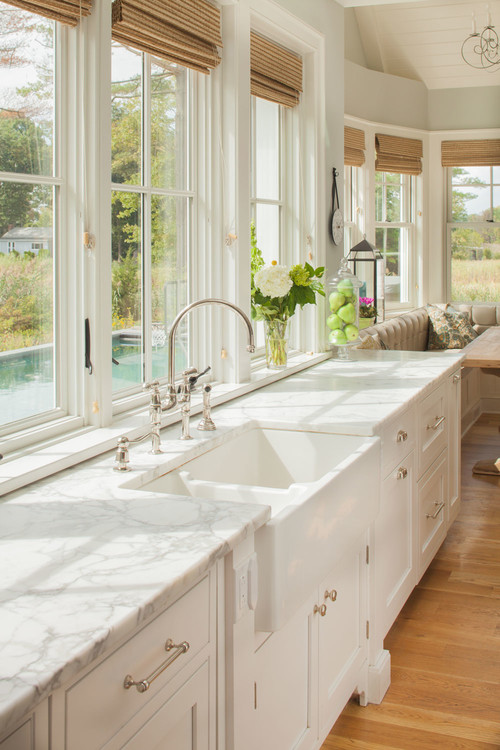
7. Avoid glass door fronts. They may be windows to your kitchen’s soul, but they’re also extra surfaces to clean. They manage to attract their fair share of dust, dirt and smudges. Dirt can build up easily on glass door fronts that feature mullions. You also have to keep whatever is behind those glass doors tidy.
One benefit to glass door fronts is how inviting they can make your kitchen space feel. Luckily, there’s more than one way to design a warm and welcoming kitchen. If you want a low-maintenance alternative to glass door fronts, stick with lighter cabinet stains like golden browns. They can make your guests feel just as cozy as glass door fronts do.
8. Reduce open shelving. Open shelving is a great canvas for displaying your favorite decor and cookware, whether it’s on a wall, on an island or at the end of cabinets. But it takes more time and effort to ensure that these spaces are dusted and organized. The upkeep can become overwhelming along with your daily tasks.
To shorten your to-do list, place your decor on necessary surfaces like dining tables and countertops instead of unnecessary cabinet shelves. You can also use pillows, chairs, bar stools and lighting as decorative touches.
9. Protect your sink cabinet from moisture. This is more of a preventative measure — it will help you avoid issues down the road. There are a couple of ways to help protect your sink cabinet from moisture. You can order the cabinet with an all-plywood construction (most semicustom and prefabricated cabinets are constructed of a mixture of pressed wood and plywood). An all-plywood construction makes the cabinet less penetrable. You can also purchase a cabinet mat, which looks like a tray and is placed at the base of the sink cabinet. It will serve as a moisture barrier and catch any liquid leaks or spills.
More Kitchen Confidential: 10 Ways to Promote Aging in Place | 7 Ways to Mix and Match Cabinet Colors | 11 Islands With Furniture Style | The Case for Corbels | All Good in the Hood
Related Reads:
Choose Shaker Cabinets for Style and Simplicity
Easy-to-Clean Corbels for the Kitchen
Decorate With Eye-Catching Kitchen Lighting
Source: Coldwell Banker Blue Matter Blog
9 Kitchen Color Ideas That Aren’t White
Can’t quite figure out just exactly you are looking for when it comes to that color pop in the kitchen?
These fabulous ideas are worth a look!
Don’t get me wrong: White kitchens are cheerful, clean and classic — it’s no wonder why they’re so popular. But since white kitchens are everywhere, it’s easy to forget that there are other colors that can also look great in this space. Thinking about bucking the trend in your kitchen? Consider one of these options, from alternative neutrals to bright, bold hues.
NEUTRALS
You can’t go wrong with these versatile picks.
Charcoal Gray

If you want a cool neutral that’ll add a bit of drama to your kitchen, look to charcoal. Bright accent colors — or even white, as seen in this kitchen designed by Brian Patrick Flynn — really pop against it.
Greige

A mix between gray and beige, greige is an incredibly versatile neutral for the kitchen that can complement both warm and cool colors. In this space designed by Tobi Fairley, greige cabinets bridge the gap between warmer brass elements and cooler marble accents.
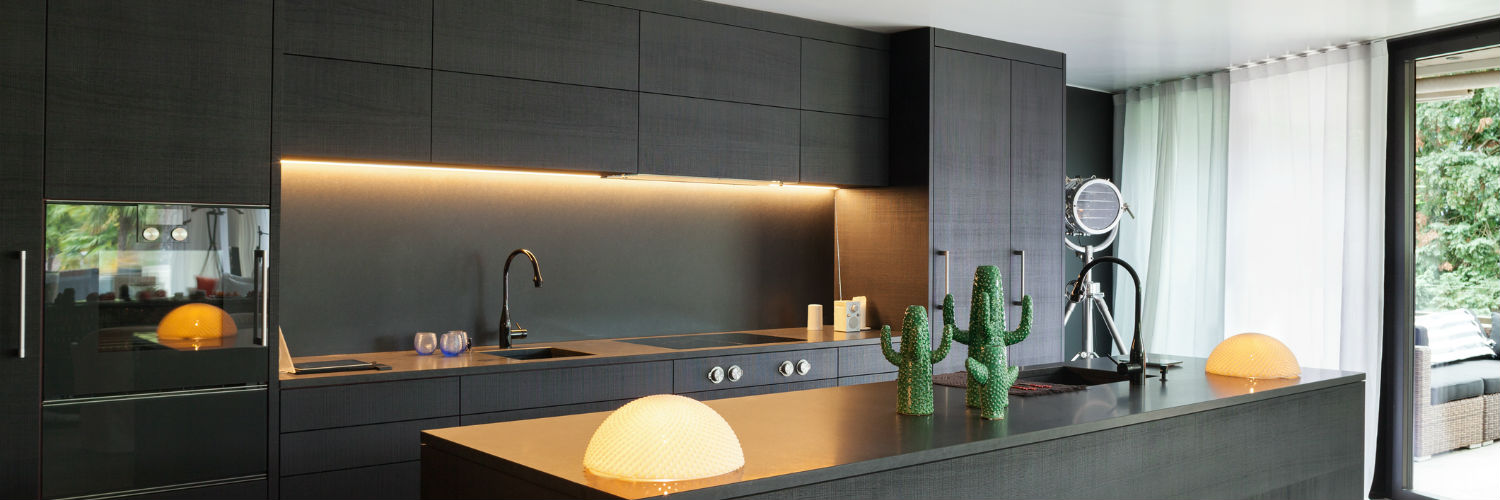
Black

A black kitchen may sound dreary, but it can actually be stunning if done right. Just take this gorgeous room that goes all in with black cabinets, a black vintage stove and a black-and-white tiled floor. If you’re not on board with an all-black kitchen, try adding one black element like a backsplash or a sink.
SUBDUED HUES
Add a touch of color without overpowering your space.
Pale Green

Hints of green in the stone countertops inspired the cabinet color in this country-style kitchen. The soft hue brings coziness to the space, yet still feels bright and fresh.
Butter Yellow
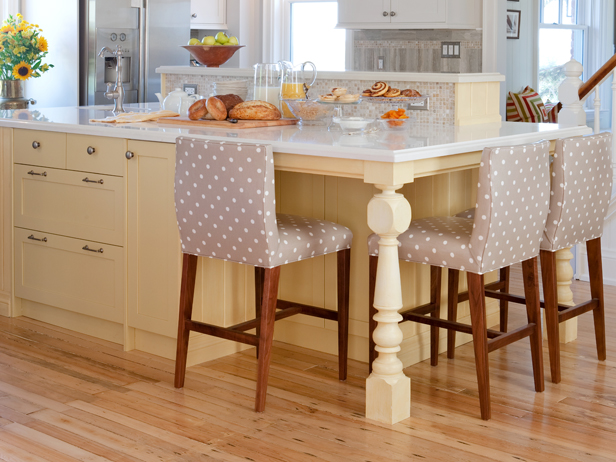
Particularly charming in a cottage- or farmhouse-style space, pale yellow adds a cheerful, sunny touch to a kitchen. Try it with robin’s egg blue or with neutrals, as seen in this kitchen designed by Sarah Richardson.
Navy Blue

Navy is practically a neutral — it pairs beautifully with everything from tangerine to turqouise to chartreuse. In the HGTV Smart Home 2014 kitchen, navy cabinets are offset by a black-and-white basketweave backsplash for lots of eye-catching contrast.
BOLD COLORS
Go all in with these daring shades.
Crimson

Want to instantly energize your kitchen? Just add a vibrant shade of red. To keep it from feeling overwhelming, try contrasting it with a cool color, like the blue-gray Brian Patrick Flynn used here. If you’re not ready to commit to red cabinets or walls, incorporate the color in small doses with red countertop appliances, dish towels and other accessories.
Emerald Green

Just a splash of this gorgeous green will make a big impact in your kitchen. In this design, Andrea Schumacher painted only the island, pulling a color from the floral wallpaper to keep the space cohesive. For an ultra-rich look, pair emerald with other jewel tones.
Orange

Orange is thought to stimulate the appetite, making it an ideal color choice for the kitchen. In this space by Jennifer Gilmer, an orange backsplash and zebrawood cabinets add warmth, keeping the contemporary design from feeling cold. Smaller orange accents, such as pendant lights or window treatments, can also liven up a kitchen.
Source: HGTV
16 Genius Storage Ideas You Probably Haven’t Thought Of
Too much stuff and no where to store it? Read on for ingenious ways to find a nook and cranny for all the items you can’t bear to give up!
Here are some awesome ideas to get you get organized and find a “home” for all of your things.
When your home has a place for everything it is magical. You open up cabinets to neat piles of Tupperware. Your closet is organized with shoes, belts and accessories organized in a way that would give Carried Bradshaw envy. Your garage is neat and each tool is hung with care while your children’s toys are lined up and ready to be used at their convenience.
Let’s be serious, there are very few who can actually say their home has enough space for all of their things. In the battle of you vs square footage, you rarely feel like you come out on top. Here are some awesome ideas to get you get organized and find a “home” for all of your things.
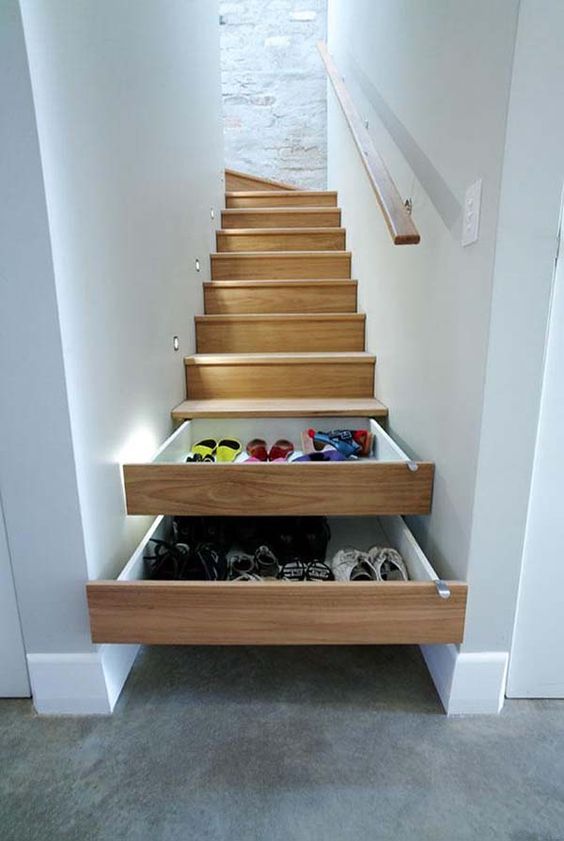
Underneath Steps
Don’t let that space underneath your stairs go to waste. Depending on the size available you may even be able to create a small office like the image in the bottom left.

Images via shelterness, artemendoza and homedit
Inside Cabinet Doors
The inside of cabinet doors are hidden which makes them a perfect place for storage. We especially love the idea for the spices below.

Images via iheartorganizing, Houzz, Instructables & thesepreciousdays
Up!
Look up and you will be amazed at all of the places you can find to store things. From the garage ceiling to the space above doors, it is important to use every inch without making a room feel cluttered.

Images via dgdoors, accentondesign, flor & marthastewart
Underneath Your Counters
If you have a smaller kitchen you know what it is like to open up a cabinet and have things fall onto you…it’s miserable. Clear up some space by taking advantage of the area underneath your counters.

Images via thedesignfile, kellysthoughtsonthings, stashvault & kitchenstuffplus
Souce: CB Blue Matter / Lindsay Listanski
8 Steps You Need to Know Before Redecorating Your Home


Breaking out the paintbrushes, fabric samples and hitting Home Goods and Pinterest for some good ideas? Here are some 8 steps you need to know before you get started!
Here’s how to prioritize your game plan for your room makeover.
If you have a DIY decorating project on your horizon but don’t know where to start, here’s a practical guide to help you navigate the process.
1. Commit to a Budget and Timeline
First, figure out your total project budget. If you skip this step, you’ll likely spend much more than you anticipated and make poor purchasing decisions you’ll later regret.
Also pick a date to complete your project by, even if you don’t have a looming reason to do so. Creating a complete-by date will fuel your project so it can take flight. Completing one stage of a project informs the next and the next. Otherwise, approaching your project piecemeal will delay completion, if you even complete it at all.
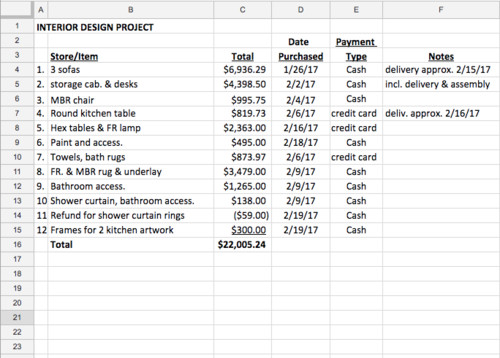
Set up a good system to keep track of your expenditures. I use an Excel spreadsheet, but even a spiral notebook can work for smaller projects. The key is to keep it updated.
Here’s an example of how I keep a running log of project expenses. While the main goal is tracking the total amount spent, I also indicate the store (which I left off here because stores will vary based on your location and preference), method of payment, general description and any notes, such as delivery fees — useful information that may come in handy later.
Keep all of your receipts together in one location. You can refer to them easily for warranty information and returns, if needed. I use a small zip pouch made for holding pens and pencils while I’m out shopping. After I return and enter them into the spreadsheet, I stapled each receipt to a piece of paper and store that neatly in a project folder.
2. Evaluate Your Needs and Lifestyle
Separating wants and needs is a hard one. Prioritize your needs by first creating a list of the furniture and accessories you envision going into your space. List any work you want to do, like painting or wallpapering, too. Then rate each item 1 through 5, with 1 indicating an absolute must and 5 reflecting a nonnecessity. Reorder the items on the list with the necessities at the top and the more wishful items at the bottom. Involve other family members in this process. They may identify overlooked items.
Also, be honest about your family’s lifestyle requirements today instead of at some far-off idyllic future date. For example, if the kiddos use your family room as a playspace, include toy storage on your list. You may have some child safety needs too. Also note any special concerns about pets, such as shed fur or the potential for furniture to get clawed.
3. Decide What Stays and What Goes
Based on your list, identify any pieces of furniture or accessories that you absolutely want to keep in the space. Remove the pieces you don’t plan to reuse; consider donating them if they’re in good shape or selling them online or through a local consignment store.
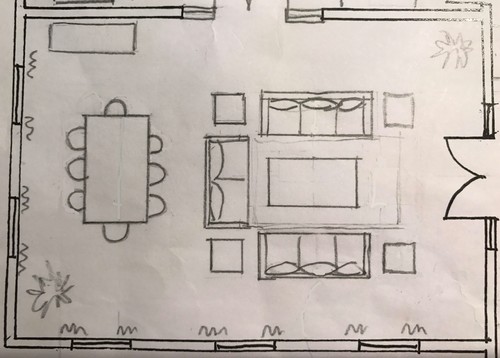
4. Draw a Preliminary Furniture Plan
If your project is small, this step may not be necessary. However, if you’re buying new furniture or just considering a new configuration, it’s extremely helpful to try out pieces in different locations to see what fits and what doesn’t. The last thing you want is to end up with a too-big piece of furniture. You’ll need a tape measure or laser measuring tool to measure your space and a scale ruler to draw it to scale. A simple sketch illustrating only the outside dimensions is all that’s necessary.
If you don’t have these items or don’t feel comfortable with drawing to scale, an alternative is to “draw” the outlines of furniture with masking tape on your floor or cut furniture-size shapes out of butcher paper to maneuver around on the floor.
Don’t forget about circulation space. Ideally, you’ll want to keep 18 inches between the edge of the sofa and the coffee table. Maintain 36 inches for comfortable general circulation. Since you may not have found specific furniture pieces yet and don’t have detailed furniture dimensions, you may need to revise the size of some furniture pieces as your project progresses. Nonetheless, this exercise is a good starting point.
Also measure your entrance door and the pathway to the room, including building elevators if you live in a high-rise. Bring these notes with you when shopping. If there are any delivery dimension concerns, you can address them then and there.
![]()
5. Concentrate on Big Items First
Focus first on the big-impact items, then concentrate on smaller accessories. Too often people get hung up on a small detail that can derail the flow of the bigger items. The idea is to work from large to small.
Find furniture. Unless you’re lucky to find the furniture you want in stock, most furniture takes eight to 12 weeks for fabrication. However, even in-stock furniture may not be delivered right away. If available, get a swatch of the upholstery or finish sample to help with other room selections.
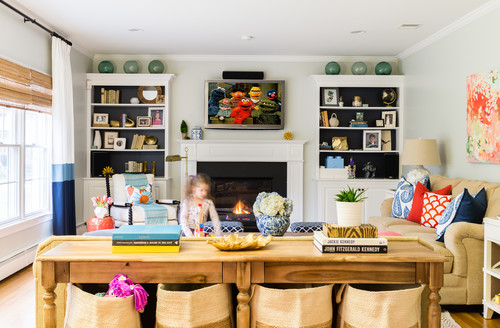
Unless you’re comfortable working with a complex color palette, minimizing your scheme to two colors, as in the space here, will make shopping easier — and your space will look sharp and put-together.
Work the walls. Compared with any other design material, wall paint gives a room the most bang for your buck. I find it easiest to select a wall paint color or wallpaper after the furniture is selected. You have much more leeway with paint color choices than furniture upholstery. Plan to get your space prepped and painted prior to the furniture delivery.

Hit the ceiling. Color instead of conventional white on the ceiling is another cost-effective attention-grabber, especially if you have crown molding to separate it from the walls, like in this living room.
6. Move Toward the Mediums
After you’ve figured out your furniture layout and color scheme, focus on finding the midscale items that will pull your space together, such as an area rug. Your scaled drawing will also come in handy to see how prospective rugs will work with your furniture layout.
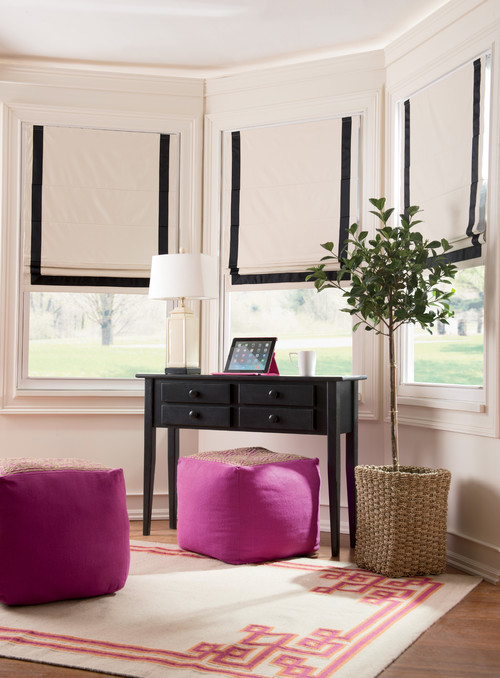
Window treatments like Roman shades and drapery can offer lots of style compared to run-of-the-mill Venetian blinds. They can minimize less-than-perfect windows and help save on energy bills, too. New window treatments don’t have to cost an arm and a leg, either. Ribbon-trimmed cordless shades like the ones shown here here can be ordered online for $100 to $125.
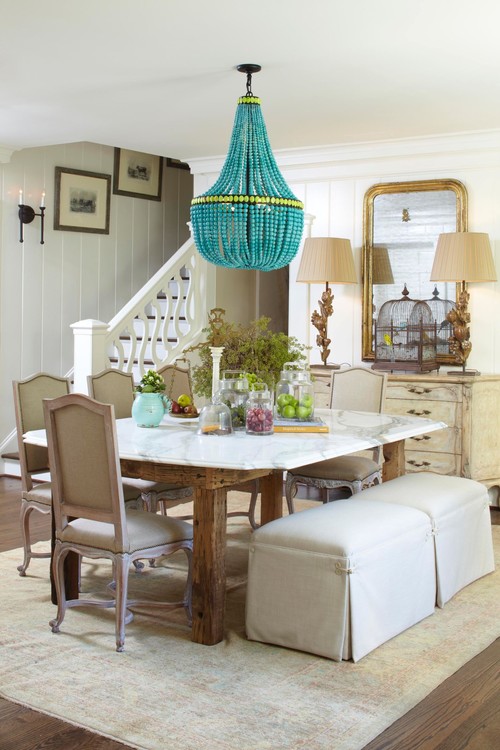
A feature light fixture, like the one in this dining room, can become a stunning design focus.
7. Save the Small Stuff for Last
Fill in your scheme with decorative accessories toward the end of your project. You’ll be able to see what areas need attention and have a better sense of scale, especially with artwork. With the furniture in place, you’ll also have easy access to key dimensions, like the clearance between shelves.
I also like to shop for table lamps, particularly lamps that will sit behind a sofa, after the furniture is delivered so I can see how all the heights work or don’t work together. Cord lengths and switch locations are also easier to evaluate when the furniture is in place.
8. Leave Room for the Unexpected
You may come across something surprising in your decorating journey that has special meaning or even adds a bit of humor, like these Hulk hand bedpost toppers. Don’t discount originality or quirkiness; it’s what makes your home truly yours.
Source: CB Blue Matter / RisMedia
5 Types of Additions and How They Add Value


Want to add value as well as space to your home? For the skinny on remodeling…Here’s how!
A person’s home is their castle, but sometimes that castle isn’t big enough to accommodate all its occupants. Maybe you’ve got a baby on the way or an older parent is moving in with you. Maybe you need a workshop to keep up with your hobbies. Whatever the reason, it’s normal to outgrow your space. When it happens, you’ve got two choices—move to a larger home or build an addition to your current home.
What types of additions are there and how do they add value to your home?
Bump It Out
If you’re not up to adding a whole new room or floor to your home, a bump-out could be a good option to add extra square footage where you need it most. If you’ve got a tiny kitchen, a bump-out can add 40 or 50 more square feet of space to make it easier to cook your meals, store your food or add a cozy little breakfast nook.
The cost for these add-ons vary dramatically depending on the location of the bump out and its size. They can run anywhere from $5,000 for a small addition to $30,000 or more for a large, ground level bump-out that requires its own poured foundation.
In terms of cost per square foot, these additions are more expensive than larger builds, but, in the grand scheme of things, they end up costing less because you don’t usually need a ton of extra contractors or permits to add a bump out to your home.
Full Additions
Full additions are the most common. These rooms add space and square footage to a home. You can add anything from a new bedroom to a new den, dining room or living room—the possibilities are only restricted by your budget and the size of your lot.
Full additions are often the most expensive and complicated to add, requiring lots of time and money to complete. A full addition can cost more than $50,000, and the price only goes up as the build gets more complicated.
These additions can be very time consuming, as they require you to hire various contractors to handle HVAC, electricity and plumbing, depending on the type of room being added. You will likely have to apply for permits through your city or county before construction can begin.
These additions take quite a while. If you’ll be staying elsewhere during the build, consider utilizing the overnight hours for construction—the work is more efficient and is often safer than daytime construction. It’s cooler, which can be essential if your home is located in a hot state.
You can save time if you’re under a deadline or are looking for a way to increase productivity and decrease project length, but don’t consider nighttime construction if you have neighbors close by—no matter what time of day you’re building, it’s still noisy!
In addition to adding more space to your home, these new builds add to the resale value of your home. While you may not recoup the entire cost of the project, adding a new garage can add around $40,000 to the resale value of your home depending on your region.
Remodels
Remodeling parts of your home gives your castle a fresh shine without knocking down too many walls. The trick to a good remodel is to have a solid idea of the finished project in mind before you start shopping for contractors. Pick one room and focus on that single room before you jump to another project—nothing looks worse than a house full of half-finished remodeling projects.
The type of remodel you’re planning will determine the price and time needed to complete it. Installing new lighting in the bathroom might cost you a few hundred dollars while remodeling your floor could cost upwards of $15,000.
Most interior remodels don’t require permitting unless you’re knocking down walls, though you should check with your local permit office before you start any remodels. You may need to employ the services of a professional electrician or plumber if you need to run wires or pipes into new areas.
You can save a lot of money on interior remodels by doing some of the work yourself—just make sure you know what you’re doing and don’t tackle any projects you’re not comfortable completing on your own.
Sunrooms
Sunrooms are often unheated rooms primarily made up of windows and designed to let you enjoy the weather without having to be out in it. It can be a great place to keep your outdoor plants safe during extreme weather conditions. They are simple to install because they do not require any additional heating or cooling routing, though you might need an electrician to run wires to power any lights or ceiling fans you choose to install. An unheated sunroom can cost around $15,000, though the price goes up depending on the materials you use. Wood framed sunrooms are less expensive than aluminum ones—those can run upwards of $22,000.
A four-season room is similar to a sunroom but is hooked into the home’s heating and cooling systems. This requires an additional contractor to set up the room’s HVAC. Collectively, these rooms tend to run around $20,000, making them slightly cheaper than a high-end sunroom.
Room Conversions
Do you have an extra garage or attic that’s just being used for storage or taking up valuable square footage? Consider converting the room into something more useful like a bedroom, workshop or craft room. Room conversions can make that extra square footage work for you, as long as you know what you’re doing or employ the skills of a contractor.
Depending on the type of conversion you’re planning, expect to pay anywhere from $25,000 to $40,000. Poorly done conversions can end up costing you more money, and lowering the value of your home, so make sure everything is done properly!
Additions and modifications to your home add space, functionality and resale value in one fell swoop. Employ professional contractors to make sure all the new work is up to code. Otherwise, it might end up costing you more money than you put into it.
Source: RisMedia
Bird’s The Word: Our Favorite Of-the-Moment Flamingo, Peacock & Swan Decor
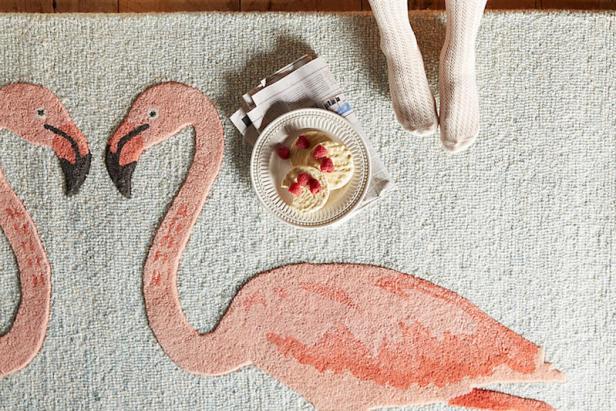
A Flock of Seagulls??? Nope! Just flamingos, peacocks and swans my friends! Check out this latest decor trend.
From water-fowl finds to flirty-flamingo fancies, bird-inspired decor is flying off the shelves and perching in the most style-savvy homes for summer. I’ve taken up a bit of a bird-watching (shopping) hobby for spring, and we’ve spotted all of the most on-trend, feather-friend items to incorporate into your home right now.
Sophisticated Swans


Notebooks

Pillows!

Trinket Dishes

Wall art

Switch Plates
Flirty Flamingos

Dish Towel Sets

Coverlets

Notepads

Bottle Openers

Plates

Rugs

Headboards

Upolstered Chairs
Trendy + Tropical

More wall art!

And more pillows!

Wallpaper


Snack Trays

Candles

Wall Art
Pretty Peacocks

Temporary tattoos

Tables

Mugs

Peacock Chairs

Smart Phone Cases

Art Prints

Passport covers

Source: HGTV Blog
5 Tips for First-Time Homebuyers


You’ve decided to go for it. You know mortgage rates are enticingly low. Buying a home can be thrilling and nerve-wracking at the same time, especially for first-time homebuyers. It’s difficult to know exactly what to expect.
Take these five steps to make the process go more smoothly.
Check Your Credit
Your credit score is among the most important factors when it comes to qualifying for a mortgage.
“In addition, the standards are higher in terms of what score you need and how it affects the cost of the loan,” says Mike Winesburg, formerly a mortgage planner in Wheeling, W. Va.
Scour your credit reports for mistakes, unpaid accounts or collection accounts.
Just because you pay everything on time every month doesn’t mean your credit is stellar. The amount of credit you’re using relative to your available credit limit, or your credit utilization ratio, can sink a credit score.
The lower the utilization rate, the higher your score will be. Ideally, first-time homebuyers would have a lot of credit available, with less than a third of it used.
Repairing damaged credit takes time. If you think your credit may need work, begin the repair process at least six months before shopping for a home.
Evaluate Assets and Liabilities
A first-time homebuyer should have a good idea of money they owe and money they have coming in.
“If I were a first-time homebuyer and I wanted to do everything right, I would probably try to track my spending for a couple of months to see where my money was going,” Winesburg says.
Additionally, buyers should have an idea of how lenders will view their income, and that requires becoming familiar with the basics of mortgage lending.
For instance, some professionals, such as the self-employed or straight-commission salesperson, may have a more difficult time getting a loan than others.
The self-employed or independent contractor will need a solid two years’ earnings history to show, according to Winesburg.
Organize Documents
When applying for mortgages, you must document income and taxes.
Typically, mortgage lenders will request two recent pay stubs, the previous two years’ W-2s, tax returns and the past two months of bank statements—every page, even the blank ones.
“Why it has to be every single last page, I don’t know. But that is what they want to see. I think they look for nonsufficient funds or odd money in or out,” says Floyd Walters, owner of a mortgage company in La Canada Flintridge, Calif.
Qualify Yourself
Ideally, you already know how much you can afford to spend before the mortgage lender tells you how much you qualify for.
By calculating debt-to-income ratio and factoring in a down payment, you will have a good idea of what you can afford, both upfront and monthly.
Though there’s not a fixed debt-to-income ratio that lenders require, the standard dictates that no more than 28 percent of your gross monthly income be devoted to housing costs. This percentage is called the front-end ratio.
The back-end ratio shows what portion of income covers all monthly debt obligations. Lenders prefer the back-end ratio to be 36 percent or less, but some borrowers get approved with back-end ratios of 45 percent or higher.
Figure Out Your Down Payment
It takes effort to scrape together the down payment.
There are programs that can assist buyers with qualifying incomes and situations.
“I’ve helped arrange assistance loans for $10,000, which are interest- and payment-free, and forgivable after five years. Although considered a loan, they’re more like grants. Other programs can provide up to $40,000 interest-free,” Winesburg says.
Finally, speak with mortgage lenders when you’re starting the process. Check with friends, co-workers and neighbors to find out which lenders they enjoyed working with and ask them questions about the process and what other steps first-time homebuyers should take.
Boost Curb Appeal in a Day…


Sometimes when planning to sell a house, in the name of renovating interior living spaces, updating bathrooms, replacing appliances and adding decorative touches throughout the bedrooms, homeowners leave outdoor curb appeal as a last priority. While of course the inside of a home is important, sellers make a big mistake when they neglect the exterior. Why is a home’s exterior so important? Consider this: Curb appeal is often a potential buyer’s first impression of a home, the very thing that helps him/her decide whether or not to come inside. Whether they’re shopping online or by cruising through neighborhoods, the outside of your property is the first thing they’ll notice. If you’re selling your home or about to, how can you quickly and effectively tackle the outdoor appeal? Here are some key tips for boosting the curb appeal in a way that means quick turnaround and increased home value:
1. Start with the Front Door. Believe it or not, your home’s front door can be one of its most important assets. A new steel entry door consistently ranks as one of the most rewarding projects in home repairs, yielding an increase in home value that’s greater than the costs to install one. Likewise, to make the door especially captivating, consider painting it a bold, pleasing color that will grab attention and add charm. When buyers see a new door that looks attractive, they see another asset that makes your home the one to buy.
2. Make Any Necessary Repairs. Is the driveway cracked or the front doorbell busted? Now is the time to call a repair company or get out your own toolbox to make repairs. Buyers want turnkey, move-in-properties, and that means they want properties with repairs already done. Do the work now to get your home in ship-shape condition.
3. Keep Up with Landscaping. From mowing the lawn to pulling weeds, make sure you’re keeping up with your outdoor landscaping so that your home looks presentable and well cared for at all times. Overgrown bushes and dying plants are a surefire signal to potential buyers that you’re not caring for your home and leaving more maintenance for them to handle.
4. Add Lighting. While most buyers will come visit your home during the daytime, it’s not at all unusual for the most interested ones to also drive by at night to see what nighttime curb appeal is like. Landscape lighting can make all the difference in terms of how a home looks, so make an investment in attractive lighting options that illuminate and add interest to your property. “Solar landscaping lights are a great addition to any yard because they don’t require complicated and expensive wiring,” says Bob Vila. “Remember, though, you get what you pay for—cheap lights won’t last as long and simply won’t look as good.”
5. Touch Up Paint. A fresh coat of paint is just as powerful outside as it is inside, so to update your home’s look, repaint the exterior or at least touch up problem areas. Another idea is to paint the trim a new color that creates either a nice complement or contrast to your home’s overall look.
6. Make Over the Mailbox. You might not think a mailbox matters much, but it’s yet another one of those little details that can add up together to make a strong impression on a buyer.
7. Add Outdoor Furniture. From rocking chairs on the front porch to an outdoor patio set on the back deck, outdoor furniture creates outdoor living spaces that expand your home’s appeal. Look for attractive, durable pieces that will endure weather damage and look good for years to come — whether or not you include these pieces with the home sale, setting them up is a great way to stage your home for greater resale value.
The bottom line when it comes to curb appeal is that a little investment today can add up to big rewards tomorrow. Take the time to update, clean, repair and add value to your property’s exterior now and you will make it more attractive to buyers, not to mention more beautiful to come home to. Use the tips above to get started now.
Source: Rismedia
Get Your Credit Score Ready for Homebuying Season!


Getting ready to buy a home this spring? Make sure there aren’t any cracks in your credit. A good credit score is essential when it comes to securing a mortgage.
“If (your score is) below 600, you’re probably not going to buy a home in the short term,” says Mike Sullivan, director of education at nonprofit credit and debt counseling agency Take Charge America.
Given the slew of stringent regulation introduced following the housing crisis, most lenders simply won’t risk extending this demographic credit. In fact, even consumers with good scores should polish up the ol’ credit report.
Qualifying for the best mortgage rates starts at a 740 credit score. Scores below that threshold will likely have higher interest on their home loans.
So if you plan on hitting up the housing market this April, make sure to pull a copy of your credit report and check to see where your score stands.
Check Your Status
Under the Credit Card Accountability Responsibility and Disclosure Act of 2009, or Credit CARD Act, everyone is entitled to one free credit report from each credit bureau every year.
Obtain a copy of this report from AnnualCreditReport.com. It won’t come with your score—you can purchase that for a nominal fee. But there also are websites that offer free versions of your score year-round.
A recent version of your credit report will show you where you stand in terms of creditworthiness. The report should also spell out what you need to do to improve your score.
“You don’t have to entirely guess,” Sullivan says. “You simply look at what (the score) takes into account and you deal with those issues.”
Get Current
You’ll definitely want to address any delinquent accounts on your record.
“If you are behind, you want to bring those up to date as soon as possible,” says Kathryn Moore, a certified consumer credit counselor with GreenPath Debt Solutions. Delinquent accounts are a huge red flag to mortgage lenders because they demonstrate a lack of ability to repay debts.
They’re also the quickest way to tank your credit score. A missed payment—particularly following an extended period of good credit behavior—can cause a drop of 70 to 90 points.
Sadly, you won’t immediately recoup all those points once the account is reported as up to date.
Instead, “you need to be patient and make all of your payments on time and slowly build your score up” again, says Stephen Brobeck, executive director of the Consumer Federation of America.
The role that time plays in building stellar credit is why it’s ideally “a good idea to look at your credit at least a year out” of shopping for a mortgage, says Bruce McClary, a spokesman for the National Foundation for Credit Counseling.
Getting a Quick Boost
If you are behind this timeline, there are a few steps you can take to potentially give your score a quick boost.
For starters, scan your credit report for accuracy. An error—such as an old, bad debt; incorrect account balance; or worse yet, a phantom foreclosure—could be needlessly weighing down your score. Have these errors corrected by contacting the credit bureau in question.
“There’s a link (on your credit report) to dispute any inaccurate information,” Moore says. “The credit bureau from there will have to resolve that dispute within 30 days.” Once a negative error is removed, your score should improve.
You can also engineer a quick boost by paying down existing debts, particularly high credit card balances. This move improves your credit utilization rate—essentially how much debt you are carrying versus how much credit has been extended to you — and should bolster your score.
Experts generally say to keep your credit utilization below 20 to 30 percent of your collective credit. However, “you really want to get that ratio down to rock bottom if you’re looking for a house,” McClary says.
Clearing out existing balances will also improve your debt-to-income ratio, which a “lender looks at” closely during their mortgage decision process, Moore says.
Lenders typically say the “back-end” debt-to-income ratio—or the amount of your income that is needed to cover all your monthly debt obligations, including credit card bills and other loans—should be 36 percent or lower.
Finally, if you recently missed a loan payment because you, say, didn’t know about the bill, try calling up the issuer (or lender) to see if they will refrain from letting the credit bureaus know about your faux pas.
What to Avoid
Once you have your score in the upper echelon, make sure it stays there. Avoid running up your credit card balances again, which will help keep your credit utilization in check.
Also avoid applying for other loans, including store credit cards, particularly in an attempt to improve this aforementioned credit utilization rate. Applying for new credit generates hard inquiries on your credit report, which could ding your score.
And “if those inquiries don’t necessarily show up as approved accounts, that sends up a red flag” to lenders because it could look like you were turned down for a credit line, McClary says.
Not to mention that you’re more likely to miss a payment when you have multiple cards at your disposal, Brobeck says.
Conversely, don’t close any accounts while you are looking for a mortgage, as the closure could send your credit utilization skyrocketing in the wrong direction.
Source: RisMedia/Bankrate.com
MUST DO’s Before you move into your new home!


The moving frenzy never ends: Even after you close, the to-do lists drag on and on—endless pages of bullet points that keep you up at night when all you want is to begin your new life. Some of them are fun, like redecorating and buying new furniture.
“When you move into a new house, you’re more concerned with decorating and taking stuff out you don’t like,” says Kevin Minto, president of Signet Home Inspections in Grass Valley, CA. “But let’s not forget about the less romantic things that are mundane—but more important in the long run.”
Once you’ve got the keys, feel free to give yourself a break. You deserve it! But don’t rest on your laurels too long—and make sure to do these eight things right away.
1. Change the locks
Before moving even one tiny piece of furniture into your new home, change the locks—or at least have them rekeyed. It’s not that you don’t trust the sellers (who are, we’re sure, perfectly respectable and upstanding citizens). It’s that you shouldn’t trust everyone who’s had contact with those keys over the years, any of whom could have copied the keys for some unsavory purpose.
2. Change the alarm batteries
Making sure your fire and carbon monoxide detectors have fresh batteries may not seemlike a pressing issue while you’re in the middle of a stressful move (and aren’t they all), but it’s the kind of thing that gets ignored and then forgotten. Better to deal with it now, when the home is empty and you can make a quick sweep of the house—without lugging a ladder around furniture.
3. Review your home inspector’s report
Can’t find your inspector’s report? Minto says reports are often filed with the escrow papers—but don’t wait until something goes wrong to pull them out. A good home inspector will outline the most important issues in their report, so use their expertise as a guide for your first few days of ownership. If they’ve marked anything as particularly pressing, make sure to handle it before moving in.
4. Find the circuit breaker
If you were there during inspection, you should know where your junction box is, but if you don’t, finding it “should be the first and foremost thing that should be attended to,” Minto says. During a move, when you’re plugging all sorts of electrical doodads into the wall, you don’t want to be lost in the dark hunting for that elusive metal box. (While you’re there, find the water shut-off, too.)
Then, get familiar: If it’s not already well-marked, have your spouse or another family member stand in different parts of the house while you flip different switches, and make a note of which ones handle different rooms.
5. Deal with any water problems
Looking at that inspector’s report? Deal with water-related issues immediately, says Minto. These tend to be troublesome because they’re so easily ignored—”out of sight, out of mind,” he says. A leaky toilet might seem minor, but the steady drip can damage internal structural components.
Check your roof, too: If the rubber vent boots on your roof are leaking, you might not know it for a while.
“By the time they see it in a ceiling, there’s been a fair amount of water,” Minto says.
6. Caulk everything
This one isn’t mandatory, but caulking is a whole lot easier if you do it when the house is empty, letting you see all the nooks and crannies that might need a little sealing—and don’t forget the exterior. Minto says he sees caulking issues on “every home,” and while they might seem minor, it doesn’t take long before cracking gives way to leaks and even more water issues.
7. Plan your emergency exits
Before you begin bringing in furniture, walk through every room and decide how you would escape in an emergency. This can help

")


