
 Facebook
 X
X
 Pinterest
 Copy Link
backyard • decorating • outdoors • real estate • seating • staging • Uncategorized • views •
July 26, 2017
Summer Fridays: Outdoor Seating Areas That Wow

This isn’t your Grandmother’s veranda! Take a peek at these great outdoor seating spaces. Enjoy!
If you have to sit, you might as well do it outside and during summer! Here are a few of our favorite outdoor seating areas from homes for sale on coldwellbanker.com
In limited web research, I’ve gleaned that on average, we’re seated for an astonishing 7.7 hours per day. Those almost 480 daily seated minutes are mostly spent at our desks as we type away diligently, in our cars as we sit in traffic, and on our couches as we binge watch our “shows” – because you know, it’s the golden age of television…we have a duty to watch these things.
Today I boldly proclaim that it is summer and if you have to sit, you might as well do it outside! You can catch up on Game of Thrones another day! Do you smell that? It’s called non-recycled air. Enjoy it while the weather is great. Here are a few of our favorite outdoor places to sit from homes listed for sale on coldwellbanker.com.
Locals call this house Hale Palekaiko, or House of Paradise – and for good reason. The home is located on world renowned Kailua Beach, but who would want to leave home when your home is basically a resort?

$9,750,000 – Santa Barbara, CA
This exquisite home in Santa Barbara transports you to the Mediterranean. Kick back with some local red wine, some good friends and enjoy those sweeping mountain views. This is how you summer!

As the saying goes, what happens in Vegas stays in Vegas…well if I were to ever visit this awesome 37th floor residence and all the amenities the building offers – I’d stay in Vegas too. Forever.

Take your pick. Sit on one of the numerous terraces and balconies as you look out at your three acre kingdom, or get closer to the action by taking to the pool and patio areas to soak up some Vitamin D.

$5,850,000 – Roslyn Harbor, NY
What’s better than an all-brick restored roaring 20s estate resting on over 3.9 pristine acres of land? Not much. One of my favorite parts of this seriously hip turn of the century home is this seating area surrounded by lush gardens and vegetations all around.

Source: CB Blue Matter
Buyer's Market • Buyers • first time buyers • hot market • Inventory • Multiple offers • real estate • Sellers Market • selling • Uncategorized •
July 26, 2017
How to Tell the Difference Between a Buyer’s Market and a Seller’s Market
This is SO IMPORTANT for you to know as a Buyer or Seller so that you can strategize your plan of action wisely and accurately. Of course, your agent can easily explain this to you, but you need to understand it! Make no mistake, if you don’t pay attention to the difference in these two markets, you may not enjoy the results of the transaction.
What you need to know when buying or selling a home.
One important thing to remember about the property market is that it’s always in a state of change. Sometimes the market is favorable to buyers and sometimes it’s favorable to sellers. But don’t worry, a knowledgeable agent can guide you in the sale or purchase of your next home, no matter what type of market you’re facing.
What is a Seller’s Market?
A seller’s market is simply a property market that benefits you as a seller. In a seller’s market, there’s a scarcity of properties, which can drive up the price of homes, especially in desirable locations.
Sellers can depend on real estate experts to know what the market is doing, but here are some signs of a seller’s market:
– Low inventory when compared to previous months and/or years
– Homes are selling faster
– Less than six months of inventory on the market
– More homes are selling
– Median sales prices are growing
– Less information in real estate ads; just the bare details
– “For Sale” signs don’t stay up long before being replaced with “pending” or “sold”
What is a Buyer’s Market?
A buyer’s market is the opposite of the seller’s market. If you’re buying at this time you’ll be spoiled for choice as the supply of homes on the market exceeds the number of buyers, giving you the chance to score a fantastic deal.
A sharp agent will quickly be able to tell you where the market lies, but here are some signs of a buyer’s market:
– Inventory that is high when compared to previous months and/or years
– Homes are selling more slowly
– More than six months in inventory on the market
– Sales prices are shrinking
– Fewer sales are taking place
– Real estate ads are growing in size, giving more details and/or images
– “For Sale” signs are staying longer, meaning the days on the market are longer too
How Do I Figure out the Months of Inventory in a Market?
1. Look for the total number of active listings for the month prior to the current one
2. Look for the total number of sold or closed transactions for the same time frame
3. Divide the total number of listings by the number of sales. This figure represents the number of months of inventory there are.
For example, let’s say there were 6,500 listings in one month’s time. During that same time, there were 1,500 properties that were sold. Divide 1,500 into 6,500 and you arrive at 4.3 months of inventory, meaning that this is a seller’s market.
While a savvy real estate agent is the best resource for this information, other resources include real estate listing websites and/or your local real estate association.
Do All Markets Follow the Same Cycles?
Markets are always in a state of flux. At its core, people are the driving force behind the real estate market.
For example, as more people move into a location, the more need there is for housing. If the number of properties in the area cannot support the number of people moving in, prices of existing homes will likely rise until more homes can be built.
This constant change to the supply and demand in a market is how markets shift back and forth from being more favorable for either buyers or sellers.
Can I Buy in a Seller’s Market?
Absolutely, but it’s not going to be a walk in the park. You’ll need determination, knowledge, and most importantly, someone on your side who knows the market inside and out.
Something to consider – you don’t know the seller’s true reasons for wanting to sell. Maybe there’s a divorce pending or another baby on the way and they need more space fast. Whatever is going on with the seller, a savvy agent will spot opportunities to help you and the seller arrive at a mutually agreeable solution.
One key reason it’s vital to engage an agent in a seller’s market is for their negotiating skills. While it’s important to always negotiate, a seller’s market calls for serious help to ensure that you don’t pay more than you need to.
Should I Wait to Sell?
It depends. Is it mandatory that you sell right now or could you wait until it’s a seller’s market again?
Consult with an agent to get his opinion about your chances of getting what you need or want for the sale of your home. He just might have some options you may not have considered that will help you get out from under your home and get on with your life.
Don’t be afraid to sell or buy if you think the market isn’t in your favor. The real estate market can be highly varied, so trust your agent to help you get the best possible results, no matter what the market looks like.
Source: CB Blue Matter
decorating • interior decorating • photography • projects • real estate • Uncategorized •
July 26, 2017
DIY: Decorating Your Home With Photos

Photographs…your real time window to the past…even better than a memory in your head. Decorate with them? Absolutely!
Decorating with photos is an awesome way to spice up your home in a really dramatic way without spending a whole lot of money. Don’t worry if you haven’t got a lot of money; your own photos are probably better than anything you’d buy.
Dial up the gorgeous drama of your Northern California home with a fun photo decor DIY project. Photographs, like art, can help us express ourselves in many different ways. They can help us play up our sentimental side, make important statements, and complete the canvas of our homes. Learning how to decorate with photos, as simple as it sounds, can be quite daunting once you put your mind to it. How exactly should you go about it? Should you hang provocative art in your living room where everyone can see it? Is it cheesy to hang photos of your entire family on your fridge? What’s the right thing to do?
The Right Way Is Your Way
Don’t worry that you’ll end up decorating with photos that people may think are cheesy or that are too much. Photographs are an expression and extension of yourself, so you’re hanging and displaying them to express your vision. Of course, if you have children regularly visiting your home, you don’t want to hang something for mature audiences only in a room where everyone gathers. You know who you invite into your home; use your judgment.

Use Your Own Photos
There are photographic gems you probably aren’t even aware of (or even remember exist) buried inside your very own camera or flash drives. Photos of vacations past, a child’s birthday party, a lonely street at night — any of these could be striking or thought-provoking enough to make perfect wall art. You don’t have to use the whole image; maybe it’s a detail of an image that’s frame worthy. If you don’t have the scene you’re looking for, create it: Your child’s feet as they leap off the ground; your grandmother’s smile the instant she bursts into laughter upon hearing an off-color joke; your cat’s profile as she watches a bird outside the window. The possibilities are literally endless.
Display Them In Innovative Ways
You can rarely go wrong with square or rectangular black frames backed by white matte when it comes to framing your pictures, but there are many different ways you can display your photos. Attach a series of photos individually on metallic clips and hang them from a metal wire grid that takes up your entire wall. Put some vintage photos inside of old mason jars. Blow up a favorite photo to life-size stats and hang it front and center in your main living area or passageway.
Source: CB Blue Matter
backyard • maintenance • Pools • real estate • safety • summer • Uncategorized •
July 26, 2017
Pool School: A Study Guide

Armed with a little know how – you can make your pool season trouble free!
1. Evaluate the Task at Hand
Always check for leaks at the start of the season—all you need is a bucket. Just fill it three-fourths of the way full and mark the water line inside, place it in the pool, mark the line on the outside and let it float for a couple days. If the water goes down the same amount inside and out, it is from evaporation, but if it goes down more on the outside, there is a leak and you’ll need to call a pro.
2. Keep It Clean
- Skim Debris – If you have trees, bushes or other plants nearby, the wind can blow debris into the pool. To keep it clean, increase the water circulation and use fewer chemicals, and use a skimmer to scoop out the debris out on a weekly basis.
- Vacuum Frequently – Not all debris floats on top, so to get the hard-to-reach debris, you should vacuum the pool on a weekly basis for about half an hour. You can always buy an automated vacuum that runs on a schedule, so you don’t have to worry about it.
- Filter and Pump – To keep water clean and save energy, run the pump daily for every 10 degrees (e.g., if it’s 80 degrees outside, run the pool pump for eight hours). Keep water healthy and clear by cleaning the filter every other week. Simply empty the filter bag or remove the filter and hose it down. If the pump is unusually loud, leaking or doesn’t hold pressure, it’s time to call a professional. If you have a home warranty with pool coverage, you’ll also save time and energy not having to find a qualified service professional yourself.
3. Get an A in Chemical Chemistry
Test water levels weekly with a home pool water test kit to make sure chemicals are balanced and safe. Optimal chemical levels vary depending on the season and weather conditions, but the pool’s pH levels should fall between 7.2 and 7.8 consistently for the cleanest water. This will also help protect your pool equipment. Water becomes more acidic with lower pH levels, which can cause costly damage to your pump, filter and anything else that it comes in contact with.
Source: RisMedia
burglary • crime • Police • real estate • safety • security • Smart Homes • Uncategorized • Vacation •
July 26, 2017
4 Steps to Take After Your Home Has Been Burglarized

Your worst nightmare…arriving home to find that you have been the victim of a burglary. Home Invasion. Loss of your precious privacy and belongings. While nothing can take away that feeling, here are a few steps you can take while you recover from the shock of it all.
What would you do if you came home and found your house was broken into and your property stolen? For millions of Americans every year, this nightmare is a reality. In 2010, there were 2,159,878 burglaries in the U.S., equivalent to nearly 700 break-ins per 100,000 people, according to the Federal Bureau of Investigation.
Most victims in this situation find themselves totally unprepared and at a loss for what to do. Fortunately, there are steps you can take to regain control of the situation, improve the odds of recovering your property, and prevent your home from being broken into again.
Call the Police
Call the police when you spot the first sign of a break-in. The intruder may still be on your property and pose a threat to your safety. Seven percent of all home burglaries involve violence against household members, according to the Bureau of Justice Statistics.
You also need to call the police to get your case on file for insurance and legal purposes. A police report and investigation increases the strength of your insurance claim, as well as your odds of retrieving your property. The police also need to record crime scene evidence which can help convict suspects if they are caught. Don’t touch anything before the police arrive so that you don’t accidentally destroy evidence, such as fingerprints.
When the police arrive, they will want you to file a report. Take pictures to document what was stolen, and provide the police with a list of everything that was taken and its approximate value. As a preventive measure, it’s wise to take an inventory of valuable items ahead of time in case you are ever robbed.
Call Your Insurance Company
You should also copy your list of stolen items for your insurance provider. To maximize your odds of receiving reimbursement for stolen items, contact your insurance provider within 24 hours. They will need your police report to process your claim, so make sure you have already filed a police report before calling. Your insurance provider will probably send an adjuster to review the crime scene, so in order to avoid disrupting the evidence, you may wish to stay somewhere else until they arrive, if possible.
Review Your Security Camera Footage
If you have security cameras installed on your property, you should review them to see if there is any additional evidence. If you’re fortunate, you may have captured footage of the burglar breaking in, walking through rooms, or rummaging through items. You may also notice more clues or additional information about which items were stolen. Provide copies of any relevant footage to the police and to your insurance provider.
Evaluate Your Home Security
After the police and your insurance adjuster have finished reviewing the crime scene, you can begin cleaning up. You should also conduct a review of your home’s security with an eye towards preventing future burglaries. Once burglars have successfully broken into a home, they often return in the future, so it’s important to make sure you secure any vulnerabilities that enabled the initial break-in. The National Crime Prevention Council provides a home security checklist you can use to review your home security and identify any vulnerabilities that need to be fixed.
Having your home broken into is a traumatic and disturbing experience, but taking these steps can help you recover and restore your life to order as quickly as possible. Filing a report with the police, calling your insurance company, and reviewing your security footage will maximize your chances of getting your property returned and bringing those responsible to justice. Reviewing your home security can help prevent future burglaries and restore your peace of mind.
Source: RisMedia
bid • Bidding • Bidding War • Multiple offers • real estate • Sellers Market • Uncategorized •
July 21, 2017
How To Win A Bidding War Without Overspending

Winning a bidding war requires tactful strategy. What’s your next move?
Right now we are in a Seller’s Market here in Solano County. Oftentimes that means multiple offers over list price. It can be a frustrating and exhausting process. Read on for strategic tips!
It’s possible to win a bidding war without paying a cent more than you budgeted for.
-
Know what you can really afford
As far as emotional purchases go, buying a home ranks right up there with choosing a wedding dress — only the financial stakes are much higher. Unless you know ahead of time exactly how much house you can afford, you could easily be sucked into spending too much. Your lender or financial adviser can help you determine that number. Then it’s time to play ball.
“Submit your best and final offer early,” says Skyler Irvine, senior partner at Myriad Real Estate Group in Phoenix, AZ. “If $1,000 keeps you from pulling into the driveway of your dream home just because you wanted to play hardball, then you might regret this more than you can imagine.” But the flip side is also true. “If you get outbid because someone offered more than you were comfortable with spending, then you didn’t lose anything and made a smart financial decision.”
Here’s a real-life strategy from a client of Naples, FL, agent Gordon Campbell on how to submit the best offer in a “best and final” situation without going too high: “They simply added a clause stating that they would pay $1,000 more than the next ‘best and final’ capped at the original price as seen in the MLS.” The outcome? “They got the property for slightly more than the other bidder.”
-
Talk with the listing agent
You can put in an offer, but unless your agent makes the effort to speak with the listing agent, your offer, in a multiple offer scenario, will probably not stand out. Gary Hughes, a Virginia real estate agent, recently received 13 offers for a property he listed. “Twelve were just emailed, and the buyers’ agents did not speak to me,” he says. But one agent called and had the lender follow up. “The lender and the buyer’s agent were able to address a concern in a way that assured me it would get to settlement. It wasn’t the highest offer, but it was close. Those conversations made all the difference.”
-
Propose a shorter closing
It’s always beneficial to find the seller’s motivation for selling (if you can). Let’s say they just accepted a new job in another part of the country. This seller is probably highly motivated to sell quickly. “If you can close the deal in two or three weeks, you may win over the higher offer that comes with a six-week closing period,” says Eric Bowlin, a real estate investor.
But just how do you go about closing faster? Here’s one way: “Tighten up your inspection time frame so sellers know that they can get through to a closing date quicker,” says William Golightly, a Florida agent.
Buyers can also be preapproved, or even better, get a conditional approval, from their lender. Going through the mortgage process first allows you to close just as fast as all-cash buyers do. -
Rent the house back to the sellers
Some sellers aren’t interested in a short closing at all. In fact, the opposite could be true. Sellers who don’t have to sell quickly but who are just making a change, such as downsizing or upsizing, might want a long closing or some sort of flexible deal to give them time to find their new home. “Being able to rent back the property to the seller for a few months while they solidify their next purchase can go a long way into not needing to overbid on the property,” says Aaron Norris, a California real estate investor with The Norris Group.
-
Submit an as is offer
The fewer conditions you put on negotiating the house price, the more attractive you look to sellers. Consider offering to buy the house as-is. Miami Beach, FL, agent Jill Hertzberg says, “You can opt out of conducting inspections.” But since this is an extremely risky proposition, Hertzberg suggests instead of waiving the inspection altogether, decrease the inspection period to two days maximum. Lilia Biberman, a Boca Raton, FL, agent says to only waive the inspection “if you have a firm grasp of all the possible defects a property may possess and the costs associated with remedying those defects.” Also, if you’ll be paying in cash, you don’t need a financing contingency, which protects buyers who don’t secure financing in time.
Source: Trulia Blog
buying • first time buyers • investing • investor • Landlord • real estate • rental • rentals • tenants • Uncategorized •
July 20, 2017
7 Things To Know Before Becoming A Landlord

Thinking about investing in a rental property? Here are some great tips that will get you started!
First-time homebuyers are a declining group. Historically, 40% of homebuyers have been first-time buyers, but that percentage continues to shrink, even as millennials continue to show more interest in becoming buyers (eventually). If you’re already a homeowner, your wheels might be spinning right about now — if people aren’t buying starter homes, then the rental market has to be booming, right? It is in many areas, particularly where unemployment is low, the population is high, and homes are not overpriced. But before you start searching for a home for sale in Austin, TX to rent, you should think about the responsibility that comes with being a landlord — and learning by trial and error is not the best way to go about gathering intel (or a steady income).
Before you take the plunge, study up on how to become a landlord with these seven tips.
-
Ideally, you want to live near your rental property
Living close to your property allows you to check on it periodically (after giving your tenants proper notice), take care of repairs yourself, and show the property when it’s time to list it for rent again. Research the best investment areas — but even if you don’t live in a prime rental region, you can still invest in one by hiring a property manager to take care of day-to-day details.
-
Know landlord-tenant law
Most states have specific landlord-tenant provisions that cover issues such as security deposits, level of access to the property, and how much notice you need to give your tenants when you want them to leave. There also are federal laws you need to know, such as habitability and anti-discrimination laws. “Many landlords gloss over housing discrimination laws because they assume that as long as they’re not racist or sexist, they needn’t worry about fair-housing violations,” says Ron Leshnower, real estate attorney and author of Fair Housing Helper for Apartment Professionals. But fair-housing liability traps can arise in many ways, so it’s important that you fully understand the law and ensure that you aren’t breaking it.
-
Make sure you can enforce that the rent is paid on time
This seems like a no-brainer, but believe me, if you get too friendly with your tenants, you might just let them slide a couple of weeks beyond the first of the month, or allow a partial payment when they’re between jobs. Before you know it, your tenants are six months behind and you’re struggling to make the mortgage payments. But being firm doesn’t mean you shouldn’t treat tenants with respect. Cultivating a good relationship with your tenants often goes a long way to ensure rent will be paid on time and that repair requests will be easier to deal with.
-
Screen potential tenants
It’s worth the time to do a background and credit check on all potential tenants: online tenant-screening services are convenient, and you should be sure to check potential tenants’ credit scores. A credit score alone shouldn’t be the sole reason to accept or deny an applicant, but it is a useful screening tool: For instance, if your renter is fresh out of college with a solid job offer, they may not have enough credit history to warrant a good score—but could be a great rental candidate.
You should also conduct an interview to make sure you’re comfortable interacting with them, and check references, especially from employers or past landlords. But be advised, it’s hard to find the perfect tenant. According to Casey Fleming, author of The Loan Guide: How to Get the Best Possible Mortgage, it’s important to have a thick skin, and advises people not to buy rental property if tenant shenanigans will “drive you crazy.” Case in point: Fleming once had an evicted tenant break into the house, change the locks, and move back in!
-
Customize the lease
If you don’t hire an attorney or a property manager, you can use a standard lease form from Nolo, for example, but you should tweak it to fit your situation. For example, if you allow pets, specify how many, what kind, and any rules that apply. Your lease could state that tenants should leash their dogs when outside the fenced-in yard and stipulate that pets should not become a nuisance to neighbors.
-
Inspect the property regularly
“Have language regarding inspections clearly written in your lease documents,” says Timmi Ryerson, CEO of Smart Property Systems. She suggests taking pictures to establish a baseline (and document the move-in condition) and conducting an inspection at three months. If you find problems, Ryerson recommends that landlords “issue a notice to comply and set another inspection in one week.”
-
Understand this is not a get-rich-quick scheme
Being a landlord is not just sitting around collecting a big wad of cash each month. You’ll need to spend some money to ready the property for tenants, buy landlord insurance, and pay property taxes. If you’re taking out a mortgage, be prepared to fork over at least a 20% down payment. Think of being a landlord as part of your overall investment strategy and be realistic about your goals — most landlords aim for about a 5% return on their investments.
Source: Trulia Blog
buying • Golf • Golf Course • real estate • Resale Value • selling • Uncategorized •
July 20, 2017
What to Consider Before Buying a Home on the Golf Course

Traditionally considered the ultimate location, here is what you need to know before you purchase a home on the golf course!
Is there anything on par with living on a golf course?
Before you buy that home on the fairway, there are a few things to consider. From maintenance to memberships, privacy to views, life on the golf course comes with a few questions. To settle the score, we turned to our golf pro, Cara Ameer with Coldwell Banker Vanguard Realty, Inc. to learn her tips for what to consider before buying a home of the golf course. In the segment below, which first aired on NBC Open House, Cara explains how to tee your home search up for success and avoid any bunkers along the way.
To find a home on the green, visit Kappelgateway.com. You can find golf properties around the world using the lifestyle search found in the top navigation of the site.
Source: CB Blue Matter
buying • distressed properties • Fixer Uppers • Fixers • Foreclosures • investor • real estate • Uncategorized •
July 20, 2017
Five Tips to Identify Fixer-Upper Homes Worth Investing In

You may know someone who did very well during the market crash in 2008 purchasing fixers. Its a complex issue that you need to study up on before you even consider taking that plunge!
When shopping for a fixer-upper home, some properties have potential beyond their appearance. Keep the following tips in mind as you look for that home.
When shopping for a new home, be aware of properties that have potential beyond their current appearance. Home buyers often overlook a great property because they are too focused on the cosmetic appeal, which can be easily altered. Keep the following tips in mind as you search for your perfect home:
- Finding the Best Neighborhood for You
Location is one of the most crucial factors to consider as you look for possible homes. Unlike the style and even structure, no amount of time, effort, or money can change a home’s location. To find the best neighborhood for you, it can help to visit the area multiple times at various hours. This will help reveal the local culture and activity to be expected from neighbors. - Identify a Cost-Efficient Fixer-Upper Home
Look for a home with sound fundamentals and an appealing floor plan. Cosmetic improvements like new paint, lighting fixtures, and flooring are relatively cheap and easy to change, while work on plumbing, electrical systems, structural walls, or cabinets are more difficult and expensive. Typically, the most expensive change involves altering a home’s structure.
- Hire a Contractor Before Buying a Home
You may want to hire a contractor in your search if you know you want to make changes to a home you plan to purchase. A contractor can help you better understand what kind of commitment a given home will require. Many remodelers will visit a potential purchase at no charge to give an estimate of how much the work would cost. This is valuable information when comparing different homes with one another. - Know What to Check Before Buying an Old Home
Examining a home can be a complex process, and looking for one with unused potential can make it more difficult. Keep in mind that homes older than 50 years are likely to have similarly aged plumbing, electrical, heating, and other systems. The home may also be worn out or too outdated to remodel. - Real Estate Agents Can Help
Real estate agents are valuable resources. They can help you understand a home in the context of its neighborhood and area, and may be able to offer advice on how to increase the value of the property after purchase.

Source: CB Blue Matter
appliances • cabinets • kitchens • living small • organization • real estate • small space • Uncategorized •
July 20, 2017
How to Keep a Small Kitchen Organized

Everyone LOVES a big kitchen. Lots of room to whip up your culinary delights! The truth is that anyone can adjust and create beautiful meals in a small kitchen. Its all in the organization!
It can be tricky keeping a compact cooking space tidy, but these ideas can help keep a small kitchen organized.
Contrary to what you might think, you don’t need acres of counter space or dozens of drawers and cupboards to have an organized kitchen that’s a joy to cook in. If anything, a smaller kitchen can encourage you to streamline your stuff and live more simply. Who wants cabinets chock-full of unloved pasta machines and dusty bread makers anyway? Check out these easy ways to restore order to your less-than-enormous kitchen.
1. Start with a utensil rack. Not only will it give you a place to hang slotted spoons and ladles for easy access while cooking, it will also free up precious drawer space.
Even in the tiniest kitchen, you can usually find somewhere to squeeze one in — under a cupboard or shelf or above the stove. Stainless steel models work in most styles of rooms and are easy to wipe down.
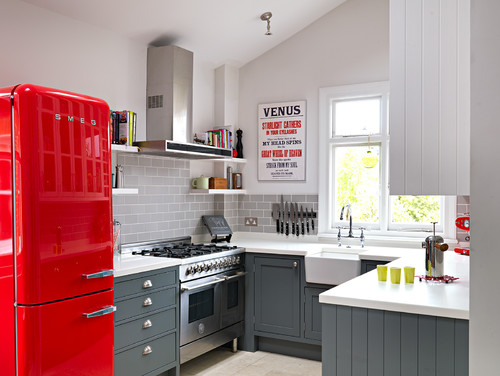
Photo by WILLIAMS RIDOUT
2. Get a knife holder. A knife block or magnetic rack is one of those simple items that really do make a difference in how functional your kitchen is. After all, rummaging around in a drawer for a piece of kitchen gear you use frequently is time-consuming and dispiriting.
A wall-mounted rack like this one keeps things orderly without swallowing too much space. Buy decent knives if you can afford it, as they should last a lifetime. One advantage of a magnetic rack is that you can slowly build up your collection of knives, buying one at a time, rather than having to invest in one large block complete with knives, which can be pricey. If you’re starting from scratch, a bread knife, paring knife and chef’s knife are essential.
3. Assign dedicated storage areas. Kitchen clutter can easily accrue, so it makes sense to assign different cupboards a specific purpose and stick to it. And dedicate a few minutes every couple of weeks to returning stray plastic lids or pot covers to their homes and sweeping out spilled spices and coffee grounds — it really will make a difference in how pleasurable (and easy) your kitchen is to use day to day.

Photo by Domus Nova
4. Reduce your numbers. If your kitchen is really mini, or even if it isn’t, think about doing a good edit of your paraphernalia. Be honest: Do you really need more than a handful of plates, mugs or glasses if there are only one or two of you?
Having less stuff can be immensely freeing — and will significantly reduce the amount of time you spend washing up, which is a big bonus.
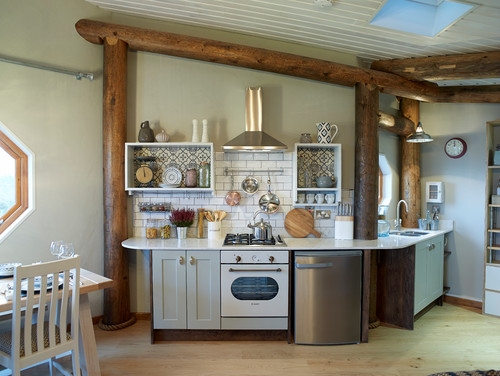
Photo by Cream & Black Interior Design
5. Gather and display. This cute kitchen demonstrates how you can be organized and chic at the same time. A charming crock to hold wooden spoons, a wall-mounted crate or two to provide a home for vintage-style scales and jugs, a small wall-mounted spice rack — they all add a pretty touch as well as having a practical function.
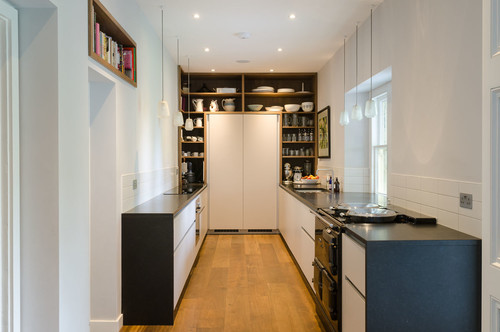
Photo by Moon Design + Build
6. Be clever with your cabinets. Use every spare inch in a small kitchen by building recessed shelves where feasible. Here, they surround an integrated refrigerator. With this design solution, wall space that’s too skinny or awkwardly shaped for extra cabinets can still be used to hold frequently used items. In this kitchen, it also helps open up the room and leads the eye to an appealing feature.
The other clever feature in this kitchen is the cookbook niche above the door — another neat storage trick that doesn’t take up too much room. Ask a builder if one can be carved out from an existing wall.
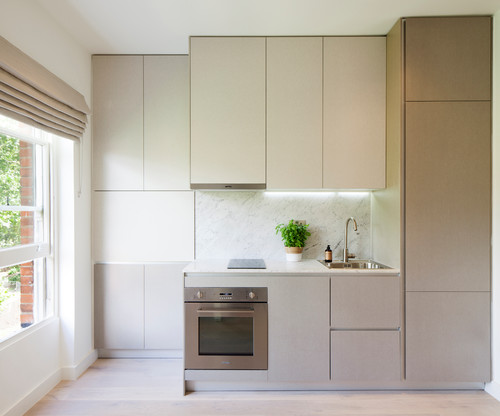
Photo by Ardesia Design
7. Go minimal. Are you in the process of picking new cabinets for your compact kitchen? Consider this look. Ultra-plain, handleless cabinets in a nude hue are soothing to look at and give a sense of visual order. Pick a seamless backsplash such as this slab of marble, since tiles with grout can look busy.
Photo by Glenvale Kitchens
8. Get in a tight corner. When space is tight, an ingenious trio of pullout corner drawers is a lifesaver, helping to solve the problem of lost space in those awkward-to-access base cabinets.
If you’re remodeling, think about how you’d use such drawers — for cutlery, towels, pans, dishes? Here, a slimmer top drawer is complemented by the two deeper ones, so all the bases are covered.
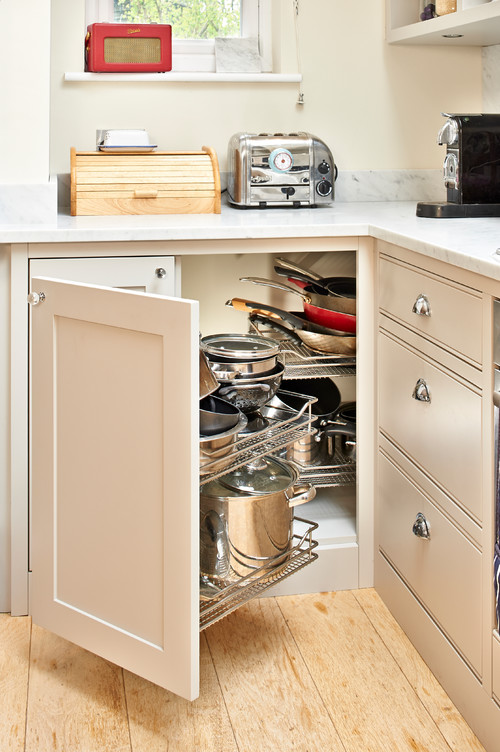
Photo by marco joe fazio photography
9. Put the pans away. Similarly a pullout pan rack can be a gift in a small kitchen, creating an organized home for frying pans and saucepans and keeping you from tearing your hair out as you hunt around in the backs of cupboards. Also try using racks for items such as steamers or large, unwieldy casserole dishes.

Photo by Vanillawood
10. Organize inside. It may sound like a no-brainer, but often what makes a kitchen, big or small, organized is how we arrange the insides of our cupboards. Shelf and drawer dividers, hooks, racks and other storage devices are key to keeping order. Consider what works for you and go custom if you can. Are you a Mason jar and Tupperware kind of person? Do you prefer mugs on hooks, shelves or in drawers? Storage is often about personal preference. Here, the slim slots for chopping boards and placemats are a brilliant idea, as is the slim pullout spice rack.
Source: CB Blue Matter / Houzz

")


