Breaking out the paintbrushes, fabric samples and hitting Home Goods and Pinterest for some good ideas? Here are some 8 steps you need to know before you get started!
Here’s how to prioritize your game plan for your room makeover.
If you have a DIY decorating project on your horizon but don’t know where to start, here’s a practical guide to help you navigate the process.
1. Commit to a Budget and Timeline
First, figure out your total project budget. If you skip this step, you’ll likely spend much more than you anticipated and make poor purchasing decisions you’ll later regret.
Also pick a date to complete your project by, even if you don’t have a looming reason to do so. Creating a complete-by date will fuel your project so it can take flight. Completing one stage of a project informs the next and the next. Otherwise, approaching your project piecemeal will delay completion, if you even complete it at all.
By Mitchell Parker
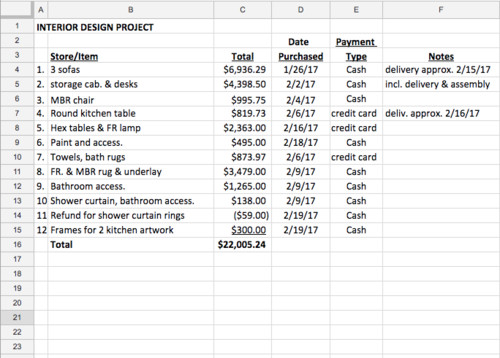
Set up a good system to keep track of your expenditures. I use an Excel spreadsheet, but even a spiral notebook can work for smaller projects. The key is to keep it updated.
Here’s an example of how I keep a running log of project expenses. While the main goal is tracking the total amount spent, I also indicate the store (which I left off here because stores will vary based on your location and preference), method of payment, general description and any notes, such as delivery fees — useful information that may come in handy later.
Keep all of your receipts together in one location. You can refer to them easily for warranty information and returns, if needed. I use a small zip pouch made for holding pens and pencils while I’m out shopping. After I return and enter them into the spreadsheet, I stapled each receipt to a piece of paper and store that neatly in a project folder.
Photo by Dina Holland Interiors
2. Evaluate Your Needs and Lifestyle
Separating wants and needs is a hard one. Prioritize your needs by first creating a list of the furniture and accessories you envision going into your space. List any work you want to do, like painting or wallpapering, too. Then rate each item 1 through 5, with 1 indicating an absolute must and 5 reflecting a nonnecessity. Reorder the items on the list with the necessities at the top and the more wishful items at the bottom. Involve other family members in this process. They may identify overlooked items.
Also, be honest about your family’s lifestyle requirements today instead of at some far-off idyllic future date. For example, if the kiddos use your family room as a playspace, include toy storage on your list. You may have some child safety needs too. Also note any special concerns about pets, such as shed fur or the potential for furniture to get clawed.
3. Decide What Stays and What Goes
Based on your list, identify any pieces of furniture or accessories that you absolutely want to keep in the space. Remove the pieces you don’t plan to reuse; consider donating them if they’re in good shape or selling them online or through a local consignment store.
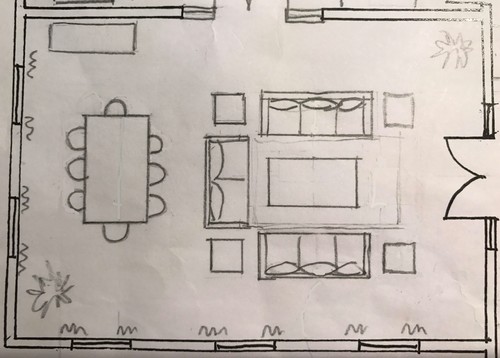
4. Draw a Preliminary Furniture Plan
If your project is small, this step may not be necessary. However, if you’re buying new furniture or just considering a new configuration, it’s extremely helpful to try out pieces in different locations to see what fits and what doesn’t. The last thing you want is to end up with a too-big piece of furniture. You’ll need a tape measure or laser measuring tool to measure your space and a scale ruler to draw it to scale. A simple sketch illustrating only the outside dimensions is all that’s necessary.
If you don’t have these items or don’t feel comfortable with drawing to scale, an alternative is to “draw” the outlines of furniture with masking tape on your floor or cut furniture-size shapes out of butcher paper to maneuver around on the floor.
Don’t forget about circulation space. Ideally, you’ll want to keep 18 inches between the edge of the sofa and the coffee table. Maintain 36 inches for comfortable general circulation. Since you may not have found specific furniture pieces yet and don’t have detailed furniture dimensions, you may need to revise the size of some furniture pieces as your project progresses. Nonetheless, this exercise is a good starting point.
Also measure your entrance door and the pathway to the room, including building elevators if you live in a high-rise. Bring these notes with you when shopping. If there are any delivery dimension concerns, you can address them then and there.
Photo by Colordrunk Designs
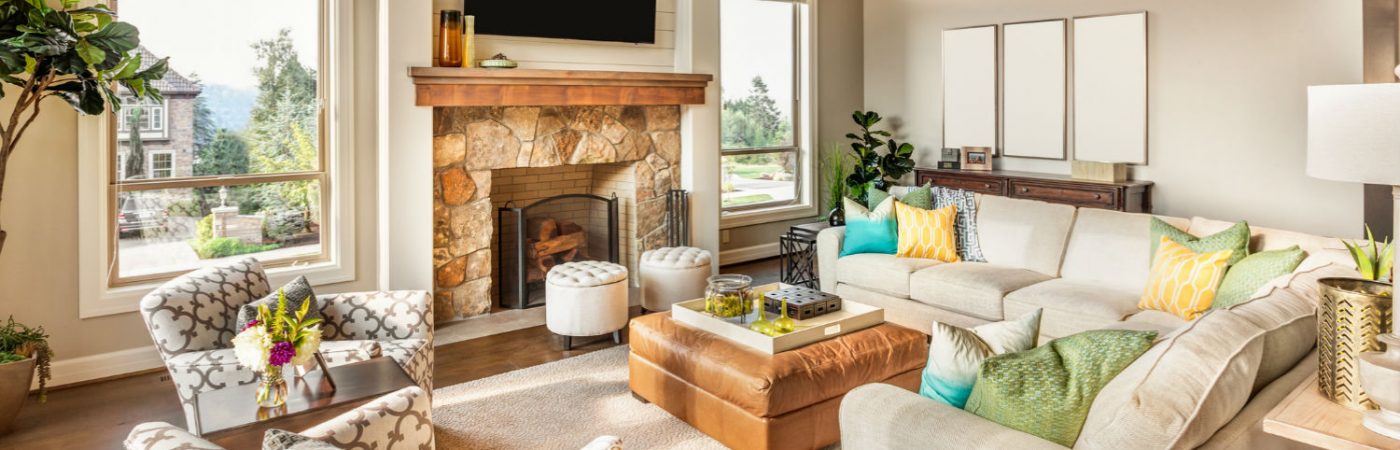
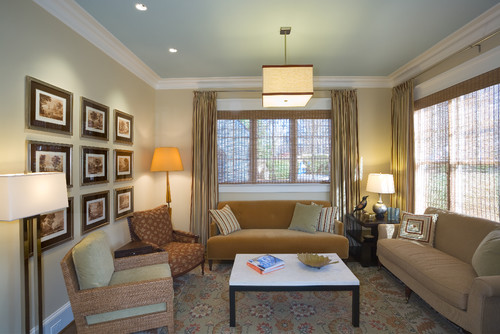
5. Concentrate on Big Items First
Focus first on the big-impact items, then concentrate on smaller accessories. Too often people get hung up on a small detail that can derail the flow of the bigger items. The idea is to work from large to small.
Find furniture. Unless you’re lucky to find the furniture you want in stock, most furniture takes eight to 12 weeks for fabrication. However, even in-stock furniture may not be delivered right away. If available, get a swatch of the upholstery or finish sample to help with other room selections.
Unless you’re comfortable working with a complex color palette, minimizing your scheme to two colors, as in the space here, will make shopping easier — and your space will look sharp and put-together.
Work the walls. Compared with any other design material, wall paint gives a room the most bang for your buck. I find it easiest to select a wall paint color or wallpaper after the furniture is selected. You have much more leeway with paint color choices than furniture upholstery. Plan to get your space prepped and painted prior to the furniture delivery.
Photo by Sroka Design, Inc.
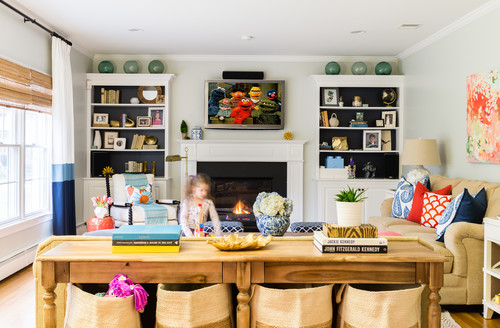
Hit the ceiling. Color instead of conventional white on the ceiling is another cost-effective attention-grabber, especially if you have crown molding to separate it from the walls, like in this living room.
6. Move Toward the Mediums
After you’ve figured out your furniture layout and color scheme, focus on finding the midscale items that will pull your space together, such as an area rug. Your scaled drawing will also come in handy to see how prospective rugs will work with your furniture layout.
Photo by Country Curtains
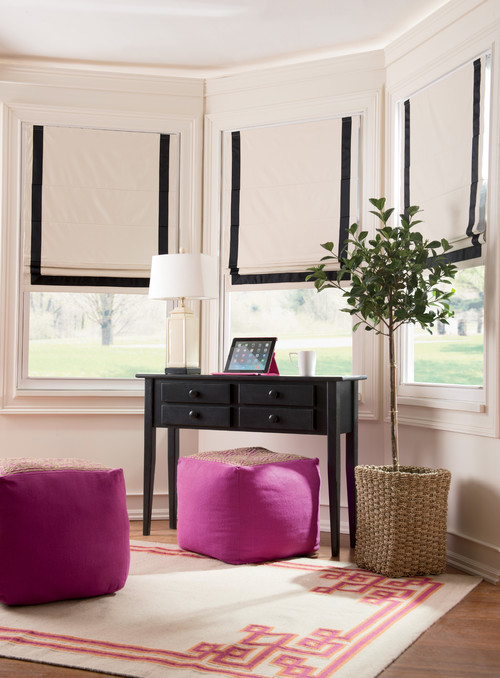
Window treatments like Roman shades and drapery can offer lots of style compared to run-of-the-mill Venetian blinds. They can minimize less-than-perfect windows and help save on energy bills, too. New window treatments don’t have to cost an arm and a leg, either. Ribbon-trimmed cordless shades like the ones shown here here can be ordered online for $100 to $125.
Photo by Meg Adams Interior Design
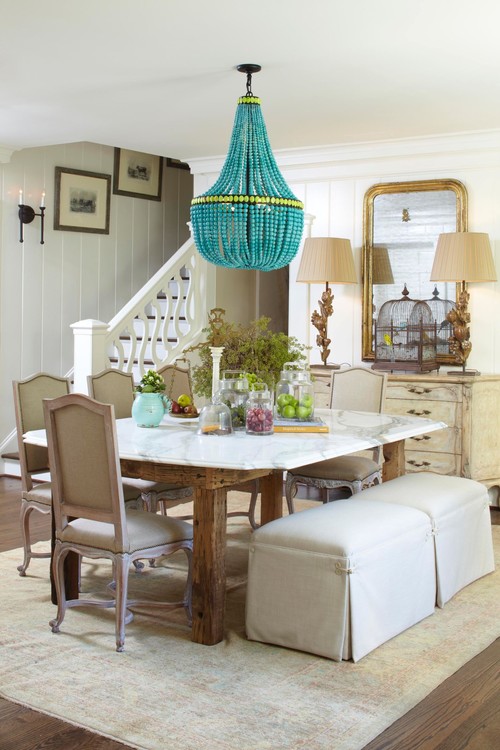
A feature light fixture, like the one in this dining room, can become a stunning design focus.
7. Save the Small Stuff for Last
Fill in your scheme with decorative accessories toward the end of your project. You’ll be able to see what areas need attention and have a better sense of scale, especially with artwork. With the furniture in place, you’ll also have easy access to key dimensions, like the clearance between shelves.
I also like to shop for table lamps, particularly lamps that will sit behind a sofa, after the furniture is delivered so I can see how all the heights work or don’t work together. Cord lengths and switch locations are also easier to evaluate when the furniture is in place.
Photo by Larette Design
8. Leave Room for the Unexpected
You may come across something surprising in your decorating journey that has special meaning or even adds a bit of humor, like these Hulk hand bedpost toppers. Don’t discount originality or quirkiness; it’s what makes your home truly yours.
Moving is always stressful. You just want to settle in already! Take a breather and checkout these tips!
Moving to a new city, whether it’s 30 or 3,000 miles away from your last one, can be stressful to say the least—perhaps even more so after you’ve dealt with the last of the packing boxes, because now it’s time to get to know your new community and begin to feel comfortable within it.
Relocation professionals offer practical tips to help you feel more at home faster:
Get connected. If they haven’t already done so, don’t wait for the neighbors to ring your doorbell. Knock on the doors of the neighbors to your left and your right to introduce yourself. Even if they don’t become friends, they can be a good source of city information, as well as referrals for reliable window washers, babysitters, medical professionals and other service providers.
Walk or drive around town. Walking your neighborhood is the best way to pinpoint local stores, schools, libraries and more—and driving will widen your familiarity with the city and acquaint you with alternative driving routes.
Don’t hesitate to say you are new in town. Wherever you happen to be, from the dry cleaners to the kids’ new gymnastics school, let people know you are new in town. You may be surprised to find how much good information they will want to share with you about their favorites in the place they call home.
Use social media. Get online to browse upcoming local events, as well as trending restaurants, museums and other local attractions.
Find clubs, schools or shops of interest. Look online for appealing local activities for everyone in the family: Toastmasters, quilting shops, book clubs, photography classes or sports leagues. They can be your best source for meeting new people who share your interests.
Say yes to invitations. Agree to join colleagues for a drink after work or a neighbor’s invitation to a fundraiser. The more people you meet as a newcomer, the more likely you will be to develop friendships.
Update your registrations. Finally, don’t forget to register your car with the DMV, apply for any necessary licenses, and re-register to vote. Identifying with your new location will help make you feel more connected.
Want to add value as well as space to your home? For the skinny on remodeling…Here’s how!
A person’s home is their castle, but sometimes that castle isn’t big enough to accommodate all its occupants. Maybe you’ve got a baby on the way or an older parent is moving in with you. Maybe you need a workshop to keep up with your hobbies. Whatever the reason, it’s normal to outgrow your space. When it happens, you’ve got two choices—move to a larger home or build an addition to your current home.
What types of additions are there and how do they add value to your home?
Bump It Out
If you’re not up to adding a whole new room or floor to your home, a bump-out could be a good option to add extra square footage where you need it most. If you’ve got a tiny kitchen, a bump-out can add 40 or 50 more square feet of space to make it easier to cook your meals, store your food or add a cozy little breakfast nook.
In terms of cost per square foot, these additions are more expensive than larger builds, but, in the grand scheme of things, they end up costing less because you don’t usually need a ton of extra contractors or permits to add a bump out to your home.
Full Additions
Full additions are the most common. These rooms add space and square footage to a home. You can add anything from a new bedroom to a new den, dining room or living room—the possibilities are only restricted by your budget and the size of your lot.
Full additions are often the most expensive and complicated to add, requiring lots of time and money to complete. A full addition can cost more than $50,000, and the price only goes up as the build gets more complicated.
These additions can be very time consuming, as they require you to hire various contractors to handle HVAC, electricity and plumbing, depending on the type of room being added. You will likely have to apply for permits through your city or county before construction can begin.
These additions take quite a while. If you’ll be staying elsewhere during the build, consider utilizing the overnight hours for construction—the work is more efficient and is often safer than daytime construction. It’s cooler, which can be essential if your home is located in a hot state.
You can save time if you’re under a deadline or are looking for a way to increase productivity and decrease project length, but don’t consider nighttime construction if you have neighbors close by—no matter what time of day you’re building, it’s still noisy!
In addition to adding more space to your home, these new builds add to the resale value of your home. While you may not recoup the entire cost of the project, adding a new garage can add around $40,000 to the resale value of your home depending on your region.
Remodels
Remodeling parts of your home gives your castle a fresh shine without knocking down too many walls. The trick to a good remodel is to have a solid idea of the finished project in mind before you start shopping for contractors. Pick one room and focus on that single room before you jump to another project—nothing looks worse than a house full of half-finished remodeling projects.
The type of remodel you’re planning will determine the price and time needed to complete it. Installing new lighting in the bathroom might cost you a few hundred dollars while remodeling your floor could cost upwards of $15,000.
Most interior remodels don’t require permitting unless you’re knocking down walls, though you should check with your local permit office before you start any remodels. You may need to employ the services of a professional electrician or plumber if you need to run wires or pipes into new areas.
You can save a lot of money on interior remodels by doing some of the work yourself—just make sure you know what you’re doing and don’t tackle any projects you’re not comfortable completing on your own.
Sunrooms
Sunrooms are often unheated rooms primarily made up of windows and designed to let you enjoy the weather without having to be out in it. It can be a great place to keep your outdoor plants safe during extreme weather conditions. They are simple to install because they do not require any additional heating or cooling routing, though you might need an electrician to run wires to power any lights or ceiling fans you choose to install. An unheated sunroom can cost around $15,000, though the price goes up depending on the materials you use. Wood framed sunrooms are less expensive than aluminum ones—those can run upwards of $22,000.
A four-season room is similar to a sunroom but is hooked into the home’s heating and cooling systems. This requires an additional contractor to set up the room’s HVAC. Collectively, these rooms tend to run around $20,000, making them slightly cheaper than a high-end sunroom.
Room Conversions
Do you have an extra garage or attic that’s just being used for storage or taking up valuable square footage? Consider converting the room into something more useful like a bedroom, workshop or craft room. Room conversions can make that extra square footage work for you, as long as you know what you’re doing or employ the skills of a contractor.
Depending on the type of conversion you’re planning, expect to pay anywhere from $25,000 to $40,000. Poorly done conversions can end up costing you more money, and lowering the value of your home, so make sure everything is done properly!
Additions and modifications to your home add space, functionality and resale value in one fell swoop. Employ professional contractors to make sure all the new work is up to code. Otherwise, it might end up costing you more money than you put into it.
Source: RisMedia
Light and airy rooms but still worried about people sharing your indoor privacy? Then this is the read for you!
Want to let light in while keeping your nosy neighbors out? Special types of light-filtering window treatments enable you to illuminate your home with natural light while preventing others from viewing your personal space. Ultimately, these window shades may prove to be exceedingly valuable, particularly for homeowners who are searching for high-quality window treatments that are both stylish and practical.
Benefits
In addition to offering maximum privacy from passersby and neighbors, light-filtering window shades provide many benefits, including:
Energy Savings: The U.S. Department of Energy points out properly installed window shades offer some of the “simplest, most effective window treatments for saving energy.”
Improved Insulation: Some light-filtering window shades have been shown to act as both insulation and air barriers, and control air infiltration more effectively than other types of window treatments.
Exceptional Value: Homeowners can enjoy light-filtering window shades that consist of UV-resistant and antimicrobial materials for superb quality, maintaining their value over time.
Eco-Friendly Styles: Some light-filtering window shade options are partly constructed from biodegradable materials.
Unparalleled Convenience: Light-filtering window treatments can be motorized or manual, allowing for ease of use both day and night.
Types of Light-Filtering Window Shades
Light-filtering window shades provide varying degrees of light infiltration. The most popular options include:
Cellular Shades
Cellular shades deliver year-round insulation and privacy. Meanwhile, they are constructed to allow small amounts of light to enter a room. Typically, cellular shades are sold in single or double thickness. They are available in multiple vibrant colors, along with various cell sizes and fabric styles to match your home decor.
Cellular shades also boast immense durability. They include an aluminum headrail and bottomrail and take only minutes to set up in any living space.
Roller Shades
Roller shades are easy to use and come in a wide range of lifts to complement any home’s decor. Light-filtering roller shades are top choices for many homeowners, as these shades block visibility into your personal space. In addition, blackout roller shades are great choices for those who prefer extra privacy and will help you maximize light control consistently.
Roman Shades
For those who want to add a hint of luxury to th eir decor, there may be no better option than Roman shades. Top-down/bottom-up Roman shades allow you to control whether light will enter from the bottom or from above. The versatile options in fabric range from every color of the rainbow, as well as prints.
If you require additional privacy, select Roman shades that feature a thermal liner. Or, if you need total or near-total darkness (like in a bathroom or media room), Roman shades with a blackout liner may prove to be ideal.
Pleated Shades
Pleated shades are available with light-filtering and room-darkening liners, maximizing light control and privacy needs. With a light-filtering liner, pleated shades can deliver daytime light transmission indoors. To maximize privacy, use pleated shades with a privacy liner, so that only minimal shadows are visible from the outdoors.
On the other hand, a blackout liner offers maximum light obstruction. This liner may serve as a great selection in a child’s bedroom or other settings where complete darkness is needed.
Vertical Cellular Shades
Ready to take your vertical window treatments to the next level? Thanks to vertical cellular shades, you can block harsh sunlight from entering large windows and patio doors.
Vertical cellular shades have been shown to deliver year-round insulation, sound absorption and ultraviolet protection. Moreover, they can include blackout fabric to provide you with the total privacy you need to get a great night’s sleep. Keep in mind that the blackout fabric of vertical cellular shades features an opacity that prevents light from filtering through at all times.
Vertical cellular shades are ideal in climates with extreme hot and cold temperatures and can be specified to stack on either side, split down the middle or stack in the center for added convenience.
Examine your window treatment options closely, and you’re sure to find window shades that match your personal style and budget perfectly, while offering privacy from prying eyes.
This secret garden contains brand new studio and one bedroom units, modestly priced from $1475 – $1575. They are nestled among relaxing greenbelts within a quiet, gated community.
Our interiors include elevated ceilings, rich Euro-frame java beech wood cabinetry, stainless appliances, granite counters, microwave, washers/dryers and much more.
These inviting living spaces are convenient to shopping and commuter access. Lots of Bright Natural light, open floor plans, spacious baths, granite countertops and vanities, washer and dryer in every unit, mirrored wardrobes and lovely front patios. The gourmet kitchens are a chef’s delight! And don’t forget to take advantage of the wonderful community room for fun events. Located at 2750 North Texas Street in a secure gated community. Come on by and visit us for a tour or you can always call us at 707.421.9900.
So you are thinking about checking out some open houses this weekend? Here are 3 very good tips to arm yourself with as you are going out the door!
When it comes to talking to the seller’s agent at an open house, a little mystery goes a long way.
More isn’t always better — especially when it comes to talking to a seller’s real estate agent. Your buyer’s agent is a guide and advocate in your real estate journey and should know everything about your needs, your desires, and how much house you can afford. But the seller’s agent is an entirely different story, and what you share with them should be minimal.
If you’re buying a home, your agent is almost always your voice to the seller. Speaking alone with the seller’s agent doesn’t happen very often, and it’s easy to forget who you’re speaking with — but there you are at the open house, eating a slice of quiche, and the seller’s agent, noticing that familiar glow in your eye, comes over and starts to chat you up.
Here are 3 things you shouldn’t talk about with a seller’s agent
How much you like (or dislike) the house.Basically, play it cool. You want the seller to know you could feel at home here and that you would be serious about any offer you might make, but she doesn’t need to know that this house is exactly what you’ve been looking for and that you’ll do whatever it takes to get it.
You also shouldn’t be too critical. If you do end up making an offer, you don’t want to reveal anything that could make you seem like a less-than-viable buyer. Especially in a competitive environment, you want the seller to think you’re as solid as they come.
The seller has the power in hot real estate markets, and he or she may choose to go with an offer that’s more likely to close than one that’s potentially shaky, even if it’s a few thousand dollars higher.
How much you can and will spend.
You also don’t want to talk about your financial situation. If he or she knows how high you’re either willing or able to go, then your offer could be at a disadvantage. Your first goal is to have your offer accepted. Your second goal is to have it accepted at the best price.
Neither of these goals are served when the sellers think they know how high or low you’ll be able to go on the final sales price. It makes no difference whether your offer relates to finances or personal choice or your last tarot reading. As with romance, a little mystery goes a long way. The seller should get a fair price for what she’s offering, and if you think it’s the right house for you, the fair price has little to do with the most money a bank will give you.
Be smart and let your agent do the talking.
In the end, your best bet is to eat your quiche, ask questions at the open house, and let the seller’s agent talk about the house. Anything else worth revealing will be done later when your agent does her job by getting you the house at the right price.
A Flock of Seagulls??? Nope! Just flamingos, peacocks and swans my friends! Check out this latest decor trend.
From water-fowl finds to flirty-flamingo fancies, bird-inspired decor is flying off the shelves and perching in the most style-savvy homes for summer. I’ve taken up a bit of a bird-watching (shopping) hobby for spring, and we’ve spotted all of the most on-trend, feather-friend items to incorporate into your home right now.
Sophisticated Swans
Elegance in bird form, right? These sleek, white wonders add a chic touch to a space, whatever it may be. Swans are sweeping bedrooms, bathrooms and baby rooms galore.
tabletop stauary
Notebooks
Pillows!
Trinket Dishes
Wall art
Switch Plates
Flirty Flamingos
Flamingos have held the title of “it” bird for quite some time now, and this fabulous, fuchsia flock doesn’t show any sign of slowing down. Pick up some pretty pink plates, a gilded bottle opener or even a painted acrylic tray to celebrate this ultra-fun, glam side of summer.
Dish Towel Sets
Coverlets
Notepads
Bottle Openers
Plates
Rugs
Headboards
Upolstered Chairs
Trendy + Tropical
Not all of us can afford to fly to the tropics this summer, so we might as well have the tropics fly to us. Get on island time and incorporate the colors of paradise through pretty parrot pillows, exotic candles or a vibrant wallpaper.
More wall art!
And more pillows!
Wallpaper
Snack Trays
Candles
Wall Art
Pretty Peacocks
Popular for their top-notch turquoise tail feathers, peacocks are having their design moment this season. There are peacock prints for gallery walls, trendy turquoise passport cases and coffee mugs — these regal birds inspire their fair share of feathered finds. Not to mention, does the peacock chair ring a bell? Let’s be real — not just any old bird has a chair named after them.
And the results are in! This is the year you’ve been waiting for…read on grasshopper!
Still on the fence about becoming a homeowner? While owning a home comes with many responsibilities, its financial and personal benefits can prove it to be one of the best investments you’ll ever make.
1.Tax Breaks
One of the greatest perks of becoming a home owner is being able to save a little bit on taxes. In the U.S. most homeowners are allowed to deduct money off the interest they pay on their mortgage every month. Not only is your home interest partially deductible, you can oftentimes get money back on extra cash you’ve spent on refinancing, a home equity loan or line of credit. Each homeowner’s financial situation is different, but be sure to inquire about the great financial perks available to you when you invest in a home.
2.Plant Your Roots
Before becoming a homeowner, you probably jumped from rental to rental every few years (or maybe even more). How do you know if you’re ready to take the leap from renting to buying? While it can be nice to have a change of scenery every once in a while, the money you spend on moving, security deposits and other fees can really take a toll on your savings. One of the great benefits of owning a home is having the opportunity to plant yourself in one, secure place and really make a life for yourself there. Being that you’ll live in the same residence for a long period of time, you’ll likely build lasting relationships with neighbors and play an active role in your community. And if you choose to raise a family in this home, your surroundings become a part of your family history, allowing you to make lasting memories.
3. Be Your Own Boss
While renting may come with fewer responsibilities than owning a home, you’re often confined to the rules of the property’s owners. When you own a home, you’re free to paint the walls any color, plant whatever you’d like in your garden and even adopt furry friends you never were allowed to before. Your home should be a place you can express yourself freely and live comfortably in.
4.Build Equity
Along with getting a sizable tax break, having the opportunity to build equity is another great financial benefit to owning a home. As you pay off your loan over time, you build more and more equity. Equity equates to whatever amount you have paid off on your home and no longer owe. If you decide to sell your home down the line, having equity plus any increase in the current market value of your property can put you in a really great position financially. When you rent a home, you aren’t building any equity at all and have nothing you can walk away with.
If you are in the market for a new home, then you’d better read up! No matter how much you know regarding mortgages, its never too late to learn.
A lot of Americans are caught up in a mortgage nightmare simply because they didn’t dive into the process with some preparation. With a little studying and education, getting a home mortgage can become a far less stressful endeavor.
Here are a few questions that can help you go into the home mortgage process with more knowledge and confidence. Although this quiz doesn’t cover everything you should know, it’s certainly a good start:
Answer: Pre-qualification is the first step in the mortgage process that involves supplying a bank or lender your financial information in order to find out how much you can borrow on a loan. Pre-approval is when you and your mortgage banker review your credit report to determine if you’re worthy of qualifying for a particular loan amount.
Question 2: What are the two big cash expenditures that require having money on hand to buy a home?
Down payment and closing costs.
Question 3: Generally, a monthly mortgage payment is made up of four different components commonly referred to as “PITI.” What are they?
Answer: Principal, Interest, Taxes, and Insurance.
Question 4: Why is it recommended to make one extra payment a year for people on 30-year fixed mortgages?
Answer: Since extra payments cut down the principle of your loan (and not interest), giving one additional payment a year can shorten your loan term by a decade.
Question 5: What is the downside to a subprime mortgage?
Answer: Although subprime mortgages come with lower introductory interest rates, they increase significantly after a number of years.
Question 6: What does LTV stand for and how do you determine it?
LTV stands for loan to value ratio. To find out an LTV, divide the loan amount by the appraised value of the house. So if your home is worth $200,000 and the loan amount is $100,000, then the LTV is 50%.
Question 7: There are three term lengths you can get for a fixed-rate mortgage. What are they?
Answer: 15 year, 20 year, and 30-year terms are your options for a fixed-rate mortgage.
Question 8: Of the mortgage rates mentioned in the last question, which one do most people find the easiest to qualify for?
30-year mortgages since a longer term means lower, more affordable payments. The fact that longer terms also mean bigger tax deductions also plays a role.
Answer: No. Since the interest rate on ARMs change along with market rates, they are unpredictable. An ARM is only recommended if you’re staying in a home for a short period of time.
Question 10: Lenders will look at your job history when considering offering you a loan. A red flag for them is if you haven’t been at your current job for at least how many years?
Lenders like to see that you’ve kept the same employment for at least two years. This also applies to people who are self-employed and part-time employees.
Question 11: What is it called when you owe more than your house is worth?
Answer: Owing more than your house is worth is called being “upside-down” on your mortgage.
Question 12: Is it OK to open a new credit account during the mortgage process in order to help pay for moving expenses, new furniture, etc?
Answer: No. Since everything must be documented with payment amounts and account statements, doing so can affect your debt-to-income ratio.
With summer swiftly approaching, it could be time for sprucing up the ole backyard a bit! Here are some great DIY projects that are sure to add some summertime family fun and enjoyment!
Remember backyards? Those things we’ve been ignoring for the past four months? They’re back! They might not be looking as sharp as they did before winter, but we’ve got some rad DIY backyard projects to bring it back to life.
1. Ground-Level Trampoline Photo Credit: Little Green Fingers
Do you live in constant fear of your kids falling off the trampoline? Honestly—parenting fears aside—trampolines might be fun, but they’re pretty ugly structures. Well, with these sunken trampolines, you’ll never have to worry about either of those things. Just dig a hole, place your trampoline, and voila! (Ground-Level Trampoline Instructions)
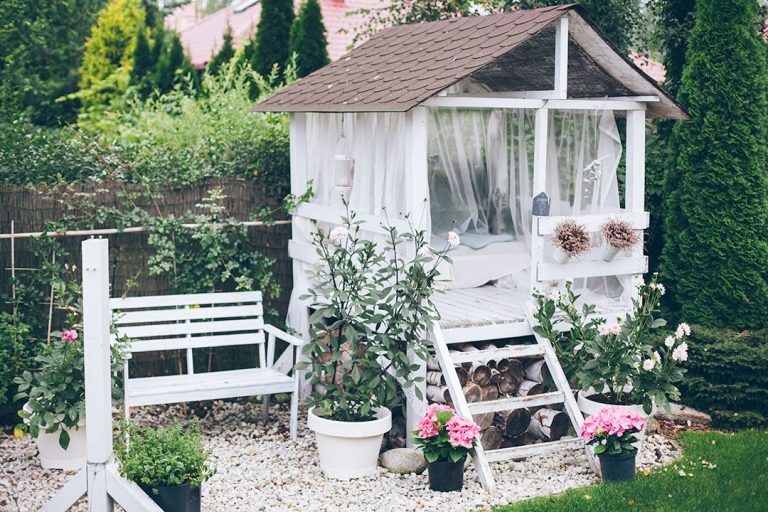
Marta Potoczek was looking for a treehouse alternative, something that looked nice but offered a little distance from the main house. Her solution was this adorable garden house, originally for her daughter to play in and now a perfect woman cave. Moral of the story: Your treehouse need not be on a tree.
3. Tin Can Lanterns
Photo Credit: GrowCreativeBlog.com
This project is both DIY and eco-friendly (because recycling is good). They are easy to make, and will elevate your backyard to the next level. It’s a win-win! (Tin Can Lantern Instructions)
I don’t have a backyard, but I’m considering making one of these anyways. Not only is Tic-Tac-Toe the best (especially when you’re super good at it), but it also scores high in decorative value. With little effort, you’ll come across as cool and tasteful. (Outdoor Tic-Tac-Toe Instructions/Supply List)
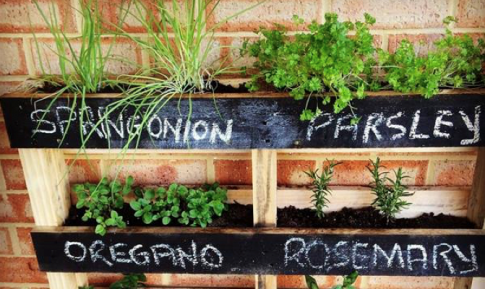
Since we’ve already installed a sunken trampoline, a play house/woman cave, and have a Tic-Tac-Toe board lying around, how about we go for space efficiency with this one? A vertical garden can cover any and all walls. It looks good, it smells nice, and you can eat it! That is the best of all the worlds, if you ask me. (Vertical Garden Instructions)
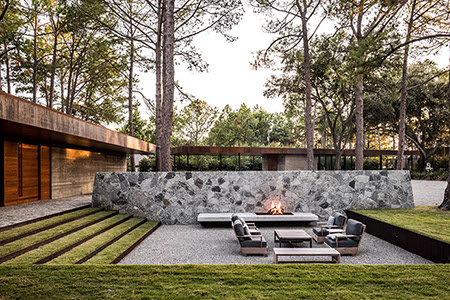
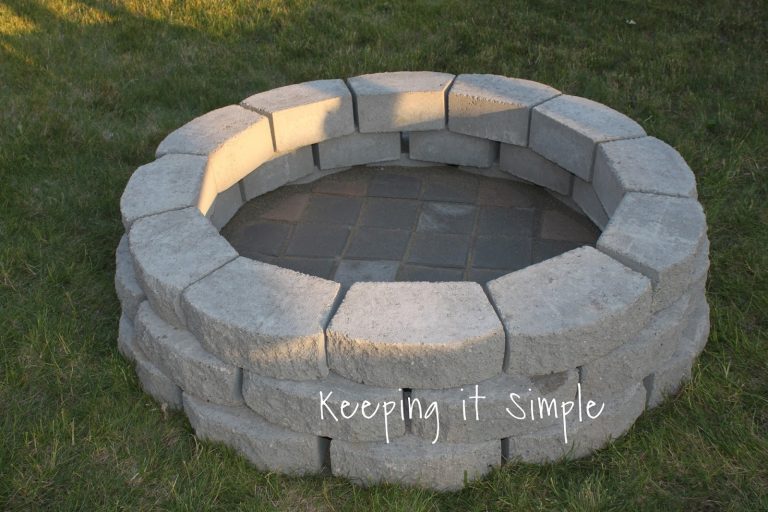
If you can’t roast s’mores in your backyard, is it even a backyard? I’m going to go with no. This DIY project costs only $60 to make, but look how fancy. This fire pit will make the perfect centerpiece for the intense fantasy backyard we just built together. (Also: s’mores.)

 Facebook
 X
X
 Pinterest
 Copy Link


")


