It’s not just you…who ever said “I just love to mow the lawn and pull weeds”! Here are some fab ideas for a grass free, easy maintenance yard!
While we can all agree that a lush, green backyard looks gorgeous, grass just doesn’t work for everyone. And grass is definitely not a requirement for a chic and stylish outdoor space. Whether you skip the grass because of your climate, the care and upkeep reasons or simply because of your personal style, there are lots of great options for creating a fabulous grass-free outdoor space.
Joslyn Amato
We’ve rounded up 10 of our favorite concrete backyard spaces to help get you inspired for your summer outdoor makeover.
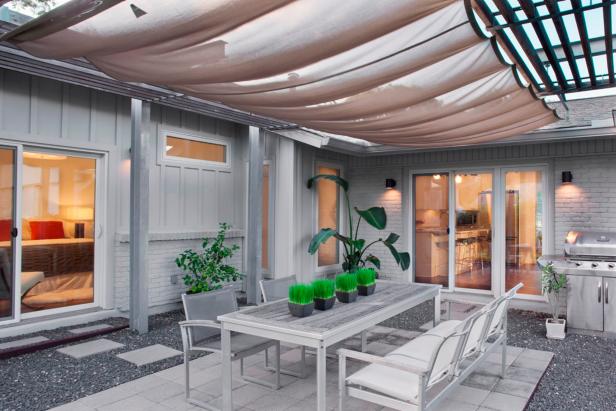
Dining Area
COLES HAIRSTON
Paula Ables Interiors created this shady outdoor dining space using a variety of textures and materials. The combo of gravel and concrete pavers, paired with the painted brick walls and overhead wood slats, helps bring a modern, fresh feel to this backyard.
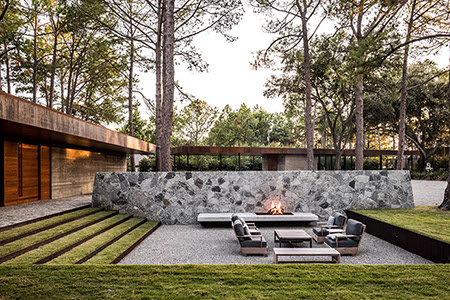
Fire Pit
Peter Lyons
This outdoor space by Baran Studio Architecture is an easy, inexpensive solution for unused space in your backyard. Instead of grass, use pea gravel to cover the ground. The homeowners have a built-in fire pit; however, you could easily add a portable fire pit or chiminea for a similar look.
Outdoor Living Room
Coreen Schmidt Photography
If you’re lucky enough to live in a milder climate, you might want to create an outdoor living room like this one by Project Groundwork. With a couple of well-placed pieces of outdoor furniture, you can set up a hangout area. Using gravel and some plants and shrubs, this outdoor space feels super cozy and inviting.
Pool Surround
Chang Kyun Kim
Concrete and gravel are also a great choice of materials to use as a pool surround, like this one by Synthesis Builders. They used large concrete pavers to help create a visual distinction between the pool and seating area. The gravel provides a beautiful texture to the backyard.
Plant Pockets
Zack Benson
Here’s an example of a really clever way to break up a larger concrete outdoor space by landscape architect Angel Carrasco. These small cutouts in the ground filled with plants and shrubs create a break for your eyes and add beautiful pops of color and texture.
Backyard Studio
Joslyn Amato
If you have a larger backyard and want to add a studio, office or guest house, consider setting up your space like Landwell Design.
Summertime….and the living is easy! If you know how to prep for it!
Our friends at HomeAdvisor 5 important steps for prepping your home for summer.
While summertime is perfect for outdoor gatherings with friends and family, it can also be a dangerous, and inefficient, time for your home. That’s why it’s important to have a preparation strategy in place before the hotter months arrive. These quick tips will help you prep your home for summer, and ensure it stays safe and inviting all summer long.
Schedule an Air Conditioning (AC) Inspection
Suffering through the hottest summer months with no AC isn’t fun, especially if you’re playing host to friends or family. Having an AC professional look at your unit before summer officially arrives will address any potential problems before they become major headaches. You can also DIY some preliminary maintenance. Clearing saplings, grass and other underbrush away from your unit will improve airflow and help prevent clogs. Replacing the air filters in your home’s HVAC will also help your AC function at its peak efficiency.
Look for Insulation Leaks and Inefficiencies
Poor insulation will allow cooled air to escape, resulting in a hot home and enormous energy bills. Fortunately, spotting faulty insulation isn’t difficult. Begin by looking for deterioration around your doors and windows. Caulk, door sweeps and weather stripping should address the majority of your door- and window-related leaks. It’s also a good idea to have a professional perform an energy audit. Pros will be able to identify hard-to-spot inefficiencies in other parts of your home and HVAC system.
Prep for Pests
It wouldn’t be summer without pests. And in addition to being an annoyance, some pests can actually damage your home and even present health problems. Spraying insect barriers around the exterior of your home is a good beginning, but it’s also important to prep the interior of your home. Sealing all food sources and potential entry points like window frames and doors is an important part of finalizing your pest proofing.
P.S. Be sure to read any warnings or instructions that come with pesticides. Improper applications can threaten the safety of your home, especially if you have pets or small children.
Inspect Your Roof
Summer is mostly known for its beautiful weather, but it can also be a time of severe thunderstorms or worse. This makes having a sturdy roof very important, especially during inclement summertime weather. Begin your inspection by looking for loose shingles, faulty flashing or other clear signs of damage. Your attic can also be home to leaks, rot and other problems not obvious from the outside of your home. Examining your attic insulation, walls and rafters for signs of moisture will help you prevent water damage and structural deterioration. If you notice signs of damage, it’s best to call a pro. Roof repair can be extensive and are rarely DIY-appropriate.
Reinvigorate Your Outdoor Spaces
Wintertime can take a toll on the appearance of your yard, patio and other outdoor living areas. Removing downed tree limbs, replanting dead flowers and power washing your patio and decking are simple ways to jumpstart your home’s summertime exterior. Your grill can also accumulate gunk during the colder months. Be sure to clean its interior and exterior before your first BBQ. Updating your tired outdoor furniture will also improve the looks and comfort of your entertainment areas. Wrap-around sofas, comfy loveseats and luxurious hammocks are ideal additions to any outdoor space. You can perfect your entertainment areas with colorful throw pillows, planters, hanging candles and outdoor lighting.
Ahhhh, the sweet smell of cut grass in the air…a true harbinger of summertime. Keeping that lawn green can be tricky without these great tips on watering!
Proper watering nourishes lawns, just as proper hydration nourishes our bodies. Yet too many of us are failing at both. We’re not going to lecture you about drinking more water, well leave that to your doctor or significant other. But we are going to give you a lesson about correctly watering your lawn.
Here are five lawn-watering mistakes that you’re likely making right now and ways you can fix those mistakes.
1. You’re over-watering your lawn.
Many homeowners drench their lawns with water. However, that’s not a wise move. Over-watering can leave your lawn susceptible to fungus and other diseases. It also can cause your lawn to grow too quickly and can wash away costly fertilizers, according to PlantCareToday.com. In addition, drowning your lawn wastes water.
To avoid excessive watering, PlantCareToday.com recommends buying a soil moisture meter. These meters are very simple and valuable tools that you can pick up for $10 or so at any garden center or home store, the website says.
Lawn care experts say most lawns need one inch of water per week. However, that’s merely a rule of (green) thumb, as watering requirements vary according to grass type, climate and seasonal changes. The amount of water required for an established lawn will be determined by its overall health, beauty, and ability to withstand use and drought, says Turfgrass Producers International, a trade group for sod growers.
While your existing lawn may be getting too much water, your newly planted lawn may not be getting enough. Bayer Advanced, a maker of lawn and garden chemicals, says a new lawn is in a critical stage during its first year. Don’t rely solely on rainfall to establish a healthy, deep root system provide supplemental irrigation during the first year of growth, Bayer Advanced suggests.
How much irrigation you do depends on factors such as the type of grass and the climate.
3. You’re not monitoring your irrigation system.
If you’ve set up an automatically timed irrigation system to water your lawn, don’t put it on autopilot.
Irrigation timers are not set it and forget it devices, says Lee Miller, a turf pathologist at University of Missouri Extension. You’re not cooking turkey for Thanksgiving dinner. Sprinklers should be adjusted according to precipitation events.
For instance, if it’s been steadily raining the past two days, your sprinkler system should be off for a while afterward. The San Diego County Water Authority recommends turning off the sprinklers for two weeks after significant rainfall. After a storm, do not begin watering again until the top 1 to 2 inches of soil are dry. Lawns that lose their lush green luster will rejuvenate with the next rain, says Jeff Stephenson, principal water resources specialist at the San Diego Water Authority.
Researchers at Kansas State University found that 65 – 83 percent of homeowners surveyed in three Kansas cities didn’t know how much water their lawn irrigation systems had applied.
In reality, deep and infrequent irrigation makes for deeper root systems, UM’s Miller says.
4. You’re watering your lawn at the wrong time.
The worst time to water your lawn is when you’re probably sound asleep. Watering after dark soaks the lawn overnight; a soggy lawn invites fungus and other diseases to invade your grass.
When’s the best time to water your lawn? Experts says it’s around 4-8 a.m., before many of us have sipped our first cup of coffee.
Watering the lawn early in the morning gives it a good supply of water to survive the heat of the day, according to University of Illinois Extension. Early morning also tends to be when wind speeds are lower and, therefore, when water evaporation is less likely to occur.
5. You’re assuming that you’ve got to water brown grass.
When your lawn is brown, you might think it’s parched. However, it may simply have gone dormant during hot weather or drought conditions. Dormancy is simply a state of reduced water usage where the turfgrass … focuses resources on the roots, the Lawn Institute says. Dormant turfgrass will turn brown and is often considered unsightly, but it will recover when conditions improve.
In other words, brown grass doesn’t necessarily equal dying grass.
The institute says summer dormancy is a normal response to heat and drought, and most lawns can stay dormant for at least three to four weeks without dying.
During the summer, the worst that will happen if lawns are not watered is that weaker parts of the lawn or areas in hot spots will die, according to the Oregon State University Extension Service. When fall returns, lawns can be reseeded and will recover just fine over the winter.
The Jury is IN! You never get a second chance to make a first impression. Curl Appeal is one of the single most important details you need to address when putting your home on the market! If your home looks amazing on the outside, Buyers will naturally assume that it looks equally as awesome on the inside. Here’s how:
How attractive your property looks when viewed by passer-byers can make all the difference in today’s market. To make sure potential homebuyers get a great first impression, consider improving your place by doing the following:
1. Revamp the front door.
Never underestimate the impact the main entrance of your house has on its curb appeal. Make sure it looks great by giving it a new coat of paint that stands out but still fits in with the rest of the home’s color scheme. Unless it’s worth replacing, in which case we recommend a custom wood door, be sure to give the door a good cleaning and polish before painting it.
2. Include nice porch furniture
If you have a porch that’s visible from the street, you can make your place look more inviting and homelike by adding some furniture. Things like nice wooden benches and a wicker patio set can make your curb appeal skyrocket. If you have the money, swap out your ruined rockers and other old porch furniture in favor of something new gliders with matching ottomans, for example.
3. Redo the house numbers
There’s just something about neat, eye-catching house numbers that leaves a good impression, especially to people on the hunt for a new house. If you don’t believe us, walk around your current neighborhood and you’ll see the difference big, bold house numbers make. It also helps to make them stand out by using aged copper, hand-painted tiles, or something unique when compared to other nearby houses.
4. Light up the place
Making sure the front of your place has great landscape lighting can improve your home’s curb appeal while making it a safer place. Switch out old lamps, pendant lights, and wall sconces with new ones that look better and offer more lighting. Pathway lights, especially solar-powered, that illuminate the walking path in your home will make the property appear better and more secure.
5. Spruce up the verdure
While there are exceptions, most people find a house with no plants outside boring-looking. If your front yard is lacking in the foliage department, invest in some new plants to give your home some vibrancy. Plant flowers, add potted plants, replace ugly weeds with a fresh lawn whatever it takes to make the area look lively and attractive.
6. Tap into your artistic side
Add a touch of style and class to your front yard by including outdoor artwork. We’re talking about things like birdbaths, fountains, and sculptures that leave a lasting impression on passer-byers. If you’re on a budget, even a few wind chimes or home-made wheel planter can do their part to improve your house’s curb appeal.
7. Doll up your windows
Unless your windows are already gorgeous and just need a good cleaning, consider investing in attractive shutters made of materials that complement the rest of your house These days exterior shutters can be made of anything from vinyl and wood to aluminum, fiberglass, and wood. You’d be surprised by how much your home’s curb appeal goes up thanks to beautiful windows.
8. Replace (or touch up) anything else that looks old
At the end of the day, it may just be an old gutter system or exterior walls in serious need of repainting that’s dragging down your property’s curb appeal. Cracked walkways, time-worn fences, and even a rusty door knocker are all things you should look out for. Instead of adding to the front of your porch, sometimes all it takes is revamping the old to significantly improve your home’s look.
Too much stuff and no where to store it? Read on for ingenious ways to find a nook and cranny for all the items you can’t bear to give up!
Here are some awesome ideas to get you get organized and find a “home” for all of your things.
When your home has a place for everything it is magical. You open up cabinets to neat piles of Tupperware. Your closet is organized with shoes, belts and accessories organized in a way that would give Carried Bradshaw envy. Your garage is neat and each tool is hung with care while your children’s toys are lined up and ready to be used at their convenience.
Let’s be serious, there are very few who can actually say their home has enough space for all of their things. In the battle of you vs square footage, you rarely feel like you come out on top. Here are some awesome ideas to get you get organized and find a “home” for all of your things.
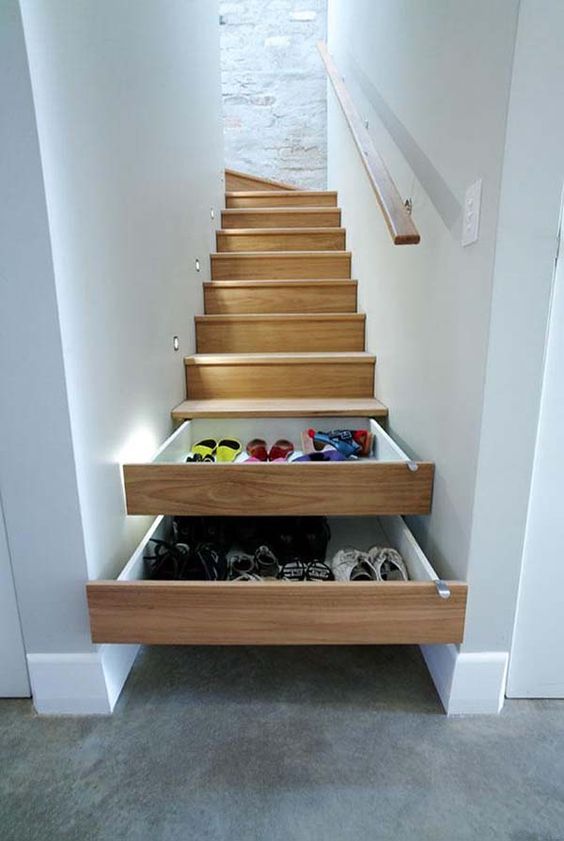
Underneath Steps
Don’t let that space underneath your stairs go to waste. Depending on the size available you may even be able to create a small office like the image in the bottom left.
Images via shelterness, artemendoza and homedit
Inside Cabinet Doors
The inside of cabinet doors are hidden which makes them a perfect place for storage. We especially love the idea for the spices below.
Images via iheartorganizing, Houzz, Instructables & thesepreciousdays
Up!
Look up and you will be amazed at all of the places you can find to store things. From the garage ceiling to the space above doors, it is important to use every inch without making a room feel cluttered.
Images via dgdoors, accentondesign, flor & marthastewart
Underneath Your Counters
If you have a smaller kitchen you know what it is like to open up a cabinet and have things fall onto you…it’s miserable. Clear up some space by taking advantage of the area underneath your counters.
Images via thedesignfile, kellysthoughtsonthings, stashvault & kitchenstuffplus
Breaking out the paintbrushes, fabric samples and hitting Home Goods and Pinterest for some good ideas? Here are some 8 steps you need to know before you get started!
Here’s how to prioritize your game plan for your room makeover.
If you have a DIY decorating project on your horizon but don’t know where to start, here’s a practical guide to help you navigate the process.
1. Commit to a Budget and Timeline
First, figure out your total project budget. If you skip this step, you’ll likely spend much more than you anticipated and make poor purchasing decisions you’ll later regret.
Also pick a date to complete your project by, even if you don’t have a looming reason to do so. Creating a complete-by date will fuel your project so it can take flight. Completing one stage of a project informs the next and the next. Otherwise, approaching your project piecemeal will delay completion, if you even complete it at all.
By Mitchell Parker
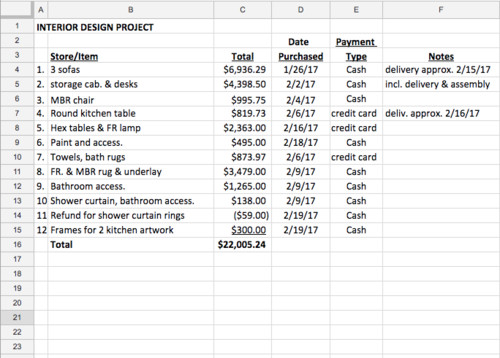
Set up a good system to keep track of your expenditures. I use an Excel spreadsheet, but even a spiral notebook can work for smaller projects. The key is to keep it updated.
Here’s an example of how I keep a running log of project expenses. While the main goal is tracking the total amount spent, I also indicate the store (which I left off here because stores will vary based on your location and preference), method of payment, general description and any notes, such as delivery fees — useful information that may come in handy later.
Keep all of your receipts together in one location. You can refer to them easily for warranty information and returns, if needed. I use a small zip pouch made for holding pens and pencils while I’m out shopping. After I return and enter them into the spreadsheet, I stapled each receipt to a piece of paper and store that neatly in a project folder.
Photo by Dina Holland Interiors
2. Evaluate Your Needs and Lifestyle
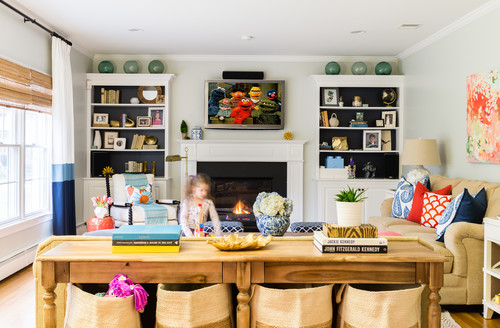
Separating wants and needs is a hard one. Prioritize your needs by first creating a list of the furniture and accessories you envision going into your space. List any work you want to do, like painting or wallpapering, too. Then rate each item 1 through 5, with 1 indicating an absolute must and 5 reflecting a nonnecessity. Reorder the items on the list with the necessities at the top and the more wishful items at the bottom. Involve other family members in this process. They may identify overlooked items.
Also, be honest about your family’s lifestyle requirements today instead of at some far-off idyllic future date. For example, if the kiddos use your family room as a playspace, include toy storage on your list. You may have some child safety needs too. Also note any special concerns about pets, such as shed fur or the potential for furniture to get clawed.
3. Decide What Stays and What Goes
Based on your list, identify any pieces of furniture or accessories that you absolutely want to keep in the space. Remove the pieces you don’t plan to reuse; consider donating them if they’re in good shape or selling them online or through a local consignment store.
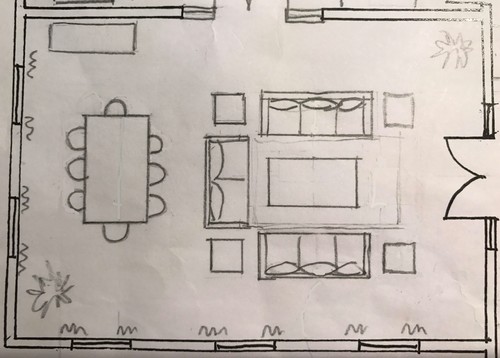
4. Draw a Preliminary Furniture Plan
If your project is small, this step may not be necessary. However, if you’re buying new furniture or just considering a new configuration, it’s extremely helpful to try out pieces in different locations to see what fits and what doesn’t. The last thing you want is to end up with a too-big piece of furniture. You’ll need a tape measure or laser measuring tool to measure your space and a scale ruler to draw it to scale. A simple sketch illustrating only the outside dimensions is all that’s necessary.
If you don’t have these items or don’t feel comfortable with drawing to scale, an alternative is to “draw” the outlines of furniture with masking tape on your floor or cut furniture-size shapes out of butcher paper to maneuver around on the floor.
Don’t forget about circulation space. Ideally, you’ll want to keep 18 inches between the edge of the sofa and the coffee table. Maintain 36 inches for comfortable general circulation. Since you may not have found specific furniture pieces yet and don’t have detailed furniture dimensions, you may need to revise the size of some furniture pieces as your project progresses. Nonetheless, this exercise is a good starting point.
Also measure your entrance door and the pathway to the room, including building elevators if you live in a high-rise. Bring these notes with you when shopping. If there are any delivery dimension concerns, you can address them then and there.
Photo by Colordrunk Designs
5. Concentrate on Big Items First
Focus first on the big-impact items, then concentrate on smaller accessories. Too often people get hung up on a small detail that can derail the flow of the bigger items. The idea is to work from large to small.
Find furniture. Unless you’re lucky to find the furniture you want in stock, most furniture takes eight to 12 weeks for fabrication. However, even in-stock furniture may not be delivered right away. If available, get a swatch of the upholstery or finish sample to help with other room selections.
Unless you’re comfortable working with a complex color palette, minimizing your scheme to two colors, as in the space here, will make shopping easier — and your space will look sharp and put-together.
Work the walls. Compared with any other design material, wall paint gives a room the most bang for your buck. I find it easiest to select a wall paint color or wallpaper after the furniture is selected. You have much more leeway with paint color choices than furniture upholstery. Plan to get your space prepped and painted prior to the furniture delivery.
Photo by Sroka Design, Inc.
Hit the ceiling. Color instead of conventional white on the ceiling is another cost-effective attention-grabber, especially if you have crown molding to separate it from the walls, like in this living room.
6. Move Toward the Mediums
After you’ve figured out your furniture layout and color scheme, focus on finding the midscale items that will pull your space together, such as an area rug. Your scaled drawing will also come in handy to see how prospective rugs will work with your furniture layout.
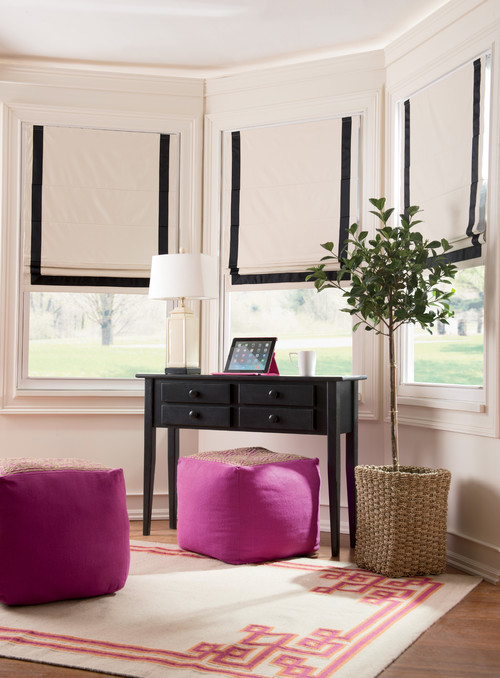
Photo by Country Curtains
Window treatments like Roman shades and drapery can offer lots of style compared to run-of-the-mill Venetian blinds. They can minimize less-than-perfect windows and help save on energy bills, too. New window treatments don’t have to cost an arm and a leg, either. Ribbon-trimmed cordless shades like the ones shown here here can be ordered online for $100 to $125.
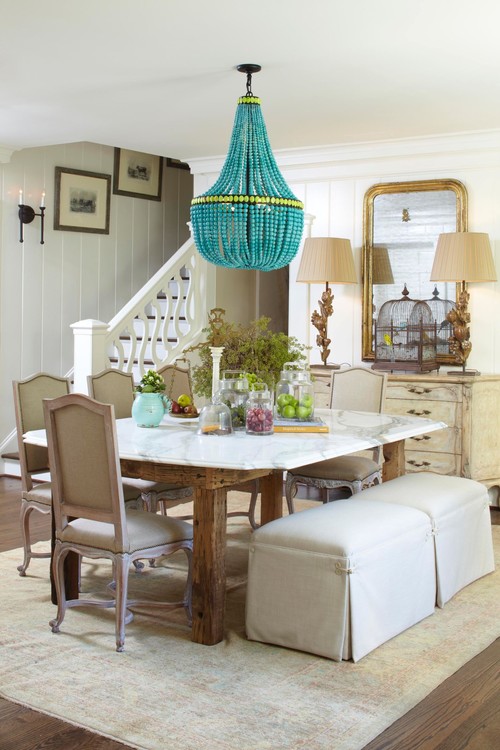
Photo by Meg Adams Interior Design
A feature light fixture, like the one in this dining room, can become a stunning design focus.
7. Save the Small Stuff for Last
Fill in your scheme with decorative accessories toward the end of your project. You’ll be able to see what areas need attention and have a better sense of scale, especially with artwork. With the furniture in place, you’ll also have easy access to key dimensions, like the clearance between shelves.
I also like to shop for table lamps, particularly lamps that will sit behind a sofa, after the furniture is delivered so I can see how all the heights work or don’t work together. Cord lengths and switch locations are also easier to evaluate when the furniture is in place.
Photo by Larette Design
8. Leave Room for the Unexpected
You may come across something surprising in your decorating journey that has special meaning or even adds a bit of humor, like these Hulk hand bedpost toppers. Don’t discount originality or quirkiness; it’s what makes your home truly yours.
With summer swiftly approaching, it could be time for sprucing up the ole backyard a bit! Here are some great DIY projects that are sure to add some summertime family fun and enjoyment!
Remember backyards? Those things we’ve been ignoring for the past four months? They’re back! They might not be looking as sharp as they did before winter, but we’ve got some rad DIY backyard projects to bring it back to life.
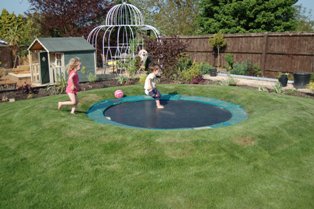
1. Ground-Level Trampoline Photo Credit: Little Green Fingers
Do you live in constant fear of your kids falling off the trampoline? Honestly—parenting fears aside—trampolines might be fun, but they’re pretty ugly structures. Well, with these sunken trampolines, you’ll never have to worry about either of those things. Just dig a hole, place your trampoline, and voila! (Ground-Level Trampoline Instructions)
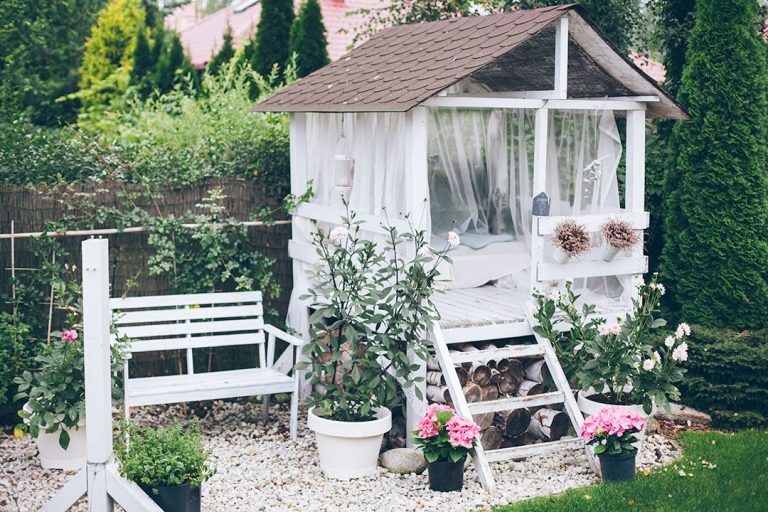
Marta Potoczek was looking for a treehouse alternative, something that looked nice but offered a little distance from the main house. Her solution was this adorable garden house, originally for her daughter to play in and now a perfect woman cave. Moral of the story: Your treehouse need not be on a tree.
3. Tin Can Lanterns
Photo Credit: GrowCreativeBlog.com
This project is both DIY and eco-friendly (because recycling is good). They are easy to make, and will elevate your backyard to the next level. It’s a win-win! (Tin Can Lantern Instructions)
I don’t have a backyard, but I’m considering making one of these anyways. Not only is Tic-Tac-Toe the best (especially when you’re super good at it), but it also scores high in decorative value. With little effort, you’ll come across as cool and tasteful. (Outdoor Tic-Tac-Toe Instructions/Supply List)
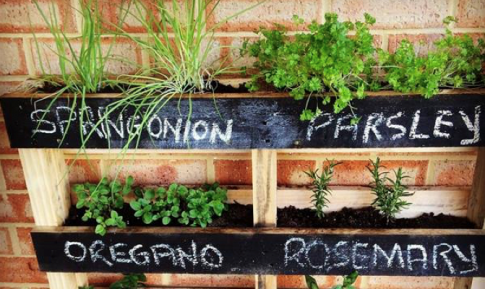
Since we’ve already installed a sunken trampoline, a play house/woman cave, and have a Tic-Tac-Toe board lying around, how about we go for space efficiency with this one? A vertical garden can cover any and all walls. It looks good, it smells nice, and you can eat it! That is the best of all the worlds, if you ask me. (Vertical Garden Instructions)
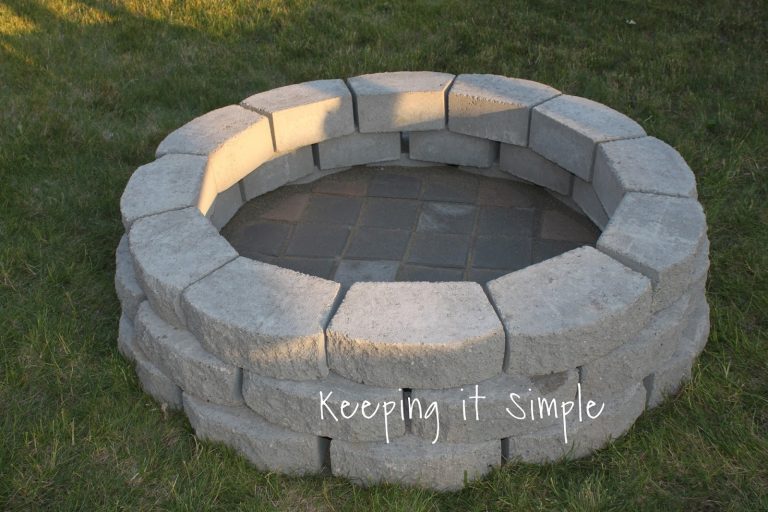
If you can’t roast s’mores in your backyard, is it even a backyard? I’m going to go with no. This DIY project costs only $60 to make, but look how fancy. This fire pit will make the perfect centerpiece for the intense fantasy backyard we just built together. (Also: s’mores.)
You’ve put your home on the market and have a nice offer to put into contract. Check out these ways to avoid the pitfalls of your own escrow from falling through! Sage advice!
Do you know what issues most often turn off buyers or kill a sale? Here are some of the big ones.
From a leaky or aging roof to a positive radon test in the basement, there’s probably a lot on your home sale to-do list. And while, yes, you want your house to look its best for prospective buyers, there are some less-than-obvious issues you should probably address before you list your home for sale. Whether you’re selling a home in San Angelo, TX or planning to list your here’s the lowdown on some common issues that can cause a home sale to fall through.
8 Home Issues To Be Aware Of Before Listing Your Home
Leaking or Old Roof. Roof issues are responsible for 39% of homeowner insurance claims, according to the National Roof Certification and Inspection Association. The typical lifespan of a roof is 20 to 25 years for shingles, and if your for-sale home’s roof is approaching the end of its lifespan, replacing it could get you to the closing table faster.
Damaged Gutters. Routine gutter maintenance could prevent thousands of dollars in damage to the foundation of a home Recognizing the importance of this chore may require a big storm to pass through, but you’ll be glad you did when your home’s siding, windows, doors and foundation avoid water damage.
Creaky Doors and windows. Expect buyers to open and close doors and windows. A jammed window or creaky door is a quick fix for you but could be a red flag to buyers who want a well-kept home. Replacing windows can bring a 50% to 80% return on your investment, but if they’re not a imperative fix, some sellers would be better served to bump this down a few notches on their must-do list.
Outdated Appliances. Most buyers know they can easily buy a new fridge, but if most of your appliances look as if they belong on That ’70s Show, buyers may wonder what else needs replacing. If you’re planning to take your refrigerator with you when you move, make sure that’s mentioned in your sellers’ disclosure.
Old Heating and Air Conditioning System . A well-maintained HVAC system can last up to 25 years, but an aged one could be a point of concern for buyers — and costly to repair or replace on the fly for a seller who doesn’t want to lose a sale.
Termites. Termite infestation causes more than $5 billion in damage to U.S. homes each year, and sellers are typically required to disclose it. Adding a termite warranty from a remediation company can give your buyer peace of mind. But be warned: termites in your home can often be a deal breaker.
Cracks in Foundation. Cracks in walls or a foundation are often a sign of larger problems. Be prepared to fix structural problemsbefore your house hits the market, or have a plan in place for repairs if a buyer balks after an inspection.
Radon. Radon is a naturally occurring, carcinogenic, radioactive gas that’s formed from the breakdown of uranium. In the home, radon is typically found in the basement or in lower levels. To put in perspective just how dangerous radon can be, consider this: Smoking is the number one cause of lung cancer — radon is No. 2.
Bonus: High listing price. Pricing your home too high could ultimately cause your house to miss out on the right buyer, stay on the market longer, and bring in a lower price than the market supports.
You’ve decided to go for it. You know mortgage rates are enticingly low. Buying a home can be thrilling and nerve-wracking at the same time, especially for first-time homebuyers. It’s difficult to know exactly what to expect.
Take these five steps to make the process go more smoothly.
Check Your Credit
Your credit score is among the most important factors when it comes to qualifying for a mortgage.
“In addition, the standards are higher in terms of what score you need and how it affects the cost of the loan,” says Mike Winesburg, formerly a mortgage planner in Wheeling, W. Va.
Scour your credit reports for mistakes, unpaid accounts or collection accounts.
Just because you pay everything on time every month doesn’t mean your credit is stellar. The amount of credit you’re using relative to your available credit limit, or your credit utilization ratio, can sink a credit score.
The lower the utilization rate, the higher your score will be. Ideally, first-time homebuyers would have a lot of credit available, with less than a third of it used.
Repairing damaged credit takes time. If you think your credit may need work, begin the repair process at least six months before shopping for a home.
Evaluate Assets and Liabilities
A first-time homebuyer should have a good idea of money they owe and money they have coming in.
“If I were a first-time homebuyer and I wanted to do everything right, I would probably try to track my spending for a couple of months to see where my money was going,” Winesburg says.
Additionally, buyers should have an idea of how lenders will view their income, and that requires becoming familiar with the basics of mortgage lending.
For instance, some professionals, such as the self-employed or straight-commission salesperson, may have a more difficult time getting a loan than others.
The self-employed or independent contractor will need a solid two years’ earnings history to show, according to Winesburg.
Organize Documents
When applying for mortgages, you must document income and taxes.
Typically, mortgage lenders will request two recent pay stubs, the previous two years’ W-2s, tax returns and the past two months of bank statements—every page, even the blank ones.
“Why it has to be every single last page, I don’t know. But that is what they want to see. I think they look for nonsufficient funds or odd money in or out,” says Floyd Walters, owner of a mortgage company in La Canada Flintridge, Calif.
Qualify Yourself
Ideally, you already know how much you can afford to spend before the mortgage lender tells you how much you qualify for.
By calculating debt-to-income ratio and factoring in a down payment, you will have a good idea of what you can afford, both upfront and monthly.
Though there’s not a fixed debt-to-income ratio that lenders require, the standard dictates that no more than 28 percent of your gross monthly income be devoted to housing costs. This percentage is called the front-end ratio.
The back-end ratio shows what portion of income covers all monthly debt obligations. Lenders prefer the back-end ratio to be 36 percent or less, but some borrowers get approved with back-end ratios of 45 percent or higher.
Figure Out Your Down Payment
It takes effort to scrape together the down payment.
There are programs that can assist buyers with qualifying incomes and situations.
“I’ve helped arrange assistance loans for $10,000, which are interest- and payment-free, and forgivable after five years. Although considered a loan, they’re more like grants. Other programs can provide up to $40,000 interest-free,” Winesburg says.
Finally, speak with mortgage lenders when you’re starting the process. Check with friends, co-workers and neighbors to find out which lenders they enjoyed working with and ask them questions about the process and what other steps first-time homebuyers should take.
Sometimes when planning to sell a house, in the name of renovating interior living spaces, updating bathrooms, replacing appliances and adding decorative touches throughout the bedrooms, homeowners leave outdoor curb appeal as a last priority. While of course the inside of a home is important, sellers make a big mistake when they neglect the exterior. Why is a home’s exterior so important? Consider this: Curb appeal is often a potential buyer’s first impression of a home, the very thing that helps him/her decide whether or not to come inside. Whether they’re shopping online or by cruising through neighborhoods, the outside of your property is the first thing they’ll notice. If you’re selling your home or about to, how can you quickly and effectively tackle the outdoor appeal? Here are some key tips for boosting the curb appeal in a way that means quick turnaround and increased home value:
1. Start with the Front Door. Believe it or not, your home’s front door can be one of its most important assets. A new steel entry door consistently ranks as one of the most rewarding projects in home repairs, yielding an increase in home value that’s greater than the costs to install one. Likewise, to make the door especially captivating, consider painting it a bold, pleasing color that will grab attention and add charm. When buyers see a new door that looks attractive, they see another asset that makes your home the one to buy.
2. Make Any Necessary Repairs. Is the driveway cracked or the front doorbell busted? Now is the time to call a repair company or get out your own toolbox to make repairs. Buyers want turnkey, move-in-properties, and that means they want properties with repairs already done. Do the work now to get your home in ship-shape condition.
3. Keep Up with Landscaping. From mowing the lawn to pulling weeds, make sure you’re keeping up with your outdoor landscaping so that your home looks presentable and well cared for at all times. Overgrown bushes and dying plants are a surefire signal to potential buyers that you’re not caring for your home and leaving more maintenance for them to handle.
4. Add Lighting. While most buyers will come visit your home during the daytime, it’s not at all unusual for the most interested ones to also drive by at night to see what nighttime curb appeal is like. Landscape lighting can make all the difference in terms of how a home looks, so make an investment in attractive lighting options that illuminate and add interest to your property. “Solar landscaping lights are a great addition to any yard because they don’t require complicated and expensive wiring,” says Bob Vila. “Remember, though, you get what you pay for—cheap lights won’t last as long and simply won’t look as good.”
5. Touch Up Paint. A fresh coat of paint is just as powerful outside as it is inside, so to update your home’s look, repaint the exterior or at least touch up problem areas. Another idea is to paint the trim a new color that creates either a nice complement or contrast to your home’s overall look.
6. Make Over the Mailbox. You might not think a mailbox matters much, but it’s yet another one of those little details that can add up together to make a strong impression on a buyer.
7. Add Outdoor Furniture. From rocking chairs on the front porch to an outdoor patio set on the back deck, outdoor furniture creates outdoor living spaces that expand your home’s appeal. Look for attractive, durable pieces that will endure weather damage and look good for years to come — whether or not you include these pieces with the home sale, setting them up is a great way to stage your home for greater resale value.
The bottom line when it comes to curb appeal is that a little investment today can add up to big rewards tomorrow. Take the time to update, clean, repair and add value to your property’s exterior now and you will make it more attractive to buyers, not to mention more beautiful to come home to. Use the tips above to get started now.

 Facebook
 X
X
 Pinterest
 Copy Link


")


