
 Facebook
 X
X
 Pinterest
 Copy Link
13 Spook-Free Safety Tips to Keep Your Kids & Pets Safe this Halloween

Halloween is full of tricks, treats, ghoulish games, frightening frocks, cute costumes, glowing Jack O’ Lanterns, pumpkin packed parties, and of course spookiness! Unfortunately, all of the frightening fun has dangers lurking behind them. Whether you are a parent of two-legged loved ones or four-legged furry loved ones, it is critical to be aware of the true spookiness that is hiding behind all the ghostly fun. So I called upon two experts that have simple tips for a safe, scare-free Halloween to keep your children and pets safe.
First up are the experts in keeping your little pumpkins safe. They may have “boo” in their name, but there is nothing scary about Boo Boo Busters. As a leading professional childproofing service they know a thing or two about keeping your kids safe. Following, are Halloween safety tips for your pets from Dr. Anthony George, doctor of veterinary medicine and certified veterinary acupuncturist. He has been taking care of all kinds of pets for over 20 years and his tips are sure to keep you furry friends from howling at the moon.
Kid Halloween Safety Tips
1) Choking Hazards
As a good rule of thumb, a choking hazard could be considered as anything that can pass through a cardboard toilet paper roll holder unobstructed. So, taking that into consideration, look closely at all the items that you are putting out to display. From bats and ghosts to pumpkins you roast. Hazards lurk everywhere!
2) Flashlights
Child safe flashlights should have a child safe battery door on them that is secured by a screw to prevent removal of the battery, thus preventing a choking hazard. Use flashlights or electric candles to light up your pumpkin too, flames and kids don’t mix.
3) Halloween Lights
Look for Halloween light strings that have tamper resistant bulbs that can’t be removed easily and remember cords pose a strangulation hazard. All cords should be kept short and tight. Consider taking the excess that you might leave hanging and bind it up with a zip tie.
4) Pumpkin Carving
Remember to only use child safe cutting tools while carving pumpkins, even as an adult. Kids learn by watching you, so if you use real knives you must know that they will want to do the same. As soon as you turn around to grab something you forgot… little hands wander.
5) Costumes
As a kid it’s mandatory to dress up. Our job is to make sure dress up is safe. Costumes should never obstruct movement, never cause visual impairment and never pose a trip hazard. Stick to material that is form fitting. If it’s loose, baggy or long it could create a trip hazard. Avoid masks that can impair vision. Face painting is the safest mask.
6) Glow at Night
Make sure your child’s costume is visible or is is equipped with something that makes them visible. Glow sticks are great and kids love them, but remember, never hang anything around their little necks unless you are using a child safe breakaway lanyard. A couple glow sticks secured to shoes can be seen from a long way away. Flashlights are a good addition as well.
7) Halloween Treats
Remember to make sure you go through and check all the candy that you are keeping. The candy should be in name brand with sealed packages. For candy bars, be sure you cut them into small pieces that are easy to chew. This also helps to ensure it hasn’t been tampered with. Unfortunately, ghouls are sometimes disguised as regular people.
Pet Halloween Safety Tips
1) Pet Costumes
Yes, your pet looks absolutely adorable in that costume! Keep in mind, your fuzzy family member might not be as thrilled with the outfit. Feel free to get that amazing photo, but respect the fact that your pet may want to get out of those duds as soon as possible. Make sure the outfit is comfortable, and pay special attention to straps that may impinge upon the neck and areas where the extremities meet the body. Never leave a pet unaccompanied in a costume to avoid any “wardrobe malfunctions!”
2) NO chocolate
Most people know chocolate is toxic to their pets. Chocolate contains methyl xanthine, which can cause a variety of symptoms ranging from stomach upset to tremors, hyperthermia and seizures. At high doses, chocolate can lead to collapse and even death. Generally speaking, the darker and more concentrated the chocolate, the more dangerous it can be. There are helpful charts available (for instance, petMD.com) that can tell you what doses are dangerous for your pooch. If in doubt, always best to contact your veterinarian to see if treatment is indicated.
3) Sugar Free Danger
Xylitol, an artificial sweetener found commonly in sugar-free gum as well as other products, can be extremely toxic to dogs. When ingested, it can cause a significant release of insulin, which can lead to extremely low blood sugars. At high doses, it can also lead to liver failure. If your pup has ingested this substance, always best to contact your veterinarian as your pet may likely need treatment and supportive care.
4) Healthy Treat Dangers
If you’re offering healthy alternatives this Halloween, keep in mind that grapes and raisins can be extremely toxic to dogs. Some pets are more sensitive than others. In some animals, the toxin can lead to stomach upset initially, followed by kidney failure within 24 hours. It is always prudent to contact your veterinarian immediately if you suspect your pet has ingested these substances.
5) Burning Jack O’ Lanterns
Flames and Fur don’t mix. Just as you do for kids safety, consider replacing that Jack-O-Lantern candle with a flickering LED light.
6) Trick-or-Treating
During trick-or-treating it is best to keep your pet inside, safe from all of the scary costumes, noises and lights that might frighten your pooch or feline. You might even want to consider locking your sweet little pal in a room so they don’t get spooked and run out the door when your trick or treaters arrive.
Laura McHolm is an organizational, moving & storage expert and co-founder of NorthStar Moving Company. NorthStar Moving Company is an award winning, “A+” rated company, which specializes in providing eco-luxury moving and storage services. www.northstarmoving.com
Source: CB Blue Matter Blog
7 Ways to Extend Your Patio Season Year-Round

Outdoor living can be constrained due to seasonality, but it doesn’t have to be– especially if it means you’ll utilize your patio area longer! As the temperatures get cooler and the days get shorter, it becomes harder to create a space outdoors that is comfortable and inviting. Here are some tips on how to continue to enjoy your outdoor living space indefinitely.
1. Outdoor Heater
Perhaps the more obvious of cool weather accommodations, adding heat to your outdoor space will allow you and your guests to relax in fresh air with warmth. Whatever your budget may be, there’s a heater that will work for your space. Ranging from less than $100 to well over $1,000, they come in many varieties and power sources such as a table-top gas heater or a standing solar-powered heater.
Standing heaters are great for heating up a patio space, typically running off of propane or natural gas. Using natural gas is the more efficient of the two and you’ll never run out of fuel. You also have the option of an electric heater, that has a lower upfront cost and costs less to run than a gas-powered heater. If you’re looking for a cost effective and eco-friendly option, a solar-powered heater is just right for you–providing all the warmth from the sun’s energy.
2. Fire Pit
Creating a space with warmth is key, but adding that element with an extra emphasis on aesthetic appeal is a bonus. You can easily create your own using bricks or large rocks to create the pit or purchase one installed by professionals, depending on your budget. Similar to outdoors heaters, there are a variety of fuel source options. If open wood burning isn’t allowed, you can install a fire pit that is fueled by gas. One advantage is that you can fire up your pit in an instant.
Not only can fire pits add warmth and depth to your patio’s hardscaping, but it also creates a collaborative social atmosphere– there’s nothing more nostalgic than roasting marshmellows or telling scary stories around the flickering blaze of a real fire.
3. Coverage
There’s nothing that really outlines a space like adding coverage by way of roof or walls, such as a pergola. As LawnStarter says, “pergolas give that “room” feeling to an open space.” Adding in a pergola or retractable awning can definitely help curate a more suitable ambiance in the winter months. If you already have a covered patio, you can hang outdoor curtains to contain heat and to help keep out wind or rain. Hanging up curtains will also add a whimsical, potentially romantic look to your patio space, softening the corners and rigidness of hardscaping. With the selection of colors, patterns and styles, you won’t have to sacrifice your fashion sense to keep the patio warm!
4. Cozy Fabrics
Creating an extra comfortable outdoor space means adding textiles that will repel warmth from their materials. These textiles include getting cozy outdoor couches, warm blankets, and throw pillows—all items that you or guests can curl up on and into. A couch with cushy cushions and throw pillows sure beats your run-of-the-mill patio furniture. Have a stack of low-cost, but decorative, blankets on hand when additional warmth is needed.
5. Hot Tub or Spa
Relaxing in a steamy hot tub or in-ground spa feels great all year long, but in cold weather, the temperature difference can make it feel even better. Although, using it during the cool months may require a little preparation before stepping out into cold weather in a swimsuit. Keep snow and ice off the path to the tub and the top of your tub or the spa cover to make it accessible whenever you want to use it–plus, it will help keep heating costs down.
To experience ultimate luxury post jacuzzi bathing, keep a towel warmer next to the spa. It’s actually more practical than it sounds—a warm towel will keep your body temperature from dropping too quickly when you step from the tub.
6. Hot Beverages
Hot chocolate will always be the quintessential winter warm-up, why not be a bit more exciting? Take the time to create a personalized hot beverage that you, your family or guests can enjoy to help withstand the cool weather.
- Warm Mulled Cider – Simmer apple cider with mulling spices, orange zest, and ginger. It smells as good as it tastes.
- Mulled Wine With Cranberries – Simmer cranberry juice cocktail, cinnamon sticks and star anise for 15 minutes. Stir in the wine and cranberries and bring back to a simmer before serving.
- Warm Hazelnut Toddy – Stir hot water into Frangelico and spoon that dollop of whipped cream onto the top.
7. Winter Grilling
Grilled meats and kabobs don’t only have to be a summer food item, enjoy summertime barbeque inspired flavors in the winter months by utilizing your grill. For that matter, grilling can be done year-round, all you have to do is keep a pathway cleared if you’re in a location that experiences snowfall. You might want to move the grill closer to the house for the winter to save yourself some steps when it’s really bitter out.
If and when the temperatures are below freezing, it can take twice as long to preheat the grill and cook your food. Keep the lid closed as much as possible when cooking, the more often you open it the longer it will take due to the release of heat.
When preparing your home for winter, whether it be indoor or outdoor maintenance – save the storage time and carry summertime outdoor living over into the cooler months using these tips!
Source: CB Blue Matter
5 Things to Do Now if You’re Selling Your Home in 2018

If you plan on selling your home next year and want to get the highest price possible, you should put it on the market at the beginning of the spring selling season. There tends to be less competition at that time, so homes listed in early spring will typically sell faster and closer to their list price than those listed later in the year.
You’re probably thinking that spring is many months away, and you have plenty of time to get your house ready to sell. But spring comes early in real estate and home sales start heating up in February, right after the Super Bowl.
So, really, you have only about three and a half months to get ready.
Most people drastically underestimate the amount of work involved in preparing a home for sale. Don’t be one of them.
Home Sale Prep List
Here’s a list of things you can do NOW, to make sure your home puts its best foot forward when the spring market rolls around.
- If the leaves are still on the trees, take photos of the exterior of your house now. Your house will look so much better than it will in January or February when the photographer shows up to take listing photos. One caveat: make sure there are no Halloween or other seasonal decorations in your photos.
- Make a schedule. Set February 1 as your go-to-market date and work backwards from there, listing all of the things that will need to be done to get your home ready for sale. Then put them on your calendar and start knocking them out.
- Have a pre-listing inspection done on your house. This is the same kind of inspection that your buyers will have done once their offer is accepted. It will cost you between $400 and $600 but it is well worth it. It will identify everything that needs fixing, and then you can take the time to get multiple bids and schedule the work.You will be shocked at how long the inspector’s list of needed repairs is, but it’s better to find out about them in advance and get them taken care of than to have your buyers hold your home sale hostage over the inspection credits they want.
- Have your real estate agent or home stager walk through the house with you and point out low cost updates or changes that you can make to maximize your home’s appeal. This could include rearranging or editing the furniture, applying a fresh coat of paint, removing wall-to-wall carpeting, or updating cabinet hardware or light fixtures.
- Get rid of the clutter! Undoubtedly you will have lots of stuff that needs to be packed away, donated, or disposed of, and dealing with it can be very time-consuming. Plan to tackle one room (and its closet) each weekend. Sort everything into four piles: give away, throw away, sell, and keep. Be ruthless. If you have trouble letting go of things or you find it all too overwhelming, line up an organizer to help you.
If you have been keeping china, glassware, or furniture to pass on to your adult children, ask them if they even want it. Chances are they don’t, so now is the time to sell it or donate it.
Selling your home is a big undertaking. Doing these five things now will get you well on your way to a successful home sale and help you maintain your sanity in the process.
6 New Countertop Ideas That Aren’t Granite
Not a fan of granite countertops? Here are 6 beautiful alternatives.
Guest Post By Andrea Davis
Granite’s durability and looks make it a popular investment for many homeowners. But there are other options aside from granite. Keep reading to learn more about six alternatives to granite countertops.
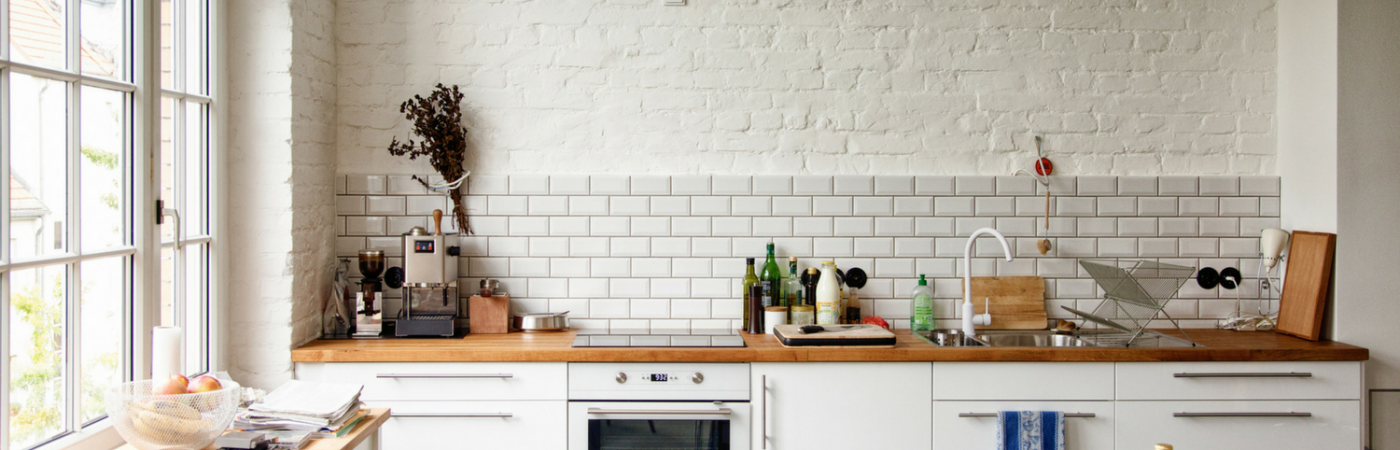
Butcher Block

Butcher block countertops provide visual warmth to modern spaces, particularly those with white cabinetry. These countertops are also very cost-effective, especially compared to natural stone.
You’ll need to make oiling a regular part of your maintenance routine if you do install butcher block countertops. You’ll also need to use trivets or pot holders under hot pots and pans to avoid burning your counters.
Soapstone
Soapstone is a natural stone that’s easier to maintain than marble, but still requires more work than sealed granite. Soapstone is particularly vulnerable to liquids and acidic spills. Too much heat can also damage its appearance. Despite regular maintenance, soapstone is a beautiful alternative to granite.
Marble

Marble is a natural stone that is considerably softer and more porous than most other stone options. If you don’t have a busy kitchen, marble can be a perfect material. For busy home chefs and homes with kids, marble may not be a good choice.
Ceramic Tile
Ceramic tile is a fun and incredibly durable countertop material. Unlike other countertops, ceramic tile isn’t prone to damage from liquids or heat. Ceramic tiles can stain and chip over time, but individual tiles are easy to replace. Tile is also extremely inexpensive, making it an ideal choice for budget-conscious homeowners.
Stainless Steel

Modern kitchen with stainless steel counters
Stainless steel’s sleek looks and durability make it the perfect material for modern or cooking-focused kitchens. You can wipe down stainless with a cloth, though special cleaner should be used from time to time as well. Stainless steel countertops can be expensive, but they’re perfect for design- or cooking-obsessed homeowners.
Quartz
Quartz, also called Caesarstone or Silestone, is a man-made stone that’s cost-effective and attractive in many spaces. Its uniform finish also appeals to many homeowners who feel that natural stone is too busy in terms of patterns. Quartz is easy to maintain and incredibly durable, making it the ideal choice for homeowners who use their kitchens regularly.
Andrea Davis is the editor at HomeAdvisor, which connects homeowners with home improvement professionals in their area for free. Connect with Andrea on Google+
Source: CB Blue Matter Blog
Fastest Remodels that Make the Most Impact

Here are a few big-picture renovations you can make in surprisingly little time, whether you do it yourself or hire help.
Guest Post by Lauren White
Remodeling projects can seem like a distant fantasy when days off are usually consumed by errands and chores. What can you accomplish with the slim hours you have to spare? Here are a few big-picture renovations you can make in surprisingly little time, whether you do it yourself or hire help.
Instant Patio
Time: 4-6 hours
Budget: $3,000
Outdoor spaces are deceptively quick and affordable to make. If you have a half-day to spare, you can turn a patch of yard into a gorgeous patio before sundown. The processwill involve digging and leveling the area you need, preparing a base for proper drainage and laying your stones. Once the project is complete, you will have a relaxing outdoor living space to enjoy.
Keep your time down by choosing pavers or bricks that don’t need to be cut. Interlocking patio pavers come in many variations and they eliminate the dilemma of fitting awkward pieces together.
One-Day Backsplash
Time: 2-8 hours
Budget: $30-$600
It only takes a few hours to install a new kitchen backsplash, but it could take less time depending on the material you choose. If you paint the backsplash, it will take mere hours of preparation and application. Painting costs as little as $30. If you use peel-and-stick ceramic tiles or rolls of faux metal, it will take roughly the same amount of time.
If you have more than a few hours, make a stand-out backsplash using an adhesive tile mat and individual tiles. The adhesive mat will ensure that heavy tile materials don’t fall off, and requires less curing time than traditional, wet adhesive. Explore your tile options in HomeAdvisor’s resource center.
Weekend Window Replacement
Time: 2-3 days
Budget: $5,000
High-efficiency windows are a strong investment, whether you are planning to sell or stay. These windows save homeowners anywhere from 10% to 30% in home energy costs. Efficiency is a top priority for today’s buyers, and this project has over 70% return on investment.
Removing old windows, installing heavy panes and finishing up with framing is a complex process. Professionals can do it in a matter of days, where it might take you much longer. Hiring a pro is worth it, because this renovation will put money back in your pocket when it is done right.
72-Hour Countertops
Time: 1-3 days
Budget: $3,000
In most cases, you’ll want to hire a professional to replace your countertops. Installation and cutting needs to be very precise, and most counter slabs weigh up to and over 400 lbs! With the right amount of muscle, you can finish this job in 1-3 days. Some materials and pre-fabricated pieces can even be installed in 3-7 hours.
Upgrading your countertops can do wonders to improve your kitchen and raise your home value. Granite, for example, can handle a lot of wear-and-tear. If your kitchen is like the Union Station of your house, this low-maintenance, high-resistance material is perfect for your counters.
For the adventurous weekend warrior, check out these countertops you can make yourself.
Two-Week Hardwood Floor Refinishing
Time: 2-14 days
Budget: $1,600
Flooring has a big impact on the appearance and value of your home. If your hardwood floors are in bad shape, you’ve probably already thought of refinishing them. Whether you hire a professional or do it yourself, you’re going to need at least two days.In fact, you may need as many as fourteen.
You will need one day for sanding and one day per layer of polyurethane finish. Each layer will need 24 hours to dry. Two to three layers of finish are recommended. If you’re going to stain the wood, add another day for that between sanding and finishing.
This project may take longer, but the results are worth it. Refinishing seals the wood against rot and moisture, and adds appeal for homebuyers. They will be more impressed by a glossy shine than rough, exposed wood. If you’re not sure it’s the right time for your floors, check out these answers to common questions to help you decide.
Investing in your property can mean a faster sale, or will at least give you a few extra luxuries to enjoy. See what you can accomplish with an afternoon or your next three-day weekend, and format your budget using these helpful cost guides.
Lauren White is a freelance writer who enjoys reading, hiking and traveling. She can usually be found on an outdoor adventure with her boyfriend and little sister on the weekends.
References
- www.bhg.com/home-improvement/remodeling/budget-remodels/weekend-home-projects/
- www.houselogic.com/remodel/remodeling-tips-advice/house-remodeling-how-long-does-it-take/
- www.fix.com/blog/tile-kitchen-backsplash-in-one-day/
- www.thespruce.com/easiest-and-cheapest-backsplashes-1821174
- www.popularmechanics.com/home/outdoor-projects/a22394/how-to-build-a-bluestone-patio/
- www.thespruce.com/process-of-installing-replacement-windows-1822901
- www.replacementwindowsfordummies.com/articles/energy-efficient-windows-advantages-and-disadvantages
- www.remodeling.hw.net/cost-vs-value/2017/
- www.valentiflooring.com/blog/hardwood-floor-refinishing-project-how-long-does-it-take
- www.thespruce.com/cost-to-refinish-hardwood-floors-1314853
- www.homeadvisor.com/r/refinishing-hardwood-floors/
- www.rempros.com/estimating-time/kitchen-countertop-replacement.html
- www.diynetwork.com/how-to/rooms-and-spaces/kitchen/how-to-install-a-granite-kitchen-countertop
- www.homeadvisor.com/cost/kitchens/tile-backsplash-install/
- www.homeadvisor.com/cost/outdoor-living/install-a-patio-or-pathway/
- www.homeadvisor.com/cost/doors-and-windows/install-windows/
- www.homeadvisor.com/cost/flooring/refinish-wood-flooring/
- www.homeadvisor.com/cost/cabinets-and-countertops/install-countertops/
Moved In? Now What? – A Post Move Check List

So, it’s been a month since you moved into your new home. The empty boxes are stacked in corners like miniature Leaning Towers of Pisas and you are missing some key pieces of mail. The moving checklist guided you day by day, but now that the moving storm has subsided, how do you complete the settling in process?
Ready for the best news ever!? Unlike your two-month long moving-in check list, there is a short list of tasks that will not only ensure you don’t miss the next People magazine, but will also help Mother Earth and others in need. Too good to be true? You can thank me later. Follow these five steps and you will forget you ever moved.
1. Boxes! Boxes!
To truly feel moved in, the first task is to get rid of all the empty moving boxes. So many of us are guilty of just leaving the empty boxes in the garage or attic to gather dust. Instead be green and save green by asking your moving company if they have a box return program. For instance, NorthStar Moving Company will give you back 25% of the original cost of their boxes if you return them.
Other ways to reuse boxes is to flatten them and put them out on recycling day or use them for storage of keepsakes, holiday décor and other items you only need on occasion. The most creative and inspirational way to reuse moving boxes is to join the Global Cardboard Challenge to celebrate child creativity!
2. Mail Yourself
Does your mailbox seem light? While you may be thankful to not be getting all of your bills you certainly don’t want to miss a due date. Check in with the post office to make sure they have your mail forwarding service set up correctly. Then send a friendly postcard to yourself, address it to you at your old address and wait and see if it gets forwarded to your new address.
3. Update Your Driver’s License & Consider Becoming a Donor
No one enjoys visiting the DMV and the good news is you don’t have to! You can change your address online. You must report your new address within 30 days of your move to the Department of Transportation Registry of Motor Vehicles.
This is also an opportunity to revisit being an organ donor. You can register to become an organ donor on your state’s DMV website as well. The number of donors willing to make organ donations are not growing as quickly as the number of people who need them. 20 people in the United States die each day while waiting for organ and tissue transplants. The number of patients in the U.S. waiting for transplants is currently over 116,000 people. Even more are waiting for much-needed tissue transplants.
While you are on the subject, consider a program to donate your whole body. The organ donor symbol on the back of a driver’s license is different from body donation, they are completely separate programs with entirely different consenting processes. Only 1% of organs donors specify to donate their whole body. There is a great need. You could potentially make a difference in the lives of many people.
4. Survey Your Stuff
After a month of living in your new home you now know what furniture, kitchen tools, artwork and even clothes fit into your new place. Rather than stumbling over the stuff that you don’t need, give it to someone that does need it and will give it a good home.
Create two labels: “donate” and “give to friends & family.” Donate clothing and household items that don’t have sentimental value to your local favorite charity such as Goodwill or Habitat for Humanity’s ReStore for someone else to enjoy.
For the items that are sentimental, keep them in the family by giving them to loved ones. But, don’t just hand it to them, throw a party, a reverse housewarming party! Instead of having your friends bring a housewarming gift, ask them to pick one (or more) of your items and take it home with them. This is a great way to reunite with old friends and meet new friends after your move. Your unneeded things will be in a home where you can visit them often.
5. Vote!
There is no “debate” that every American needs to cast their ballot, so it is vital to register to vote. Your voter registration does not move with you. If you move within your existing county, you must complete a new voter registration form to update your new address. If you move to a different county or state, you must re-register with your new county and/or state.
Visit the EAC website to download and print the National Mail Voter Registration Form. Once you have completed the registration form, mail it to the address listed under your state in the “State Instructions.”
See, in just five steps you are now clear of moving remnants and clutter, sipping coffee with your New York Times and are the shining example of being a responsible citizen. Enjoy your new life!
Moving with a Baby: The Complete Guide for Parents

We have organized the guide into three sections: Before the Move, Moving In and Baby Proofing.
By NorthStar Moving Co-Founder Laura McHolm
On the move with a little mover in tow? Every parent knows having a baby at home is an adventure. Take that everyday baby voyage and mix in moving your home, now your adventure is more like a hike up Mt. Everest! Here’s the good news, if you plan ahead and take simple steps that trek will become a walk in the park (well maybe not, but a manageable stroll up hill.) Before you pack up and gear up for the baby + move exploration, check out this complete guide for parents moving with a baby to ease the stress and enjoy the transition.
We have organized the guide into three sections: Before the Move, Moving In and Baby Proofing. You can think of it like pregnancy, nesting and then labor!
Before the Move
Stick to Routine: Baby’s love and need their routine. Don’t let the moving to-do list and packing get in the way of your regular daily routine. Instead of pulling an all-nighter to pack, try to pack over a long period of time. Use naptime and baby’s early bedtime to get packing done in bits. Baby & parents need their sleep!
Create a Moving Calendar: To keep your head from spinning, it is best to plan your move 8 weeks out. Here is a Moving Day Count Down Calendar to copy, print and hang it up where you can easily refer to it while feeding the little one. This way you can take it day-by-day and get the satisfaction of checking off moving to-dos!
Use Childcare: During the actual moving day, when boxes and furniture are being moved, little ones should be somewhere else. Ask a trusted babysitter, friend or family member to take your bundle of joy for the day. It is also ideal to use childcare for days leading up to your move so that you can get more done on your moving calendar. There are great nanny and babysitting services that help you find qualified childcare.
Talk To Your Current Pediatrician: Your pediatrician is a great resource. If you are traveling long distance, ask them for tips for keeping your baby happy on a plane or long car ride. If you need to find a new pediatrician, make sure you get a copy of all of your child’s medical records to give to your new pediatrician. Get copies of all your child’s prescriptions and have them called into a pharmacy near your new home. Ask your current pediatrician for recommendations on how to find a new pediatrician close to your new home. When finding a new doc, it is recommended to set up a meet and greet appointment as soon as you move.
Pack a Baby Bag: You know the daily drill; pack half the nursery to carry with you wherever you go. Well, this time the baby bag (box or small suitcase) should include all of your needs for three days (if you’re moving a long distance, you may want at least one month of supplies with you rather than on the moving truck). Once you move into your new place, you may not have easy access to diapers, baby food, pacifiers and the important squeaky toy. So be sure to pack everything you need for three days (or more) in one place that you keep by your side for easy access on moving day and the first few days after.
Moving In
Unpack the Nursery First: When moving in you should set up the nursery first. This will allow you to change your baby and easily put them to sleep on the first night in your new home. Arrange the nursery as closely as possible to your previous nursery. The familiarity will help you and your baby in the transition.
Setting Up The Crib: All new cribs on the market today meet the safety standards of the Consumer Product Safety Commission (CPSC) and the Juvenile Products Manufacturers Association (JPMA). When setting up a new crib or reassembling your crib look for the following suffocation and strangulation hazards:
- Sharp or jagged edges
- Missing, broken or loose parts
- Loose hardware
- Cut out designs in the headboard or footboard
- Crib slats more than 2 3/8 inches apart (width of a soda can)
- Corner post extension over 1/16 of an inch high
- Gaps larger than 2 fingers width between the sides of the crib and the mattress
- Drop side latches that could be easily released by your baby
Use Safe Bedding: Soft bedding can suffocate a baby, blocking the baby’s airway during sleep. Babies can suffocate when their faces become wedged against or buried in a mattress, pillow or other soft object. Use a safe crib with a firm, tight-fitting mattress covered with a crib sheet and nothing else in it. To keep your baby warm, use a sleep sack (wearable blanket).
Baby Proofing the New Home
I turned to the uber knowledgeable folks at Safe Kids Worldwide for a Baby Safety Checklist:
Crawl Through Your Home: The first step to a safe home, say the experts at Safe Kids, is to look at the world through your baby’s eyes. See what looks interesting and what can be reached. And I mean it literally – get down on your hands and knees in your new home and check for small things your baby can choke on. You will be amazed at what you discover! If you question if an item is a choking hazard, take an empty toilet paper roll and put the small object in it. If it fits completely into the roll, don’t let children under 3 play with it.
Test Alarms: Have working smoke alarms and carbon monoxide detectors inside all bedrooms, outside all sleeping areas and on every level of your new home. Test alarms monthly and change batteries once a year.
Install Gates: Install stair gates at the top and bottom of stairs. Stair gates at the top must be attached to the wall with hardware.
Secure Furniture: Secure furniture to the wall to avoid tip overs.
Check Windows: When decorating your new place, be sure to use cordless window coverings.
Mindful Unpacking: When unpacking, be sure to lock up medicines, vitamins, cleaning products, pet food, alcohol, poisonous plants, and chemicals (like paint, gasoline, etc.) and store them high out of your baby’s reach.
Your baby’s arrival was certainly the most blissful and incredible life change. Now you get to start the next chapter together in your new home. A home that is safe for your little one to play, grow and explore!
Laura McHolm is an organizational, moving & storage expert and co-founder of NorthStar Moving Company. NorthStar Moving Company is an award winning, “A+” rated company, which specializes in providing eco-luxury moving and storage services. www.northstarmoving.com
Trend Alert: 8 Colors to Try This Season

Now that October is here and it’s officially fall, breezy colors and summery decor will start to feel out of place. Make holiday houseguests and potential buyers feel at-home with the comfy, cozy and even cheerful shades of the season. Follow along as we uncover eight trendy colors that will last through the new year.
1. Pumpkin Spice
As everyone is lining up for their long-awaited pumpkin spice lattes, the hue also has a well-earned spot in home decor. It’s bold, exudes warmth and resembles the always festive holiday, Halloween. This color works well when painted on one wall, as shown above, or through accessories like rugs, pillows, and throws if you’re color shy. It pairs well with neutral colors and monochromatic palettes as it takes the spotlight in all of its seasonal glory.
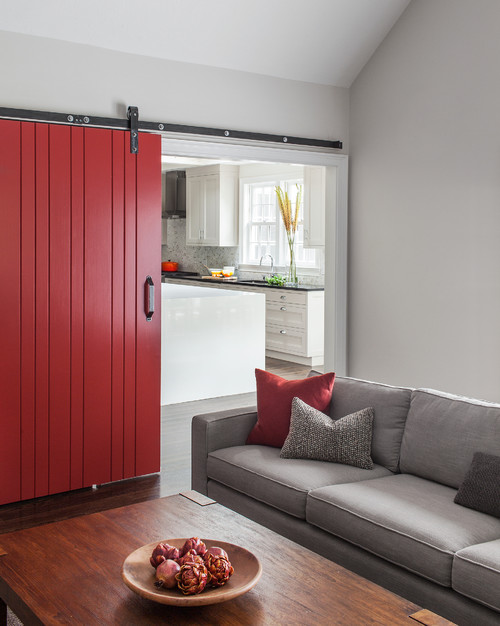
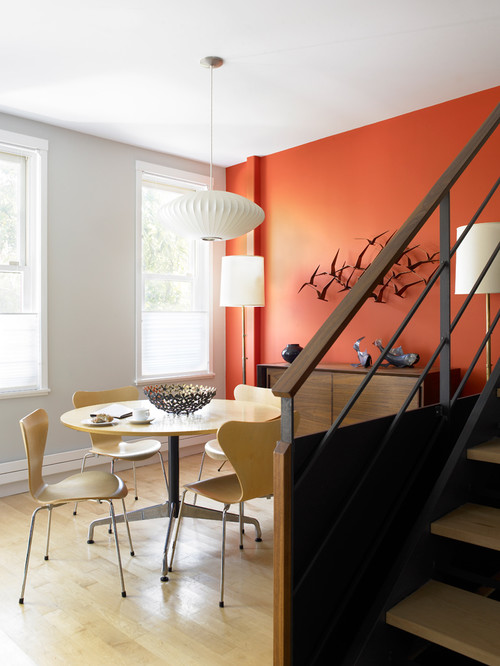
2. Autumn Red
If you don’t use autumn red in autumn, when will you use it? Although it’s a dramatic shade, it can infuse any room with a fiery and fun vibe. It adds intense energy to contemporary and modern rooms while being a happy addition to any playful, eclectic space. Use it intentionally and sparingly in a room to enhance its overall effect.
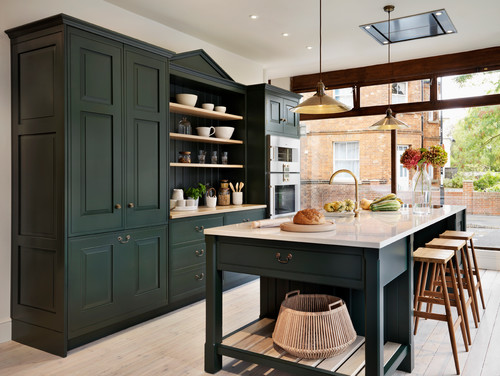
3. Emerald Green
There’s so much to love about this deep shade of green. Unlike the previous colors that are more playful, emerald draws from its roots in Mother Nature to create a sense of calm in any space. Serving as the focus in this kitchen, emerald green cabinetry marries perfectly with blond wood tones and light countertops. Wouldn’t you like to spend all holiday season here?
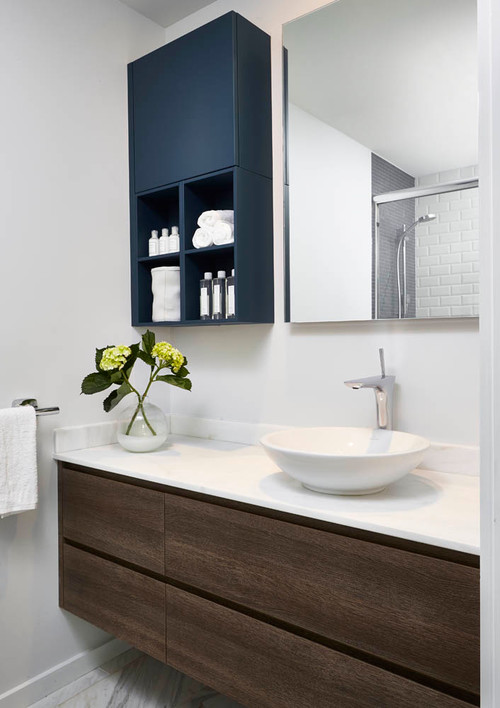
4. Navy Blue
Even darker and more daring than emerald green, navy is a close cousin to black. If you’re not psyched about displaying the iconic holiday colors in your home, but still want to stay on the dark side of the spectrum, this shade of blue is perfect for you. Honoring its origin from the British Royal Navy, this color embodies ultimate elegance, sophistication and power. Bringing navy into your home this season can have surprisingly health benefits too. It’s been shown to have a calming effect on the human body by slowing heart rate and metabolism.
5. Wine
Often an overlooked shade of purple, wine would make a lovely addition to any home this fall. Following suit with the deep tones discussed above, it has the strongest effect when used sparsely, as seen in this Chicago bedroom. Purple has historically been a color of royalty and power. Its wine pigment is no different, conveying richness and seduction in every capacity.

6. Steel Gray
Gray is one of the most versatile hues on the spectrum and can easily be used all year-round. Having said that, it’s often hard to choose the right gray for the season. Light gray can be seen as a winter wonderland while charcoal can be hard to distinguish from black. Steel gray is a solid middle ground. It’s the star of the show in this contemporary London kitchen with its sharp, clean and defined lines.

7. Mustard Yellow
A hue that echoes the falling leaves soon to come, mustard yellow provides warmth and joy to any space. It plays well with other bold colors, like the bright blue sofa and TV stand in this eclectic living room. For year-round summer lovers, this color can also serve as a happy reminder of the sunny days and will brighten up any interior.

8. Brown to Beige
Brown is a classic fall color, but too much of it can make a home feel more like a cave. Instead, use brown as an accent color and brighten it up with a lovely beige tone. Add in some white decor for a gorgeous layered look, like you see in this Denver bedroom.
The Best and Worst Flooring Materials for Family & Pets

Is it possible to have children, pets, and beautiful flooring? Yes—but you’ve got spills, muddy feet and the occasional pet “accident” working against you. You just want to find flooring material that meets your needs, like:
- Durability – The floors should be able to withstand untrimmed dog nails, kneading cats, and sippy cup spills.
- Easy to clean – In a house full of kids and pets, messes are going to happen. What’s important is that your flooring material is easy to mop, sweep, and clean with your preferred products.
- Safety – The right flooring for your family is safe, soft and slip-resistant. You also want to check that it doesn’t contain harmful chemicals—such as lead and phthalate.
- Visual appeal – It’s your home—you should enjoy your space! That means picking out flooring that makes you happy. Choose an appealing color and texture that compliments your space.
- Price – According to HomeAdvisor, it costs an average of about $2,900 to install flooring in your home. Since new flooring is a big investment, it’s best to pick a material that’s cost effective and will last a few decades.
Here are materials that do and don’t meet these specifications.

The Best
Bamboo Flooring
Bamboo floors are kid, pet, and earth friendly. Bamboo’s surface is hard (on par with maple and oak flooring) and extremely durable. It’s also stain resistant and can be easily cleaned using a mop, broom, or vacuum. And, its attractive exterior should be able to withstand scratches from toys and claws, making it the ideal choice for families.
Linoleum
Linoleum flooring makes the list because it’s easy to clean, fairly water resistant, quiet, and hypoallergenic (a must with stray furs flying around). And, since its color and print design extends from the surface into the base, it’s harder to detect scratches.
Vinyl
Vinyl flooring is among the most resilient flooring materials. Its tough surface will resist scratches, tear, and wear and is incredibly water resistant. And, it takes minimal maintenance to keep clean. Spills and stray hairs can be mopped, swept, or vacuumed away in minutes time and won’t leave long-lasting stains. Just be sure not to skimp on the price—cheap vinyl won’t offer the same durability and softness as higher end brands.
Tile or Stone
Tile flooring is a great option for families and pet owners because it can stand up to almost any mess or accident. It’s water resistant, stain resistant, and incredibly durable. Terra cotta and natural stone are beautiful and will compliment almost any home. One drawback is the relative hardness of the flooring—what makes it so easy to clean is also what makes it uncomfortable to sit and play on. Counteract this by adding a soft play rug to rooms where animals and kids gather and keep the beautiful flooring for yourself.
Rethink Carpet
While this is one of the most popular types of flooring, it has many qualities that children and pets love—it’s soft, warm, and slip resistant. However, it does a terrible job hiding pet accidents, fur and stains. It can also trap foul smelling odors! Even worse, looped cut carpet can catch on animal claws and cause a lot of pain. If you must have carpet, choose either polyester, nylon, or eco-friendly, triexta fibers. These types are known for their durability and stain resistance.
Choose Flooring That Will Last
Choosing the right flooring for your family is important—the floor is where you gather, play, and roam. Why spend that time worrying about spills and messes? The right flooring for your family will stand up to the chaos and provide a space for fun first.
Katy Caballeros is a freelance writer who enjoys scheming eclectic home design ideas for her apartment. She can usually be found with book and bottle of ginger beer on the weekends.
References
- https://www.consumerreports.org/cro/2012/05/got-kids-find-the-best-flooring-for-your-family/index.htm
- http://www.homeadvisor.com/cost/flooring/install-flooring/
- https://www.thespruce.com/carpet-types-for-homes-with-children-4121003
- https://learn.livingdirect.com/flooring-for-pet-owners/
- https://www.homeflooringpros.com/blog-guides/best-flooring-dogs-pet-friendly-floors/
- http://www.diynetwork.com/how-to/rooms-and-spaces/floors/guide-to-selecting-flooring
Source: Coldwell Banker Blue Matter Blog
7 Things to Do Before Moving into Your New Home

The keys are yours, now what?
Congratulations! You’re a new homeowner. While you may not be able to wait to move in, there are a few things you should consider tackling before hanging those family photos on the walls.

1. Change the locks – For peace of mind, it’s a good idea to change out the locks on your exterior doors to ensure that anyone the previous owners may have given a key to can no longer access the property. According to Home Advisor, the average homeowner spends between $100-$300 hiring a locksmith.
2. Paint – Don’t love the lemon yellow the previous homeowners chose for the master bedroom? Painting your new home will be infinitely easier if you can do so before moving furniture into the space. Head to your local paint store to pick up a few samples to test before committing. Take your time and be sure to view the color swatches in different lights before committing. There are also handy online visualization tool like the Benjamin Moore Personal Color Viewer.

3. Take care of your floors – Like with painting, treating and refinishing floors is much easier without furniture in the way. Costs for this project will vary depending on the size of the job, but you can estimate roughly $200 for supplies and equipment. Check out this useful guide to refinishing wood floors from This Old House before heading to the hardware store.

4. Make any necessary repairs – Does the bathtub need to be re-caulked or the tile re-grouted? Do the floor boards creak? Make a list of priority repairs and tackle them one by one. You’ll be happy you did a few months from now when other projects crop up on the honey do list.
5. Clean from top to bottom – The only thing better than a new home is a clean new home. Now is the best time to give every nook and cranny of your home a deep clean. Scrub the inside of appliances like the refrigerator, oven, dishwasher and microwave. Wipe down walls and baseboards with a damp cloth. Looking for clever ways to banish grease and grime? Check out our Home Tip of the Day video series.

6. Set up your utilities – Call your electric, gas, cable and water utility providers to make sure service is transferred to you after closing. You’ll also want to research when trash and recycling pick-up are scheduled for your zone.
7. Change your Address – While you may want those mortgage bills to be sent elsewhere, it’s important to file a change of address with the US Postal Service to ensure that all mail is forwarded to your new address following your move. Also be sure to alert friends and family of your new address. They’ll need to know where to send that housewarming gift!
Now, the only thing left to do is celebrate! Looking for great housewarming party ideas? Try one of these backyard flings!

")


