
 Facebook
 X
X
 Pinterest
 Copy Link
How to Avoid the Top 5 Home Seller Mistakes

When you are selling your home, it can be easy to be in a vacuum. You have a certain idea of what the market should pay for your home and what may or may not be an issue. After all, you are king of your castle, right? Your home has x, y and z . The location can’t be beat. It’s just around the corner from (insert fabulous restaurant, park, coffee shop, school, etc. here).
However, when buyers and agents are coming through your home, it can be where distorted perception meets reality. Here are the top mistakes sellers make and how to avoid them.
1. Overpricing Your Home
If your home is overpriced, two things won’t happen: showings or offers. The price is what sets the tone for showings. It is the nonverbal message that either invites or discourages activity. If it is too high, buyers that can afford it may be interested in something else, as they can go higher in price range, and the audience for whom it was intended price-wise are usually shut out. To avoid frustration over offers much lower than your set price, have an open discussion with your real estate agent to set the right price for your home.
2. Making Showings Difficult
Restricted showing times, no lockbox or having to be present for all showings can impact the ability of showing traffic through your home. If there are umpteen instructions or restrictions, agents and their buyers will simply move on to those properties with less rules. Work with your real estate agent to find a way to make showings convenient for both you as the seller as well as potential buyers.
3. Not Countering an Offer
While everyone would love to get the most for their home, a seller also needs to keep a realistic balance. It is too easy to get hung up on the starting number in an offer when the focus should be on what the end result is. The opening offer is simply that –a starting point. It gets a conversation going and results in hopefully a happy medium that is amenable to the buyer and seller. Not countering an offer is like having a one way conversation. It won’t work. How can you move to sold if you can’t have a dialogue of back and forth? It doesn’t mean that the buyers aren’t serious, they are simply being conservative in their first offer to get a feel for how the negotiation is going to go. It doesn’t mean that is the most they are willing to pay unless the offer was positioned that way. Failure to counter sends a discouraging signal to the buyer that can create an uncomfortable situation, perceived or real. Buyers want to do business with sellers who are eager to do business with them. You don’t have to give away the store to do so, but certainly responding with a number in good faith is a step in the right direction.
4. Property Condition Denial
Would you as a buyer pay top dollar for a home with original systems approaching the end of their life? In today’s real estate climate, buyers, lenders, appraisers and inspectors are more scrutinous than ever. It is not only the buyer, but the lender, appraiser and the buyer’s insurance company that could be making the call on a home’s condition. Before you sell, be realistic about the condition of your home. Unless the home is deeply discounted below market value, which realistically means it would be far too low pricewise that you would agree to accept, the buyer will care about it and if they don’t, their home inspector certainly will!
5. Selective Memory
Sellers often fear that if they disclose too much or provide too many details, that it could affect their ability to sell for top dollar; however, failure to disclose could open you up to liability after the sale. Leaving questions blank, or not being clear on the age of certain things only creates more red flags and concern for a potential buyer. If you answer the questions honestly and fully disclose any known issues or repairs that were made (with receipts to document and provide a history) it will eliminate buyer fear and doubt.
For more seller resources, or to find a real estate professional in your area, visit coldwellbanker.com.
Source: CB Blue Matter blog
Your Home’s November Honey-Do List

This month, we’re especially thankful for home. Home is where the family comes together, where we’re protected from the elements, and where love abounds. Your home’s November Honey-Do list will make sure your home is ready for the holidays, prepared for colder weather and loved inside and out.
1. Winterize your home – For most of the country, November is the time when we can no longer deny that the colder weather has settled in. Now is the time to winterize summer tools and appliances like air conditioner units, grills and lawn mowers. Bring garden hoses indoors and check your windows and doors for drafts.
2. Make a Turkey Game Plan – No coach would head to a big game without a game plan up his sleeve. Likewise, no chef should hit the kitchen without thinking through the menu and timeline first. Determine what menu items you can make ahead, decide what responsibilities you can delegate, and take an inventory of your pantry and china cabinet. Oh, and now’s the time to clean that oven, too.
3. Polish the Silver and Dust off the China – Thanksgiving is a special meal, which deserves the best of your entertaining arsenal. Because we don’t often use our special dishes year round, it’s smart to give them a good deep clean and polish before setting the table on Turkey Day.
4. Give your living room a refresh – With the holidays ahead, your living room is sure to get plenty of use. Give the space a refresh by changing out the window treatments for a new look.
5. Use some pest control – Rodents and other pests are opportunistic and seek warmer environments when the temperatures drop. Be sure that they don’t call your house their home by implementing these 5 surefire tricks to pest control.
6. Clear out the gutters – Avoid drainage problems and damage to your home’s foundation by clearing out the gutters before snow and ice wreaks havoc. Here is an easy how-to guide to cleaning rain gutters on your home.
7. Be ready for snow – Before the first winter storm, it’s a good idea to make sure your snow shovels and/or snow blower are in proper working order. Ready to invest in a snow blower after the brutal winter last year? Here is a buying guide from Home Depot that will help you make an educated purchase.
8. Start tackling the December to do list – The holiday to do list is notoriously the longest of the year. Get a head start by ordering your holiday cards, updating your address book, and making a gift wish list for each of your family members NOW. You can even start stringing twinkle lights on your shrubbery before the deep chill sets in. After all, the most important part of the holidays is taking the time to enjoy our family and friends.
Next month we’ll cover everything you’ll need to know to make your home holiday ready. Until then, Happy Thanksgiving!
Source: CB Blue Matter Blog
Kitchen Storage Ideas for Your Apartment

An uncluttered counter is essential in a small apartment. It looks attractive, feels more airy, and encourages you to cook, rather than sending you running for the takeout menu. So get creative with kitchen storage ideas, and you can make clean counters a reality.
No Drawers? No Problem!
Some tiny NYC kitchens lack drawers. This may seem like a big problem, but with a few clever kitchen storage ideas, you can work around it. For utensils, you have plenty of options. Mason jars work great. You can do what Heather Clawson of Habitually Chic did, and put them on the counter where they double as an attractive interior design element — but if you’re striving for empty counters, simply put them inside a cabinet. If you don’t want to use mason jars, you can use the kind of utensil caddytypically used for outside dining. It has separate compartments for each type of utensil, making it the perfect storage tool for forks, knives, and spoons.
Nesting Bowls
If you like to cook and bake, you’ll have lots of mixing bowls, ramekins, and dishes. In order to allow them to be organized inside your cabinets and take up as little space as possible, it’s important to look for nesting bowls. Try Williams-Sonoma’s glass or melamine bowls — they’re incredibly useful for cooking while taking up minimal space.
Use Your Oven
Where’s the best place to store big, bulky pots and pans in a tiny kitchen? The oven! This saves invaluable cabinet space in a compact kitchen, and it takes only a few seconds to remove all the pots when you need to use the oven for cooking. If you have the appropriate overhead space, a pot rack can also be a good space saver — but be sure that your pans are attractive enough to be on constant display (copper is always a beautiful, high-quality option).
Maximize Wall Space
Use your wall space whenever possible. You can hang up a magnetic knife rack; you can also hang spices on the wall or the refrigerator, if you get magnetic spice containers. Both options look fun and eclectic, while saving valuable cabinet space.
Create More Counters
When your counter space is sparse, you need to get creative. Here’s an idea: Buy a large wooden or marble cutting board and place it over two of the stove burners. Instant extra counter space! When you’re not using the cutting board for cooking prep, you can put something on it like a French press or a spoon holder. It’s a win-win … but you must be careful of your stove dials! Always be vigilant about not accidentally brushing against them and turning them on while the cutting board is in place.
With these tips, your compact kitchen will be a clean, uncluttered space, perfect for whipping up meals and hosting friends!
13 Spook-Free Safety Tips to Keep Your Kids & Pets Safe this Halloween

Halloween is full of tricks, treats, ghoulish games, frightening frocks, cute costumes, glowing Jack O’ Lanterns, pumpkin packed parties, and of course spookiness! Unfortunately, all of the frightening fun has dangers lurking behind them. Whether you are a parent of two-legged loved ones or four-legged furry loved ones, it is critical to be aware of the true spookiness that is hiding behind all the ghostly fun. So I called upon two experts that have simple tips for a safe, scare-free Halloween to keep your children and pets safe.
First up are the experts in keeping your little pumpkins safe. They may have “boo” in their name, but there is nothing scary about Boo Boo Busters. As a leading professional childproofing service they know a thing or two about keeping your kids safe. Following, are Halloween safety tips for your pets from Dr. Anthony George, doctor of veterinary medicine and certified veterinary acupuncturist. He has been taking care of all kinds of pets for over 20 years and his tips are sure to keep you furry friends from howling at the moon.
Kid Halloween Safety Tips
1) Choking Hazards
As a good rule of thumb, a choking hazard could be considered as anything that can pass through a cardboard toilet paper roll holder unobstructed. So, taking that into consideration, look closely at all the items that you are putting out to display. From bats and ghosts to pumpkins you roast. Hazards lurk everywhere!
2) Flashlights
Child safe flashlights should have a child safe battery door on them that is secured by a screw to prevent removal of the battery, thus preventing a choking hazard. Use flashlights or electric candles to light up your pumpkin too, flames and kids don’t mix.
3) Halloween Lights
Look for Halloween light strings that have tamper resistant bulbs that can’t be removed easily and remember cords pose a strangulation hazard. All cords should be kept short and tight. Consider taking the excess that you might leave hanging and bind it up with a zip tie.
4) Pumpkin Carving
Remember to only use child safe cutting tools while carving pumpkins, even as an adult. Kids learn by watching you, so if you use real knives you must know that they will want to do the same. As soon as you turn around to grab something you forgot… little hands wander.
5) Costumes
As a kid it’s mandatory to dress up. Our job is to make sure dress up is safe. Costumes should never obstruct movement, never cause visual impairment and never pose a trip hazard. Stick to material that is form fitting. If it’s loose, baggy or long it could create a trip hazard. Avoid masks that can impair vision. Face painting is the safest mask.
6) Glow at Night
Make sure your child’s costume is visible or is is equipped with something that makes them visible. Glow sticks are great and kids love them, but remember, never hang anything around their little necks unless you are using a child safe breakaway lanyard. A couple glow sticks secured to shoes can be seen from a long way away. Flashlights are a good addition as well.
7) Halloween Treats
Remember to make sure you go through and check all the candy that you are keeping. The candy should be in name brand with sealed packages. For candy bars, be sure you cut them into small pieces that are easy to chew. This also helps to ensure it hasn’t been tampered with. Unfortunately, ghouls are sometimes disguised as regular people.
Pet Halloween Safety Tips
1) Pet Costumes
Yes, your pet looks absolutely adorable in that costume! Keep in mind, your fuzzy family member might not be as thrilled with the outfit. Feel free to get that amazing photo, but respect the fact that your pet may want to get out of those duds as soon as possible. Make sure the outfit is comfortable, and pay special attention to straps that may impinge upon the neck and areas where the extremities meet the body. Never leave a pet unaccompanied in a costume to avoid any “wardrobe malfunctions!”
2) NO chocolate
Most people know chocolate is toxic to their pets. Chocolate contains methyl xanthine, which can cause a variety of symptoms ranging from stomach upset to tremors, hyperthermia and seizures. At high doses, chocolate can lead to collapse and even death. Generally speaking, the darker and more concentrated the chocolate, the more dangerous it can be. There are helpful charts available (for instance, petMD.com) that can tell you what doses are dangerous for your pooch. If in doubt, always best to contact your veterinarian to see if treatment is indicated.
3) Sugar Free Danger
Xylitol, an artificial sweetener found commonly in sugar-free gum as well as other products, can be extremely toxic to dogs. When ingested, it can cause a significant release of insulin, which can lead to extremely low blood sugars. At high doses, it can also lead to liver failure. If your pup has ingested this substance, always best to contact your veterinarian as your pet may likely need treatment and supportive care.
4) Healthy Treat Dangers
If you’re offering healthy alternatives this Halloween, keep in mind that grapes and raisins can be extremely toxic to dogs. Some pets are more sensitive than others. In some animals, the toxin can lead to stomach upset initially, followed by kidney failure within 24 hours. It is always prudent to contact your veterinarian immediately if you suspect your pet has ingested these substances.
5) Burning Jack O’ Lanterns
Flames and Fur don’t mix. Just as you do for kids safety, consider replacing that Jack-O-Lantern candle with a flickering LED light.
6) Trick-or-Treating
During trick-or-treating it is best to keep your pet inside, safe from all of the scary costumes, noises and lights that might frighten your pooch or feline. You might even want to consider locking your sweet little pal in a room so they don’t get spooked and run out the door when your trick or treaters arrive.
Laura McHolm is an organizational, moving & storage expert and co-founder of NorthStar Moving Company. NorthStar Moving Company is an award winning, “A+” rated company, which specializes in providing eco-luxury moving and storage services. www.northstarmoving.com
Source: CB Blue Matter Blog
7 Ways to Extend Your Patio Season Year-Round

Outdoor living can be constrained due to seasonality, but it doesn’t have to be– especially if it means you’ll utilize your patio area longer! As the temperatures get cooler and the days get shorter, it becomes harder to create a space outdoors that is comfortable and inviting. Here are some tips on how to continue to enjoy your outdoor living space indefinitely.
1. Outdoor Heater
Perhaps the more obvious of cool weather accommodations, adding heat to your outdoor space will allow you and your guests to relax in fresh air with warmth. Whatever your budget may be, there’s a heater that will work for your space. Ranging from less than $100 to well over $1,000, they come in many varieties and power sources such as a table-top gas heater or a standing solar-powered heater.
Standing heaters are great for heating up a patio space, typically running off of propane or natural gas. Using natural gas is the more efficient of the two and you’ll never run out of fuel. You also have the option of an electric heater, that has a lower upfront cost and costs less to run than a gas-powered heater. If you’re looking for a cost effective and eco-friendly option, a solar-powered heater is just right for you–providing all the warmth from the sun’s energy.
2. Fire Pit
Creating a space with warmth is key, but adding that element with an extra emphasis on aesthetic appeal is a bonus. You can easily create your own using bricks or large rocks to create the pit or purchase one installed by professionals, depending on your budget. Similar to outdoors heaters, there are a variety of fuel source options. If open wood burning isn’t allowed, you can install a fire pit that is fueled by gas. One advantage is that you can fire up your pit in an instant.
Not only can fire pits add warmth and depth to your patio’s hardscaping, but it also creates a collaborative social atmosphere– there’s nothing more nostalgic than roasting marshmellows or telling scary stories around the flickering blaze of a real fire.
3. Coverage
There’s nothing that really outlines a space like adding coverage by way of roof or walls, such as a pergola. As LawnStarter says, “pergolas give that “room” feeling to an open space.” Adding in a pergola or retractable awning can definitely help curate a more suitable ambiance in the winter months. If you already have a covered patio, you can hang outdoor curtains to contain heat and to help keep out wind or rain. Hanging up curtains will also add a whimsical, potentially romantic look to your patio space, softening the corners and rigidness of hardscaping. With the selection of colors, patterns and styles, you won’t have to sacrifice your fashion sense to keep the patio warm!
4. Cozy Fabrics
Creating an extra comfortable outdoor space means adding textiles that will repel warmth from their materials. These textiles include getting cozy outdoor couches, warm blankets, and throw pillows—all items that you or guests can curl up on and into. A couch with cushy cushions and throw pillows sure beats your run-of-the-mill patio furniture. Have a stack of low-cost, but decorative, blankets on hand when additional warmth is needed.
5. Hot Tub or Spa
Relaxing in a steamy hot tub or in-ground spa feels great all year long, but in cold weather, the temperature difference can make it feel even better. Although, using it during the cool months may require a little preparation before stepping out into cold weather in a swimsuit. Keep snow and ice off the path to the tub and the top of your tub or the spa cover to make it accessible whenever you want to use it–plus, it will help keep heating costs down.
To experience ultimate luxury post jacuzzi bathing, keep a towel warmer next to the spa. It’s actually more practical than it sounds—a warm towel will keep your body temperature from dropping too quickly when you step from the tub.
6. Hot Beverages
Hot chocolate will always be the quintessential winter warm-up, why not be a bit more exciting? Take the time to create a personalized hot beverage that you, your family or guests can enjoy to help withstand the cool weather.
- Warm Mulled Cider – Simmer apple cider with mulling spices, orange zest, and ginger. It smells as good as it tastes.
- Mulled Wine With Cranberries – Simmer cranberry juice cocktail, cinnamon sticks and star anise for 15 minutes. Stir in the wine and cranberries and bring back to a simmer before serving.
- Warm Hazelnut Toddy – Stir hot water into Frangelico and spoon that dollop of whipped cream onto the top.
7. Winter Grilling
Grilled meats and kabobs don’t only have to be a summer food item, enjoy summertime barbeque inspired flavors in the winter months by utilizing your grill. For that matter, grilling can be done year-round, all you have to do is keep a pathway cleared if you’re in a location that experiences snowfall. You might want to move the grill closer to the house for the winter to save yourself some steps when it’s really bitter out.
If and when the temperatures are below freezing, it can take twice as long to preheat the grill and cook your food. Keep the lid closed as much as possible when cooking, the more often you open it the longer it will take due to the release of heat.
When preparing your home for winter, whether it be indoor or outdoor maintenance – save the storage time and carry summertime outdoor living over into the cooler months using these tips!
Source: CB Blue Matter
5 Things to Do Now if You’re Selling Your Home in 2018

If you plan on selling your home next year and want to get the highest price possible, you should put it on the market at the beginning of the spring selling season. There tends to be less competition at that time, so homes listed in early spring will typically sell faster and closer to their list price than those listed later in the year.
You’re probably thinking that spring is many months away, and you have plenty of time to get your house ready to sell. But spring comes early in real estate and home sales start heating up in February, right after the Super Bowl.
So, really, you have only about three and a half months to get ready.
Most people drastically underestimate the amount of work involved in preparing a home for sale. Don’t be one of them.
Home Sale Prep List
Here’s a list of things you can do NOW, to make sure your home puts its best foot forward when the spring market rolls around.
- If the leaves are still on the trees, take photos of the exterior of your house now. Your house will look so much better than it will in January or February when the photographer shows up to take listing photos. One caveat: make sure there are no Halloween or other seasonal decorations in your photos.
- Make a schedule. Set February 1 as your go-to-market date and work backwards from there, listing all of the things that will need to be done to get your home ready for sale. Then put them on your calendar and start knocking them out.
- Have a pre-listing inspection done on your house. This is the same kind of inspection that your buyers will have done once their offer is accepted. It will cost you between $400 and $600 but it is well worth it. It will identify everything that needs fixing, and then you can take the time to get multiple bids and schedule the work.You will be shocked at how long the inspector’s list of needed repairs is, but it’s better to find out about them in advance and get them taken care of than to have your buyers hold your home sale hostage over the inspection credits they want.
- Have your real estate agent or home stager walk through the house with you and point out low cost updates or changes that you can make to maximize your home’s appeal. This could include rearranging or editing the furniture, applying a fresh coat of paint, removing wall-to-wall carpeting, or updating cabinet hardware or light fixtures.
- Get rid of the clutter! Undoubtedly you will have lots of stuff that needs to be packed away, donated, or disposed of, and dealing with it can be very time-consuming. Plan to tackle one room (and its closet) each weekend. Sort everything into four piles: give away, throw away, sell, and keep. Be ruthless. If you have trouble letting go of things or you find it all too overwhelming, line up an organizer to help you.
If you have been keeping china, glassware, or furniture to pass on to your adult children, ask them if they even want it. Chances are they don’t, so now is the time to sell it or donate it.
Selling your home is a big undertaking. Doing these five things now will get you well on your way to a successful home sale and help you maintain your sanity in the process.
8 Space Savers for a Small Bedroom
Not everyone is blessed with endless square footage and expansive master suites in their home. If you find yourself drowning in piles of clothes and surround by belongings, you’re not alone. Here are eight simple tricks to save space and maximize storage in a small bedroom.
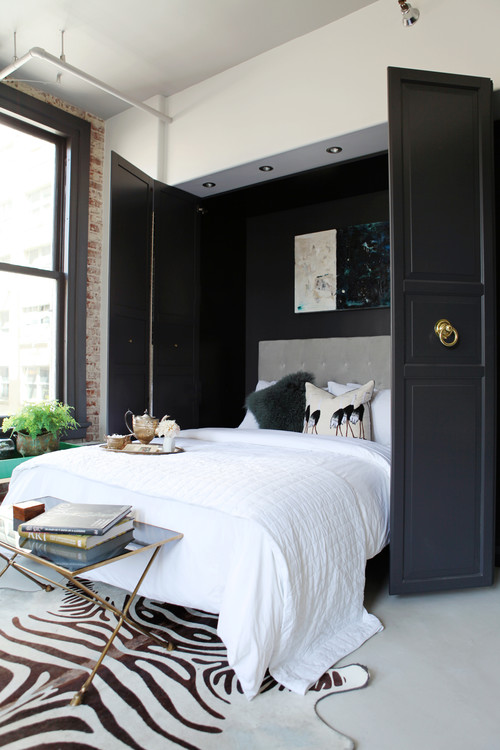
1. Fold Out Furniture
Murphy beds and pull-out sofa beds have gotten bad reputations in the past for being clunky and old-fashioned. However, there are many new and stylish ways to integrate a convertible bed in today’s modern home designs, one of which is shown above. Also try installing a fold-out desk against a wall for a small workspace. It can work double-duty as a mini makeup vanity too.

2. Use Large Mirrors
Here’s one of the oldest tricks in the book: mirrors. Mirrors never fail to visually expand and enhance a small space. The effect is strongest when it covers the entire side of a room with floor-to-ceiling or wall-to-wall mirrors. If you have an unsightly open closet situation, you can resolve both problems by opting for mirrored doors to hide the clutter and add visual dimension.
Tip: Another strategy for making a small room feel bigger is to capitalize on as many natural light sources as possible. Not only is natural light beneficial for your health and well-being, it draws the eye outwards and beyond the corners of any small space. Reflect a window in a mirror to bring more light further into a room.
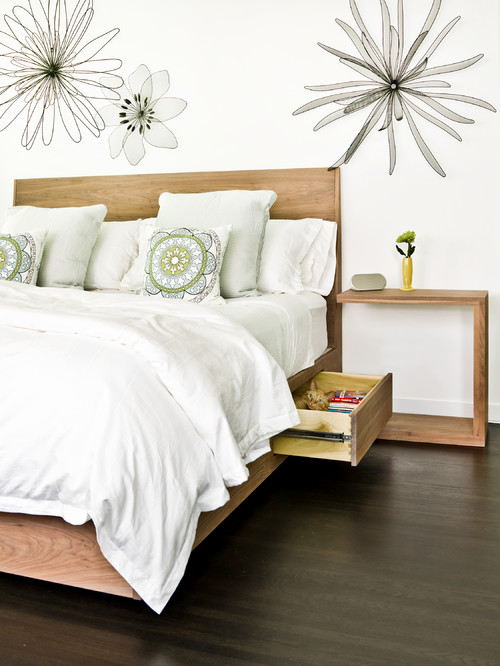
3. Underbed Space and Storage
A lot of potential is hidden in floor space, an area that’s often forgotten and unused in many bedrooms – big or small. If it isn’t already, prop your bed a foot or two above the floor with store-bought bed risers and voila! You’ve found more space. Don’t start cramming everything you can in your newly found space though. Being able to see beneath the bed will make a bulky bed feel light and airy. If you need more storage, purchase wide and shallow drawers that can easily slide under the bed. You can use this space to keep belongings dust-free and easily accessible.
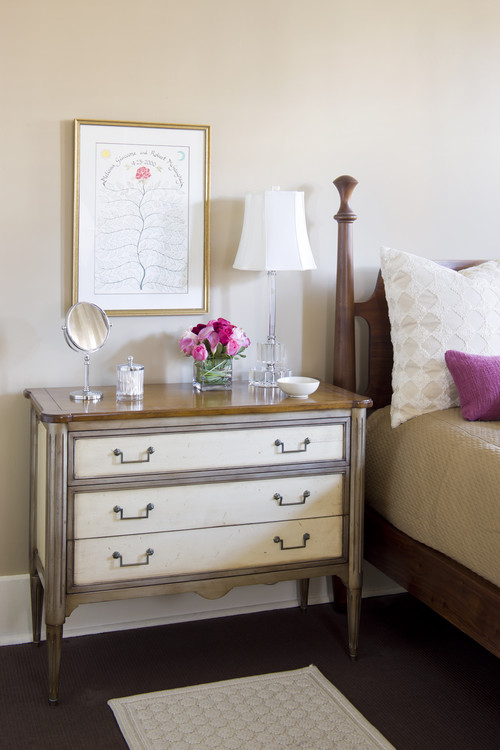
4. Combine Your Nightstand and Dresser
Most people try to buy the smallest furniture pieces possible for a small bedroom, but in certain cases, one large item is much better than two small ones. With an oversized nightstand, you can eliminate the need for a big dresser and keep everything within arm’s reach of the bed. The surface can still hold bedside essentials while the space below can be used for clothing storage.

5. Outfit Your Headboard With Storage
Headboards with built-ins make the most of otherwise wasted space. Traditional tufted headboards are gorgeous in all their glory, but block the wall space above the bed from being used for anything else. You can pull out your headboard to create a ledge at the top or purchase a one with storage cubbies built in or around the panel. For the most storage, use a combination of both, as seen in this storage-savvy contemporary bedroom.
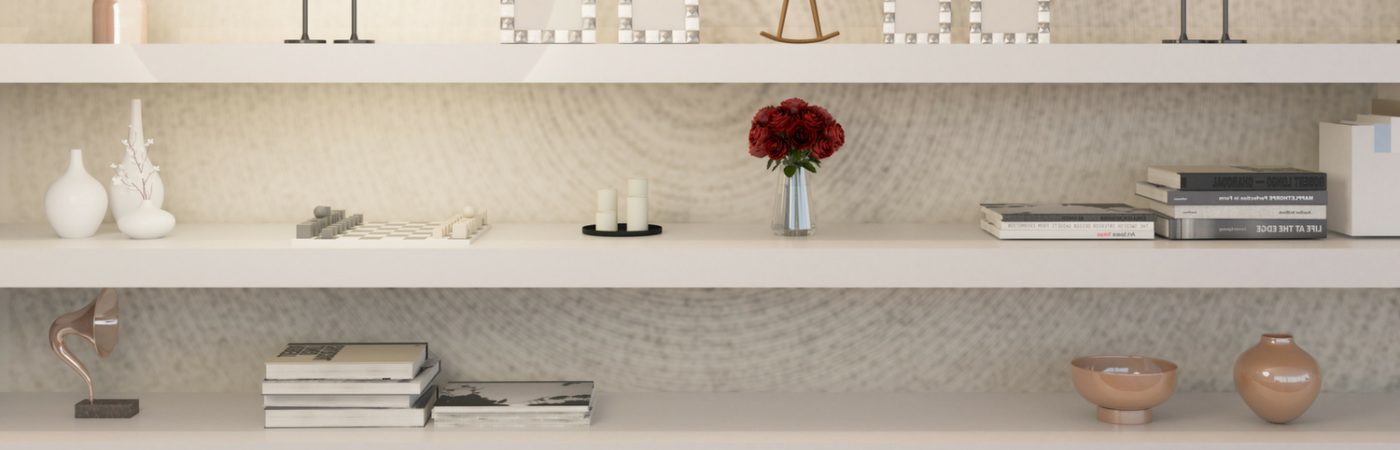
6. Utilize Open Wall Shelves
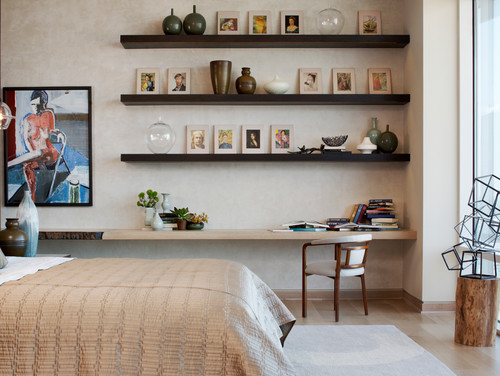
If you have cherished knick-knacks that you want to put on display but don’t have the surface area to spare, look to your blank walls. Just as easy as hanging a picture frame or piece of artwork, mounting vertical wooden boards is a simple solution for holding your favorite photos or books. In this modern New York bedroom, multiple rows of open shelves above a desk hold countless frames and pottery pieces without using a single inch of floor space.
7. Mount Wall Lighting
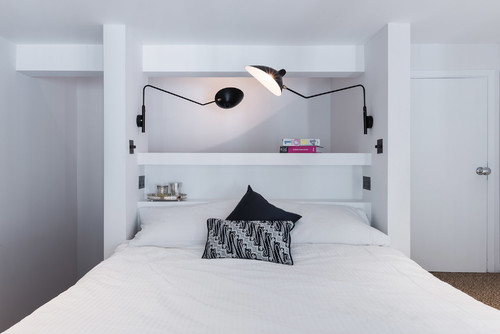
If you’re struggling to fit a table lamp on your nightstand, look to your walls once more for another space-saving solution. Wall-mounted lights with flexible arms can be pulled to wherever they’re needed most or they can lay flush against the wall when unused. Like lamps, wall lights are come in a variety of sizes and prices.
8. Look Behind the Door
Behind-the-door storage seems to have vanished largely from recent home design trends, but if you’re desperate for more space, look no further. You don’t have to confine yourself to classic over-the-door hooks; this space can also be used to hold shoes and coats; hats and scarves; and even makeup and bath supplies. Get creative and customize the back of your door to fit your storage needs.
Source: CB Blue Matter Blog
6 New Countertop Ideas That Aren’t Granite
Not a fan of granite countertops? Here are 6 beautiful alternatives.
Guest Post By Andrea Davis
Granite’s durability and looks make it a popular investment for many homeowners. But there are other options aside from granite. Keep reading to learn more about six alternatives to granite countertops.
Butcher Block

Butcher block countertops provide visual warmth to modern spaces, particularly those with white cabinetry. These countertops are also very cost-effective, especially compared to natural stone.
You’ll need to make oiling a regular part of your maintenance routine if you do install butcher block countertops. You’ll also need to use trivets or pot holders under hot pots and pans to avoid burning your counters.
Soapstone
Soapstone is a natural stone that’s easier to maintain than marble, but still requires more work than sealed granite. Soapstone is particularly vulnerable to liquids and acidic spills. Too much heat can also damage its appearance. Despite regular maintenance, soapstone is a beautiful alternative to granite.
Marble

Marble is a natural stone that is considerably softer and more porous than most other stone options. If you don’t have a busy kitchen, marble can be a perfect material. For busy home chefs and homes with kids, marble may not be a good choice.
Ceramic Tile
Ceramic tile is a fun and incredibly durable countertop material. Unlike other countertops, ceramic tile isn’t prone to damage from liquids or heat. Ceramic tiles can stain and chip over time, but individual tiles are easy to replace. Tile is also extremely inexpensive, making it an ideal choice for budget-conscious homeowners.
Stainless Steel
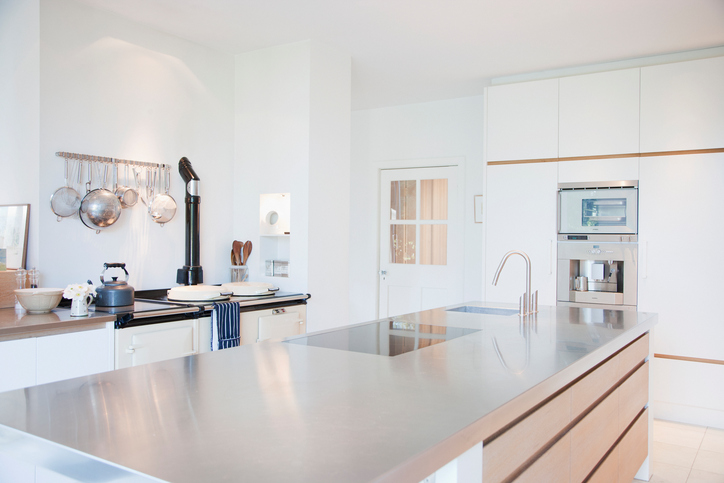
Modern kitchen with stainless steel counters
Stainless steel’s sleek looks and durability make it the perfect material for modern or cooking-focused kitchens. You can wipe down stainless with a cloth, though special cleaner should be used from time to time as well. Stainless steel countertops can be expensive, but they’re perfect for design- or cooking-obsessed homeowners.
Quartz
Quartz, also called Caesarstone or Silestone, is a man-made stone that’s cost-effective and attractive in many spaces. Its uniform finish also appeals to many homeowners who feel that natural stone is too busy in terms of patterns. Quartz is easy to maintain and incredibly durable, making it the ideal choice for homeowners who use their kitchens regularly.
Andrea Davis is the editor at HomeAdvisor, which connects homeowners with home improvement professionals in their area for free. Connect with Andrea on Google+
Source: CB Blue Matter Blog
5 Fantastic Kitchen Staging Ideas for Fall

Wow fall homebuyers with these easy staging ideas from HomeAdvisor
Guest Post by Andrea Davis
Selling your home in the fall means adding small seasonal elements to make your home feel warm and welcoming. And, what better place to do that than in the kitchen? Here are some ideas to help you make your kitchen — and your home — appeal to fall homebuyers:
Fall counter decor
You should always keep the countertops nearly clear when potential homebuyers are walking through. In fact, you should keep it down to about two to three essentials if you’re living there from day to day. For the fall season, you can add small elements like placemats, fruit and leaf decor (window drapings, vase, etc.).
“Fall odors”
The smell of leaves, apple pie, pumpkin and cinnamon evoke the cozy feelings of fall. Candles are nice and actually baking something “fall-like” before a showing is a sure way to make potential buyers feel more at home during a showing.
Colors of fall
Depending on the current condition of your home, you might consider a fresh coat of paint. What color you decide to use may or may not be influenced by the season. While you should always lean towards neutral colors, you might consider accent walls or cabinets in browns or dark tones of red or green if you think they would work. The cost to paint an interior room is about $380, though prices will vary depending on the size of the room.
Bringing nature in
If there are windows in the kitchen, make sure to keep them clean. Depending on the weather outside during a showing, you might open them and let the fresh air in. It helps to create a flow between nature outside and the atmosphere you’re trying to create in the kitchen. If your budget allows, you might also accent the windows with fall-like window treatments to create an even easier flow. If you don’t have these treatments, a professional home stager can sometimes find them for a reasonable price.
Natural lighting elements
Lighting is an essential element of home staging, no matter the season. In fall, in particular, it’s all about enhancing the twilight or sunset and complementing of all the fall colors. For lighting in your kitchen, consider accent and track lighting. Or, you could install recessed lighting on a dimmer switch, which will allow you to control the brightness of the kitchen to complement the mood outside.
Source: CB Blue Matter Blog
Fastest Remodels that Make the Most Impact
Here are a few big-picture renovations you can make in surprisingly little time, whether you do it yourself or hire help.
Guest Post by Lauren White
Remodeling projects can seem like a distant fantasy when days off are usually consumed by errands and chores. What can you accomplish with the slim hours you have to spare? Here are a few big-picture renovations you can make in surprisingly little time, whether you do it yourself or hire help.
Instant Patio
Time: 4-6 hours
Budget: $3,000
Outdoor spaces are deceptively quick and affordable to make. If you have a half-day to spare, you can turn a patch of yard into a gorgeous patio before sundown. The processwill involve digging and leveling the area you need, preparing a base for proper drainage and laying your stones. Once the project is complete, you will have a relaxing outdoor living space to enjoy.
Keep your time down by choosing pavers or bricks that don’t need to be cut. Interlocking patio pavers come in many variations and they eliminate the dilemma of fitting awkward pieces together.
One-Day Backsplash
Time: 2-8 hours
Budget: $30-$600
It only takes a few hours to install a new kitchen backsplash, but it could take less time depending on the material you choose. If you paint the backsplash, it will take mere hours of preparation and application. Painting costs as little as $30. If you use peel-and-stick ceramic tiles or rolls of faux metal, it will take roughly the same amount of time.
If you have more than a few hours, make a stand-out backsplash using an adhesive tile mat and individual tiles. The adhesive mat will ensure that heavy tile materials don’t fall off, and requires less curing time than traditional, wet adhesive. Explore your tile options in HomeAdvisor’s resource center.
Weekend Window Replacement
Time: 2-3 days
Budget: $5,000
High-efficiency windows are a strong investment, whether you are planning to sell or stay. These windows save homeowners anywhere from 10% to 30% in home energy costs. Efficiency is a top priority for today’s buyers, and this project has over 70% return on investment.
Removing old windows, installing heavy panes and finishing up with framing is a complex process. Professionals can do it in a matter of days, where it might take you much longer. Hiring a pro is worth it, because this renovation will put money back in your pocket when it is done right.
72-Hour Countertops
Time: 1-3 days
Budget: $3,000
In most cases, you’ll want to hire a professional to replace your countertops. Installation and cutting needs to be very precise, and most counter slabs weigh up to and over 400 lbs! With the right amount of muscle, you can finish this job in 1-3 days. Some materials and pre-fabricated pieces can even be installed in 3-7 hours.
Upgrading your countertops can do wonders to improve your kitchen and raise your home value. Granite, for example, can handle a lot of wear-and-tear. If your kitchen is like the Union Station of your house, this low-maintenance, high-resistance material is perfect for your counters.
For the adventurous weekend warrior, check out these countertops you can make yourself.
Two-Week Hardwood Floor Refinishing
Time: 2-14 days
Budget: $1,600
Flooring has a big impact on the appearance and value of your home. If your hardwood floors are in bad shape, you’ve probably already thought of refinishing them. Whether you hire a professional or do it yourself, you’re going to need at least two days.In fact, you may need as many as fourteen.
You will need one day for sanding and one day per layer of polyurethane finish. Each layer will need 24 hours to dry. Two to three layers of finish are recommended. If you’re going to stain the wood, add another day for that between sanding and finishing.
This project may take longer, but the results are worth it. Refinishing seals the wood against rot and moisture, and adds appeal for homebuyers. They will be more impressed by a glossy shine than rough, exposed wood. If you’re not sure it’s the right time for your floors, check out these answers to common questions to help you decide.
Investing in your property can mean a faster sale, or will at least give you a few extra luxuries to enjoy. See what you can accomplish with an afternoon or your next three-day weekend, and format your budget using these helpful cost guides.
Lauren White is a freelance writer who enjoys reading, hiking and traveling. She can usually be found on an outdoor adventure with her boyfriend and little sister on the weekends.
References
- www.bhg.com/home-improvement/remodeling/budget-remodels/weekend-home-projects/
- www.houselogic.com/remodel/remodeling-tips-advice/house-remodeling-how-long-does-it-take/
- www.fix.com/blog/tile-kitchen-backsplash-in-one-day/
- www.thespruce.com/easiest-and-cheapest-backsplashes-1821174
- www.popularmechanics.com/home/outdoor-projects/a22394/how-to-build-a-bluestone-patio/
- www.thespruce.com/process-of-installing-replacement-windows-1822901
- www.replacementwindowsfordummies.com/articles/energy-efficient-windows-advantages-and-disadvantages
- www.remodeling.hw.net/cost-vs-value/2017/
- www.valentiflooring.com/blog/hardwood-floor-refinishing-project-how-long-does-it-take
- www.thespruce.com/cost-to-refinish-hardwood-floors-1314853
- www.homeadvisor.com/r/refinishing-hardwood-floors/
- www.rempros.com/estimating-time/kitchen-countertop-replacement.html
- www.diynetwork.com/how-to/rooms-and-spaces/kitchen/how-to-install-a-granite-kitchen-countertop
- www.homeadvisor.com/cost/kitchens/tile-backsplash-install/
- www.homeadvisor.com/cost/outdoor-living/install-a-patio-or-pathway/
- www.homeadvisor.com/cost/doors-and-windows/install-windows/
- www.homeadvisor.com/cost/flooring/refinish-wood-flooring/
- www.homeadvisor.com/cost/cabinets-and-countertops/install-countertops/

")


