
 Facebook
 X
X
 Pinterest
 Copy Link
Creating the Stadium Experience in Your Own Kitchen

For some sports fans, there’s more to the game day experience than the game itself. Sure, it’s great to cheer on your favorite team through a white-knuckle competition, but it’s just as fun to explore the smorgasbord of delicious food that every stadium and arena across America has to offer. Food is a big part of the stadium experience, whether you’re sharing a snack with friends or chowing down on a full meal from the comfort of the stands.
Nachos, chili cheese dogs, cotton candy and pretzels are just some of the classic foods you’ll find spectators noshing on—and don’t forget liquid accompaniments ranging from lemonade to beer. But as tasty as they are, these treats can do a number on your waistline. Fortunately, it’s relatively easy to replicate your favorite game day snacks at home—and with creative and healthy twists—no matter which team you root for.

Hot Dogs
America’s pastime isn’t complete without a ballpark frank—and that goes double for Chicago Cubs fans, who gobble down Chicago-style hot dogs by the thousands each season. Topped with a garden of veggies—including tomato slices, white onion, pickle relish, sport peppers and a pickle spear—a Chicago dog is a much smarter choice than a chili cheese dog. And with a few simple substitutions—like chicken sausage instead of beef, organic veggies, and whole wheat buns—you won’t feel guilty going back for seconds. Or thirds.
Chicken Wings
Buffalo, New York is most famous for three things: the Buffalo Bills, the Buffalo Sabres, and the tangy, spicy, bright orange sauce that works so perfectly on chicken wings. Traditionally, buffalo wings should be fried, but grilling is a healthy and delicious alternative (and baking works just as well). Make sure you have a big stack of napkins for this snack, and don’t forget the celery and bleu cheese.
Peanuts
Peanuts are the perfect handheld snack that can feed tons of sports fans with very little effort. Rich in protein, they can be sweet, spicy, salty or sometimes all three. Southern sports fans have a penchant for boiled peanuts, which can be whipped up in a crock pot, while roasted peanuts have universal appeal.
French Fries
If you’re making fries at home, you might as well kick it up a notch. Northern California is famous for its garlic and, as a result, its garlic fries. So it comes as no surprise that the dish is one of the most popular menu items at San Francisco’s AT&T Stadium, home of the Giants. If you follow this recipe, you won’t even need a deep fryer.
Pretzels
If there’s one thing New York Yankees and New York Mets fans can agree on, it’s that a baseball game isn’t complete without a soft pretzel and a side of spicy mustard. But if you’re gluten intolerant, you often miss out on this handheld treat. Luckily, pretzels are surprisingly easy to make at home—even without the wheat.
Nachos
Stadium nachos are notorious for their neon yellow cheese sauce and a few other suspicious toppings. At home, you can load up your tortilla chips with whatever you want. Miami fans swear by Cuban-style nachos, which add a Caribbean twist to the traditional recipe by topping gluten-free tortilla chips with slow-cooked pork, ham and a light Swiss cheese sauce.
Cracker Jacks
By the time the seventh-inning stretch rolls around, you’re going to be craving something sweet—that’s the real reason Cracker Jacks are prominently featured in “Take Me Out to the Ball Game.” By substituting sugar with maple syrup, you can make caramel corn that’s as good as the Cracker Jacks you remember from childhood baseball games—but without all the calories (or, sadly, the toy surprise).
Lemonade
After all the hot dogs, peanuts and other snacks, you’re going to need something to quench your thirst. With just three ingredients—lemons, water, and honey—you can make ballpark-park quality lemonade at a fraction of the price.
Once you’ve gathered your snacks and turned on the game, it’s easy to recreate the stadium experience at home. Just gather your favorite sports fans, sit back and dig in.
Source: CB Blue Matter Blog
6 New Countertop Ideas That Aren’t Granite
Not a fan of granite countertops? Here are 6 beautiful alternatives.
Guest Post By Andrea Davis
Granite’s durability and looks make it a popular investment for many homeowners. But there are other options aside from granite. Keep reading to learn more about six alternatives to granite countertops.
Butcher Block

Butcher block countertops provide visual warmth to modern spaces, particularly those with white cabinetry. These countertops are also very cost-effective, especially compared to natural stone.
You’ll need to make oiling a regular part of your maintenance routine if you do install butcher block countertops. You’ll also need to use trivets or pot holders under hot pots and pans to avoid burning your counters.
Soapstone
Soapstone is a natural stone that’s easier to maintain than marble, but still requires more work than sealed granite. Soapstone is particularly vulnerable to liquids and acidic spills. Too much heat can also damage its appearance. Despite regular maintenance, soapstone is a beautiful alternative to granite.
Marble

Marble is a natural stone that is considerably softer and more porous than most other stone options. If you don’t have a busy kitchen, marble can be a perfect material. For busy home chefs and homes with kids, marble may not be a good choice.
Ceramic Tile
Ceramic tile is a fun and incredibly durable countertop material. Unlike other countertops, ceramic tile isn’t prone to damage from liquids or heat. Ceramic tiles can stain and chip over time, but individual tiles are easy to replace. Tile is also extremely inexpensive, making it an ideal choice for budget-conscious homeowners.
Stainless Steel
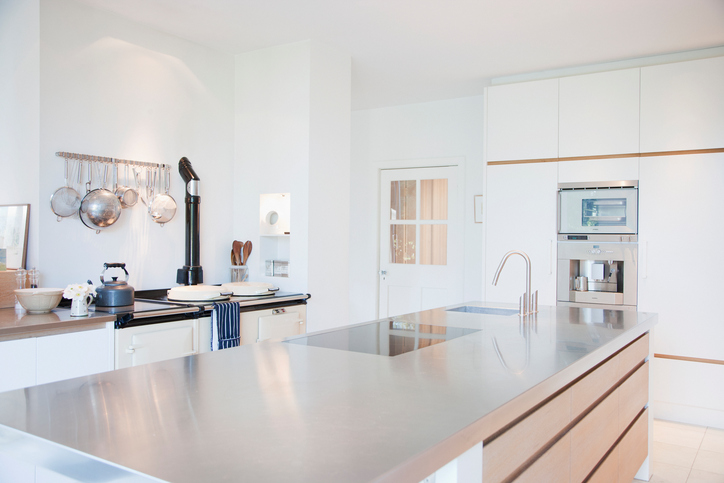
Modern kitchen with stainless steel counters
Stainless steel’s sleek looks and durability make it the perfect material for modern or cooking-focused kitchens. You can wipe down stainless with a cloth, though special cleaner should be used from time to time as well. Stainless steel countertops can be expensive, but they’re perfect for design- or cooking-obsessed homeowners.
Quartz
Quartz, also called Caesarstone or Silestone, is a man-made stone that’s cost-effective and attractive in many spaces. Its uniform finish also appeals to many homeowners who feel that natural stone is too busy in terms of patterns. Quartz is easy to maintain and incredibly durable, making it the ideal choice for homeowners who use their kitchens regularly.
Andrea Davis is the editor at HomeAdvisor, which connects homeowners with home improvement professionals in their area for free. Connect with Andrea on Google+
Source: CB Blue Matter Blog
Fastest Remodels that Make the Most Impact
Here are a few big-picture renovations you can make in surprisingly little time, whether you do it yourself or hire help.
Guest Post by Lauren White
Remodeling projects can seem like a distant fantasy when days off are usually consumed by errands and chores. What can you accomplish with the slim hours you have to spare? Here are a few big-picture renovations you can make in surprisingly little time, whether you do it yourself or hire help.
Instant Patio
Time: 4-6 hours
Budget: $3,000
Outdoor spaces are deceptively quick and affordable to make. If you have a half-day to spare, you can turn a patch of yard into a gorgeous patio before sundown. The processwill involve digging and leveling the area you need, preparing a base for proper drainage and laying your stones. Once the project is complete, you will have a relaxing outdoor living space to enjoy.
Keep your time down by choosing pavers or bricks that don’t need to be cut. Interlocking patio pavers come in many variations and they eliminate the dilemma of fitting awkward pieces together.
One-Day Backsplash
Time: 2-8 hours
Budget: $30-$600
It only takes a few hours to install a new kitchen backsplash, but it could take less time depending on the material you choose. If you paint the backsplash, it will take mere hours of preparation and application. Painting costs as little as $30. If you use peel-and-stick ceramic tiles or rolls of faux metal, it will take roughly the same amount of time.
If you have more than a few hours, make a stand-out backsplash using an adhesive tile mat and individual tiles. The adhesive mat will ensure that heavy tile materials don’t fall off, and requires less curing time than traditional, wet adhesive. Explore your tile options in HomeAdvisor’s resource center.
Weekend Window Replacement
Time: 2-3 days
Budget: $5,000
High-efficiency windows are a strong investment, whether you are planning to sell or stay. These windows save homeowners anywhere from 10% to 30% in home energy costs. Efficiency is a top priority for today’s buyers, and this project has over 70% return on investment.
Removing old windows, installing heavy panes and finishing up with framing is a complex process. Professionals can do it in a matter of days, where it might take you much longer. Hiring a pro is worth it, because this renovation will put money back in your pocket when it is done right.
72-Hour Countertops
Time: 1-3 days
Budget: $3,000
In most cases, you’ll want to hire a professional to replace your countertops. Installation and cutting needs to be very precise, and most counter slabs weigh up to and over 400 lbs! With the right amount of muscle, you can finish this job in 1-3 days. Some materials and pre-fabricated pieces can even be installed in 3-7 hours.
Upgrading your countertops can do wonders to improve your kitchen and raise your home value. Granite, for example, can handle a lot of wear-and-tear. If your kitchen is like the Union Station of your house, this low-maintenance, high-resistance material is perfect for your counters.
For the adventurous weekend warrior, check out these countertops you can make yourself.
Two-Week Hardwood Floor Refinishing
Time: 2-14 days
Budget: $1,600
Flooring has a big impact on the appearance and value of your home. If your hardwood floors are in bad shape, you’ve probably already thought of refinishing them. Whether you hire a professional or do it yourself, you’re going to need at least two days.In fact, you may need as many as fourteen.
You will need one day for sanding and one day per layer of polyurethane finish. Each layer will need 24 hours to dry. Two to three layers of finish are recommended. If you’re going to stain the wood, add another day for that between sanding and finishing.
This project may take longer, but the results are worth it. Refinishing seals the wood against rot and moisture, and adds appeal for homebuyers. They will be more impressed by a glossy shine than rough, exposed wood. If you’re not sure it’s the right time for your floors, check out these answers to common questions to help you decide.
Investing in your property can mean a faster sale, or will at least give you a few extra luxuries to enjoy. See what you can accomplish with an afternoon or your next three-day weekend, and format your budget using these helpful cost guides.
Lauren White is a freelance writer who enjoys reading, hiking and traveling. She can usually be found on an outdoor adventure with her boyfriend and little sister on the weekends.
References
- www.bhg.com/home-improvement/remodeling/budget-remodels/weekend-home-projects/
- www.houselogic.com/remodel/remodeling-tips-advice/house-remodeling-how-long-does-it-take/
- www.fix.com/blog/tile-kitchen-backsplash-in-one-day/
- www.thespruce.com/easiest-and-cheapest-backsplashes-1821174
- www.popularmechanics.com/home/outdoor-projects/a22394/how-to-build-a-bluestone-patio/
- www.thespruce.com/process-of-installing-replacement-windows-1822901
- www.replacementwindowsfordummies.com/articles/energy-efficient-windows-advantages-and-disadvantages
- www.remodeling.hw.net/cost-vs-value/2017/
- www.valentiflooring.com/blog/hardwood-floor-refinishing-project-how-long-does-it-take
- www.thespruce.com/cost-to-refinish-hardwood-floors-1314853
- www.homeadvisor.com/r/refinishing-hardwood-floors/
- www.rempros.com/estimating-time/kitchen-countertop-replacement.html
- www.diynetwork.com/how-to/rooms-and-spaces/kitchen/how-to-install-a-granite-kitchen-countertop
- www.homeadvisor.com/cost/kitchens/tile-backsplash-install/
- www.homeadvisor.com/cost/outdoor-living/install-a-patio-or-pathway/
- www.homeadvisor.com/cost/doors-and-windows/install-windows/
- www.homeadvisor.com/cost/flooring/refinish-wood-flooring/
- www.homeadvisor.com/cost/cabinets-and-countertops/install-countertops/
Trend Alert: 8 Colors to Try This Season

Now that October is here and it’s officially fall, breezy colors and summery decor will start to feel out of place. Make holiday houseguests and potential buyers feel at-home with the comfy, cozy and even cheerful shades of the season. Follow along as we uncover eight trendy colors that will last through the new year.
1. Pumpkin Spice
As everyone is lining up for their long-awaited pumpkin spice lattes, the hue also has a well-earned spot in home decor. It’s bold, exudes warmth and resembles the always festive holiday, Halloween. This color works well when painted on one wall, as shown above, or through accessories like rugs, pillows, and throws if you’re color shy. It pairs well with neutral colors and monochromatic palettes as it takes the spotlight in all of its seasonal glory.
2. Autumn Red
If you don’t use autumn red in autumn, when will you use it? Although it’s a dramatic shade, it can infuse any room with a fiery and fun vibe. It adds intense energy to contemporary and modern rooms while being a happy addition to any playful, eclectic space. Use it intentionally and sparingly in a room to enhance its overall effect.
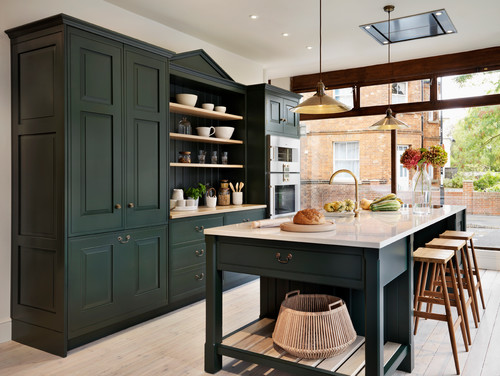
3. Emerald Green
There’s so much to love about this deep shade of green. Unlike the previous colors that are more playful, emerald draws from its roots in Mother Nature to create a sense of calm in any space. Serving as the focus in this kitchen, emerald green cabinetry marries perfectly with blond wood tones and light countertops. Wouldn’t you like to spend all holiday season here?
4. Navy Blue
Even darker and more daring than emerald green, navy is a close cousin to black. If you’re not psyched about displaying the iconic holiday colors in your home, but still want to stay on the dark side of the spectrum, this shade of blue is perfect for you. Honoring its origin from the British Royal Navy, this color embodies ultimate elegance, sophistication and power. Bringing navy into your home this season can have surprisingly health benefits too. It’s been shown to have a calming effect on the human body by slowing heart rate and metabolism.
5. Wine
Often an overlooked shade of purple, wine would make a lovely addition to any home this fall. Following suit with the deep tones discussed above, it has the strongest effect when used sparsely, as seen in this Chicago bedroom. Purple has historically been a color of royalty and power. Its wine pigment is no different, conveying richness and seduction in every capacity.

6. Steel Gray
Gray is one of the most versatile hues on the spectrum and can easily be used all year-round. Having said that, it’s often hard to choose the right gray for the season. Light gray can be seen as a winter wonderland while charcoal can be hard to distinguish from black. Steel gray is a solid middle ground. It’s the star of the show in this contemporary London kitchen with its sharp, clean and defined lines.
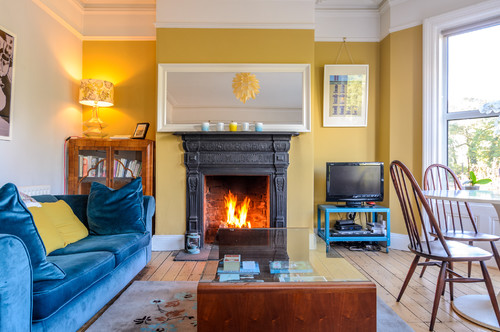
7. Mustard Yellow
A hue that echoes the falling leaves soon to come, mustard yellow provides warmth and joy to any space. It plays well with other bold colors, like the bright blue sofa and TV stand in this eclectic living room. For year-round summer lovers, this color can also serve as a happy reminder of the sunny days and will brighten up any interior.

8. Brown to Beige
Brown is a classic fall color, but too much of it can make a home feel more like a cave. Instead, use brown as an accent color and brighten it up with a lovely beige tone. Add in some white decor for a gorgeous layered look, like you see in this Denver bedroom.
How to Plan Your Furniture Arrangement Before Moving In

Guest post by Laura McHolm
Designing a floor plan in your new home is a step that is frequently overlooked. However, it is essential to create a floor plan for your new home before you move. Not only is it the step that saves you money on moving day, it also transforms a new house into your new home.
If you have a plan for where each piece of furniture will be placed in your new home, you will save time and money on moving day. The movers will not be rearranging your furniture for hours while on the clock. Sadly, the easy act of creating a floor plan before a move is a rarity. If you are not an interior designer it can be extremely challenging to know how to create a floor plan and envision a layout for your new home. So naturally, I called upon an experienced pro, Interior Designer Kathy Geissler Best of Kathy Best Design, to unwrap the secrets behind creating a beautiful and functional floor plan.

Here are Kathy’s seven steps to create a well-designed floor plan:
1. Edit
Edit your furniture. Move only pieces you love and use. Now is the time to get rid of furniture. You want your new home to look open and feel fresh. Give items that you no longer love to the Goodwill, Habitat for Humanity, a family member, or sell at a consignment store.
2. Measure
Once edited, measure your key pieces. You don’t need to measure every piece of furniture, just the large items like sofas, beds and main tables.
3. Take a Field Trip
With furniture measurements in hand, take a trip to your new home. Stand in each room and think about how you are going to use each space. Rooms will be used more often if they have multiple purposes. For instance, a living room can be both for entertaining and a family game room, and a guest room can double as a home office.
4. Don’t Rush
Walk around the new home. Experience the light in each room at different times of the day and if possible on different days. Think about how you want to use each room and what will be the focal point of each room.
5. Take Note
Once you have a purpose and a feel for each room, it’s time to make a sketch. Draw a rough sketch of the room and jot down measurements. Note locations of electrical outlets, windows, light switches, chandeliers. This information will help you place furniture and décor later. Be sure to measure the path of entry to be sure big furniture items will fit through doorways, halls, and stairs.
6. Play & Design
Another way to get ready for the move is to make templates of the large furniture pieces on butcher-block paper. Move the templates around and play with them, rearranging them in different places of the room, until you find a layout that feels right. Then adjust to these pro rules:
- Think about where you want to look in each room. At the fireplace, the view, TV? Face the furniture to work with this focal point.
- Figure out where you want the bigger pieces and then build around them.
- If you can, place dressers in the bedroom closets to open up space in the bedroom.
- Leave an open welcoming path into each room. For example, do not have the back of a sofa facing the entrance to a living room.
- Think about seat heights. A dining chair is taller than a lounge chair. You want chairs and a sofa to be at the same level in a sitting area.
- Leave at least 18 inches to walk around beds. If guest rooms are not large, a queen bed will make the room appear bigger.
- Use rugs to define areas. For instance, define a reading space in the living room with a separate rug. Be sure to make note of where rugs go so the movers can lay them down first in the correct locations.
7. Sketch & Post
Now that you have figured out where you want each large piece of furniture, complete your sketches. Tape the drawings of each room layout in the rooms. The movers will know where to place the furniture.
Congrats, you have a plan and the fun part is just beginning! At the end of move day, you will be walking into a home that fits you. The furniture staples will be placed just where you want and need them and now you get to add the décor accents! Furniture is like a wardrobe, dress it up with seasonal throw pillows, side tables and other accessories. You want to feel happy when you walk into each room. With the layout done now you can make your new home your happy place.
Simple Water-Saving Bathroom Upgrades
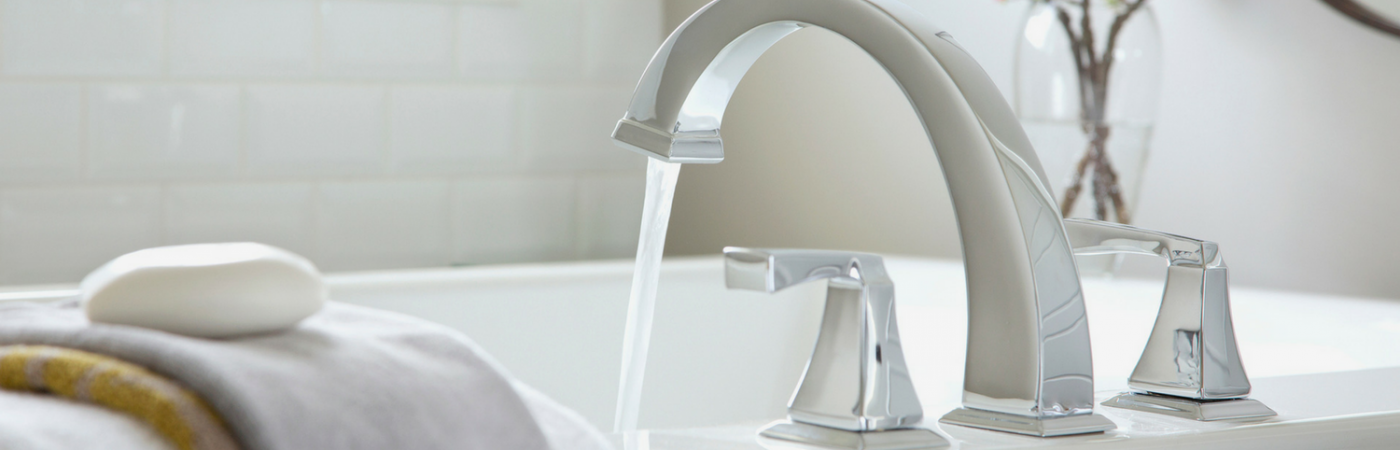
Guest post by Katy Caballeros
Between the toilet, shower, and sink, your bathroom accounts for nearly 60% of your home’s water usage. With water scarcity estimated to affect 2/3 for the global population by 2025, water costs are bound increase. Make a water-saving change and an investment in the future, without sacrificing performance. Read about the three simple bathroom upgrades that have a positive impact on your wallet and the world.
1. Install a Low-Flow Faucet Aerator
Although a sink doesn’t seem to use as much water as the shower or toilet, it can pour out around 3 gallons of water per minute (gpm). Those extra gallons add up, especially if occasionally forget to turn off the sink while you shave or brush your teeth. By installing a low-flow faucet aerator on your bathroom sink, you can cut your water waste in half, reducing it by as much as 1,400 gallons per year. Purchasing an aerator for your sink is one of the cheapest conservation renos, with aerators available for as little as $1.
2. Switch Out Your Showerhead
It’s easy to waste water in the shower—many of us use the shower to relax or perhaps leave the water running as we wait for it to warm. While taking shorter showers can definitely help with water conservation, new energy-efficient showerheads can help reduce water waste without sacrificing enjoyment.
WaterSense labeled products are certified by the Environmental Protection Agency (EPA) to help save water and are worth consideration as you search for the right products for your home. Showerheads labeled “low flow” are another option for your bathroom reno, as they deliver 2.5 gpm instead of the wasteful 5 gpm of older showerheads.
Newer models, like Evolve’s showerheads, have features like smart home technology, which conserve water and reduce energy use. Here’s how it works: instead of wasting water as you wait for the shower to warm, this technology automatically reduces the water flow to a trickle when it reaches 95 degrees. When you’re ready to shower, you pull on the showerhead’s built in lever and the flow returns to normal. No more letting energy-burning hot water flow down the drain. They estimated this showerhead technology can save homeowners 2-6 gallons of water per shower!
3. Replace Your Old Toilet
The toilet is the most water-wasteful piece of plumbing in most homes. Nearly 1/3 of a household’s total water consumption is flushed down the toilet. They can use as much as 7 gallons per flush! Luckily, toilet technology has come a long way in the past few decades. Newer energy-saving models can reduce water waste up to 67%. There are three main types of water efficient toilets:
- Low Flow Toilets
- Duel Flush Toilets
- Pressure Assist Toilets
Some toilets use a combination of low flow, duel flush, and pressure assist to create a conservation-friendly commode. Low flow toilets are designed to use significantly less water than older models, whereas duel flush toilets customize each flush for either solid or liquid waste. Pressure-assist toilets use an air cartridge to push water from the tank, which means using as little as one gallon per flush. With thousands of gallons a year in water savings at stake, a toilet reno is a must for water-conscious homeowners.
HomeAdvisor surveyed homeowners and found that replacing a toilet cost an average of $377. Compare that to savings up to $2,200 over its lifespan, and that’s more than a 580% return on investment.
Luckily, with innovations in water-saving technology, it’s easy to drastically cut back on water consumption without sacrificing performance. And, compared to other home updates, purchasing and installing water-saving products is relatively cheap and promise big savings on your water and energy bills. Whether you’re conserving water for your wallet, the environment, or state regulations upgrading bathroom fixtures can make a positive impact.
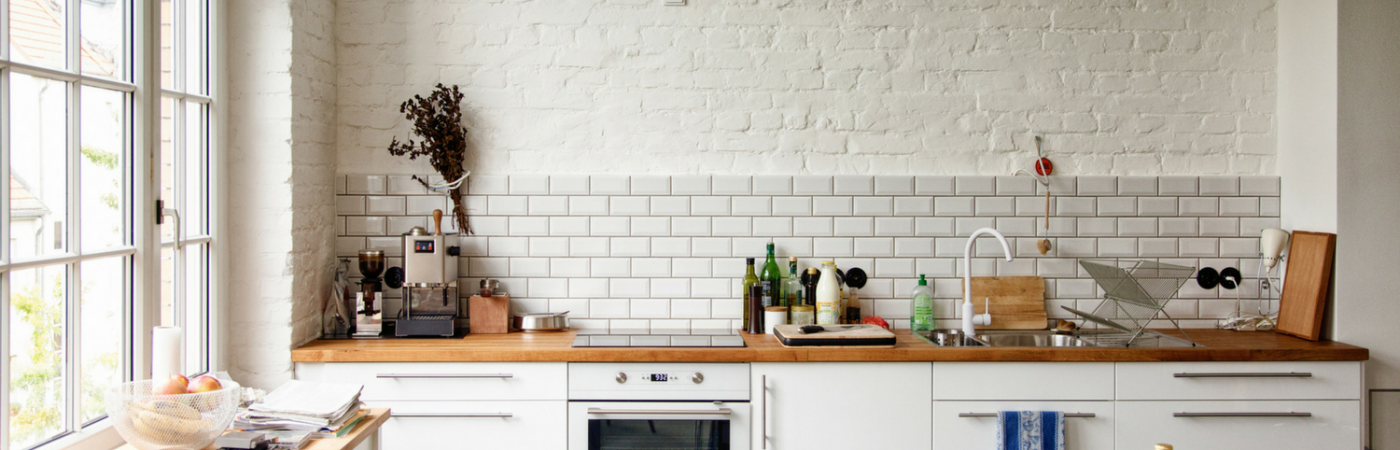
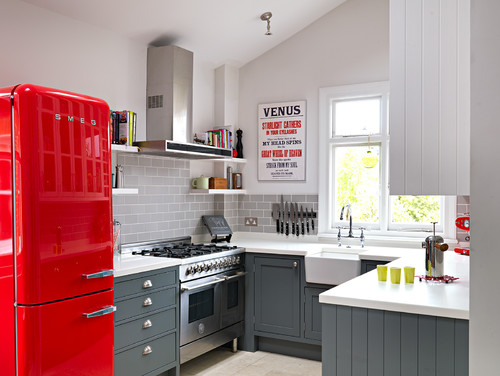
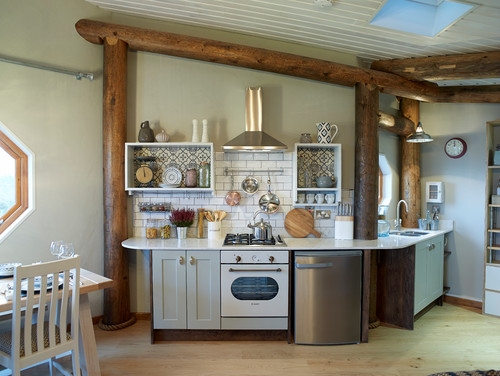
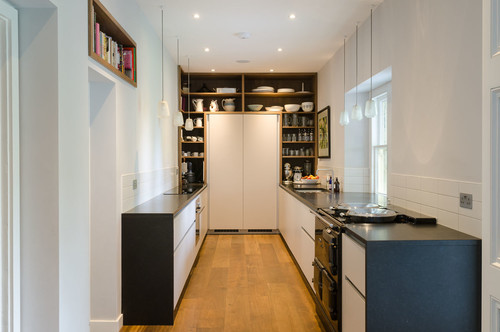
How to Keep a Small Kitchen Organized

Everyone LOVES a big kitchen. Lots of room to whip up your culinary delights! The truth is that anyone can adjust and create beautiful meals in a small kitchen. Its all in the organization!
It can be tricky keeping a compact cooking space tidy, but these ideas can help keep a small kitchen organized.
Contrary to what you might think, you don’t need acres of counter space or dozens of drawers and cupboards to have an organized kitchen that’s a joy to cook in. If anything, a smaller kitchen can encourage you to streamline your stuff and live more simply. Who wants cabinets chock-full of unloved pasta machines and dusty bread makers anyway? Check out these easy ways to restore order to your less-than-enormous kitchen.
1. Start with a utensil rack. Not only will it give you a place to hang slotted spoons and ladles for easy access while cooking, it will also free up precious drawer space.
Even in the tiniest kitchen, you can usually find somewhere to squeeze one in — under a cupboard or shelf or above the stove. Stainless steel models work in most styles of rooms and are easy to wipe down.
2. Get a knife holder. A knife block or magnetic rack is one of those simple items that really do make a difference in how functional your kitchen is. After all, rummaging around in a drawer for a piece of kitchen gear you use frequently is time-consuming and dispiriting.
A wall-mounted rack like this one keeps things orderly without swallowing too much space. Buy decent knives if you can afford it, as they should last a lifetime. One advantage of a magnetic rack is that you can slowly build up your collection of knives, buying one at a time, rather than having to invest in one large block complete with knives, which can be pricey. If you’re starting from scratch, a bread knife, paring knife and chef’s knife are essential.
3. Assign dedicated storage areas. Kitchen clutter can easily accrue, so it makes sense to assign different cupboards a specific purpose and stick to it. And dedicate a few minutes every couple of weeks to returning stray plastic lids or pot covers to their homes and sweeping out spilled spices and coffee grounds — it really will make a difference in how pleasurable (and easy) your kitchen is to use day to day.

4. Reduce your numbers. If your kitchen is really mini, or even if it isn’t, think about doing a good edit of your paraphernalia. Be honest: Do you really need more than a handful of plates, mugs or glasses if there are only one or two of you?
Having less stuff can be immensely freeing — and will significantly reduce the amount of time you spend washing up, which is a big bonus.
5. Gather and display. This cute kitchen demonstrates how you can be organized and chic at the same time. A charming crock to hold wooden spoons, a wall-mounted crate or two to provide a home for vintage-style scales and jugs, a small wall-mounted spice rack — they all add a pretty touch as well as having a practical function.
6. Be clever with your cabinets. Use every spare inch in a small kitchen by building recessed shelves where feasible. Here, they surround an integrated refrigerator. With this design solution, wall space that’s too skinny or awkwardly shaped for extra cabinets can still be used to hold frequently used items. In this kitchen, it also helps open up the room and leads the eye to an appealing feature.
The other clever feature in this kitchen is the cookbook niche above the door — another neat storage trick that doesn’t take up too much room. Ask a builder if one can be carved out from an existing wall.
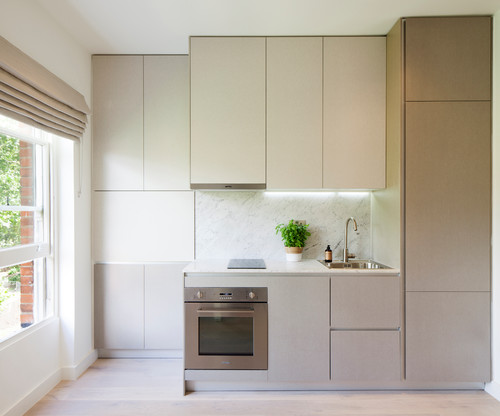
7. Go minimal. Are you in the process of picking new cabinets for your compact kitchen? Consider this look. Ultra-plain, handleless cabinets in a nude hue are soothing to look at and give a sense of visual order. Pick a seamless backsplash such as this slab of marble, since tiles with grout can look busy.
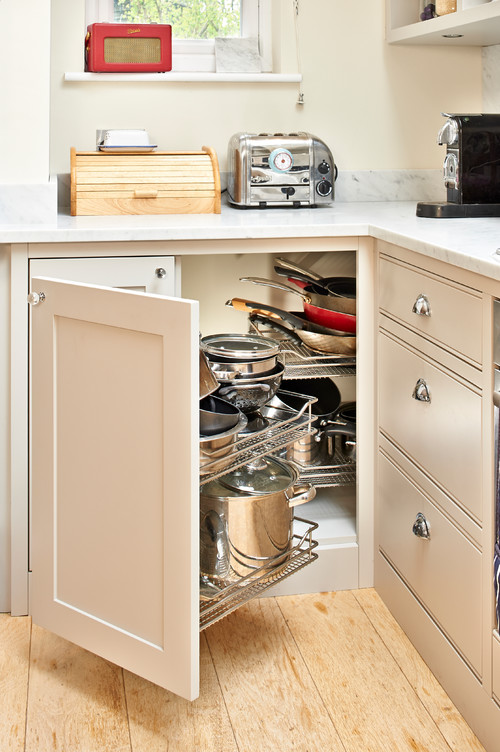
8. Get in a tight corner. When space is tight, an ingenious trio of pullout corner drawers is a lifesaver, helping to solve the problem of lost space in those awkward-to-access base cabinets.
If you’re remodeling, think about how you’d use such drawers — for cutlery, towels, pans, dishes? Here, a slimmer top drawer is complemented by the two deeper ones, so all the bases are covered.
9. Put the pans away. Similarly a pullout pan rack can be a gift in a small kitchen, creating an organized home for frying pans and saucepans and keeping you from tearing your hair out as you hunt around in the backs of cupboards. Also try using racks for items such as steamers or large, unwieldy casserole dishes.

10. Organize inside. It may sound like a no-brainer, but often what makes a kitchen, big or small, organized is how we arrange the insides of our cupboards. Shelf and drawer dividers, hooks, racks and other storage devices are key to keeping order. Consider what works for you and go custom if you can. Are you a Mason jar and Tupperware kind of person? Do you prefer mugs on hooks, shelves or in drawers? Storage is often about personal preference. Here, the slim slots for chopping boards and placemats are a brilliant idea, as is the slim pullout spice rack.
Source: CB Blue Matter / Houzz
16 Genius Storage Ideas You Probably Haven’t Thought Of
Too much stuff and no where to store it? Read on for ingenious ways to find a nook and cranny for all the items you can’t bear to give up!
Here are some awesome ideas to get you get organized and find a “home” for all of your things.
When your home has a place for everything it is magical. You open up cabinets to neat piles of Tupperware. Your closet is organized with shoes, belts and accessories organized in a way that would give Carried Bradshaw envy. Your garage is neat and each tool is hung with care while your children’s toys are lined up and ready to be used at their convenience.
Let’s be serious, there are very few who can actually say their home has enough space for all of their things. In the battle of you vs square footage, you rarely feel like you come out on top. Here are some awesome ideas to get you get organized and find a “home” for all of your things.
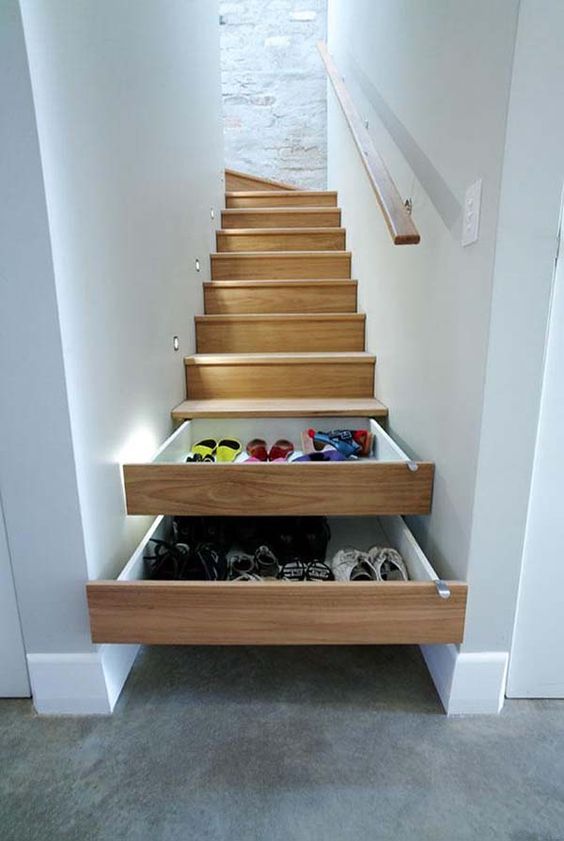
Underneath Steps
Don’t let that space underneath your stairs go to waste. Depending on the size available you may even be able to create a small office like the image in the bottom left.

Images via shelterness, artemendoza and homedit
Inside Cabinet Doors
The inside of cabinet doors are hidden which makes them a perfect place for storage. We especially love the idea for the spices below.

Images via iheartorganizing, Houzz, Instructables & thesepreciousdays
Up!
Look up and you will be amazed at all of the places you can find to store things. From the garage ceiling to the space above doors, it is important to use every inch without making a room feel cluttered.

Images via dgdoors, accentondesign, flor & marthastewart
Underneath Your Counters
If you have a smaller kitchen you know what it is like to open up a cabinet and have things fall onto you…it’s miserable. Clear up some space by taking advantage of the area underneath your counters.

Images via thedesignfile, kellysthoughtsonthings, stashvault & kitchenstuffplus
Souce: CB Blue Matter / Lindsay Listanski

")


