
 Facebook
 Twitter
 Pinterest
 Copy Link
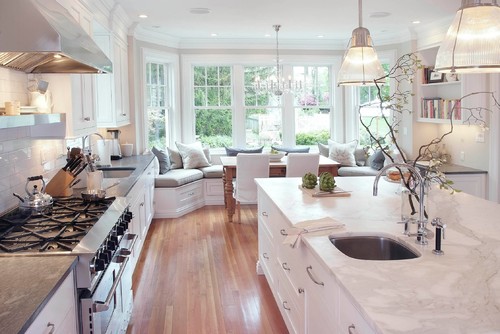
How to Get Wood Flooring on Any Budget
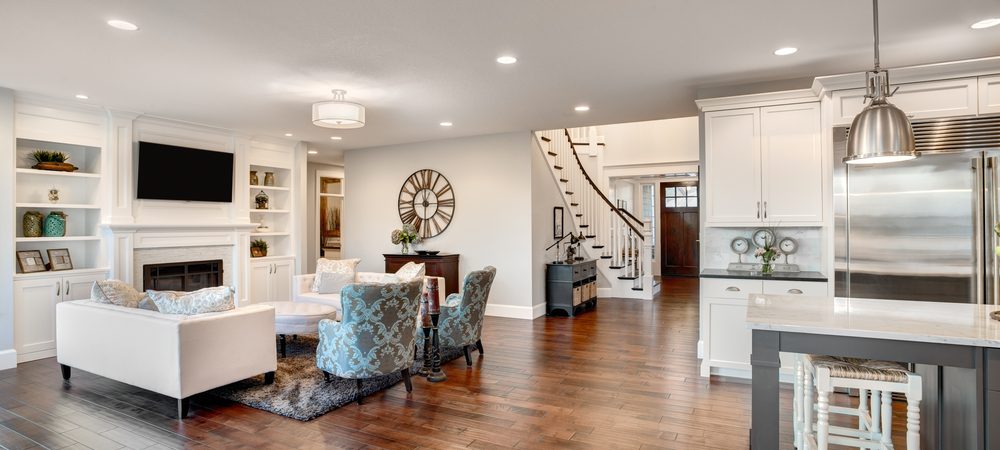
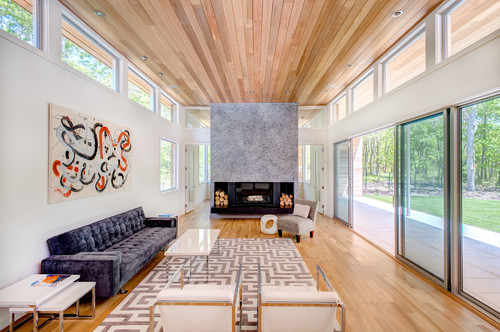
Hardwood flooring is often considered a must-have feature by new homeowners or those undertaking a remodeling project. Wood is a natural, renewable resource, plus wood flooring complements all types of home decor, from traditional to contemporary. Hardwood flooring is often considered a must-have feature by new homeowners or those undertaking a remodeling project. Wood is a natural, renewable resource, plus wood flooring complements all types of home decor, from traditional to contemporary. The downside is that wood floors, especially solid wood floors, can be expensive. Some exotic wood species, such as Brazilian walnut, can cost more than $15 per square foot — and that doesn’t include installation labor. However, you can find alternatives that give you the look of real wood at a reduced price — some as low as $2 or $3 per square foot. Here are some of the best budget-friendly hardwood floor choices.
Calculating the Overall Price
The products listed below go from most expensive to least expensive, but there’s a lot of overlap among the categories. For example, some solid wood products are less expensive than some luxury vinyl tiles. Before you make your final decision, factor in the cost of professional installation, which can add as much as $3 to $10 per square foot to the total cost of a flooring project. Some of the items that can drive up installation costs include:
• Removing and disposing of the old flooring
• Repairing the subfloor when necessary
• The size and shape of the room(s)
• Stair installation
If you’re an experienced DIYer, you can save money by installing the floors yourself. Beginners should leave the job to the professionals, though — you may end up making mistakes that are even more expensive to fix.
Solid Wood

This is usually the most expensive option, but there are ways to reduce the cost, especially in the long run. When properly maintained, solid wood flooring will last as long as the house stands. You can freshen up the look at any time by sanding away the old finish and restaining and sealing the floor.
Some wood species are more expensive than others. Fortunately, many of the most common types, such as oak or maple, fall into the low- to mid-range of costs. Solid wood products can come finished or unfinished. If the floor is unfinished, the installer will stain and seal the floor once it is in place, which adds to the installation costs. On the flip side, the prefinished product may cost more up front.
Engineered Wood

These products are constructed of multiple thin layers of material that are bonded together under pressure. The top layer is made from a familiar wood species — such as oak or maple — and is usually treated with a factory-applied finish that resists dirt and scuff marks. Engineered wood floors are less likely than solid wood to wrap and twist because of moisture and humidity, so they can be installed in basements and bathrooms. Some products feature click-in-place installation — no need for adhesives or fasteners — which is an easier, faster installation method perfect for DIYers. However, a vapor barrier needs to be installed or attached to the flooring.
Bamboo

Bamboo floors are manufactured to either look like traditional wood flooring or showcase their distinctive grass-like look. Some bamboo products are harder than solid wood flooring. They are strong and long-lasting, but are easy to scratch and are not recommended for areas prone to moisture. Bamboo is a type of grass and grows to maturity much more quickly than trees do, which makes it a sustainable, eco-friendly option. Click-in-place installation is available for some products.
Porcelain Tile

New porcelain tiles can be made to look like anything, including real wood. Some products are available in planks that have a wood-like texture. Porcelain tiles are an inexpensive, easy way to achieve a “reclaimed” wood look — many tiles mimic the texture and color variation of aged planks. As with regular tiles, they are durable and can be used in wet areas, including bathrooms. They are also stain-resistant and much easier to clean than real wood — spills wipe up quickly, and using just water and a mild soap makes them shine. Porcelain tiles must be installed using mortar and grout.
Luxury Vinyl Tile

As with porcelain tiles, luxury vinyl tile (LVT) can look like wood and come in traditional-style planks. LVTs are thicker and more durable than standard vinyl. They are usually waterproof, are easier to clean than true hardwoods, and can be installed in any room in the house. To prolong their durability, many LVTs are treated to resist color fading and scratches.
Laminate

Laminate floors are composed of a high-density hardboard core protected by a melamine layer that can be made to look like anything — including real wood. The top layer protects against dirt and scuff marks, but the material should not be installed in rooms that are exposed to moisture. Click-in-place installation is available.
Hardwood flooring is a classic, timeless look that fits a wide range of design options. Thanks to today’s selection of flooring products, it’s easy to get a wood look at a lower cost. When making your final decision, be sure to include both the material costs and the installation costs. That way, you’ll get the look you want at a budget-friendly price.
DIY author Fran Donegan has written several books, including Paint Your Home. He also writes for The Home Depot about homeownership and projects that add value to your house. To see a selection of hardwood flooring options like those described by Fran in this article, please click here.
This article is editorial content that has been contributed to our site at our request and is published for the benefit of our readers. We have not been compensated for its placement.
Source: CB Blue Matter Blog
The Lazy Guide to Spring Cleaning at Home
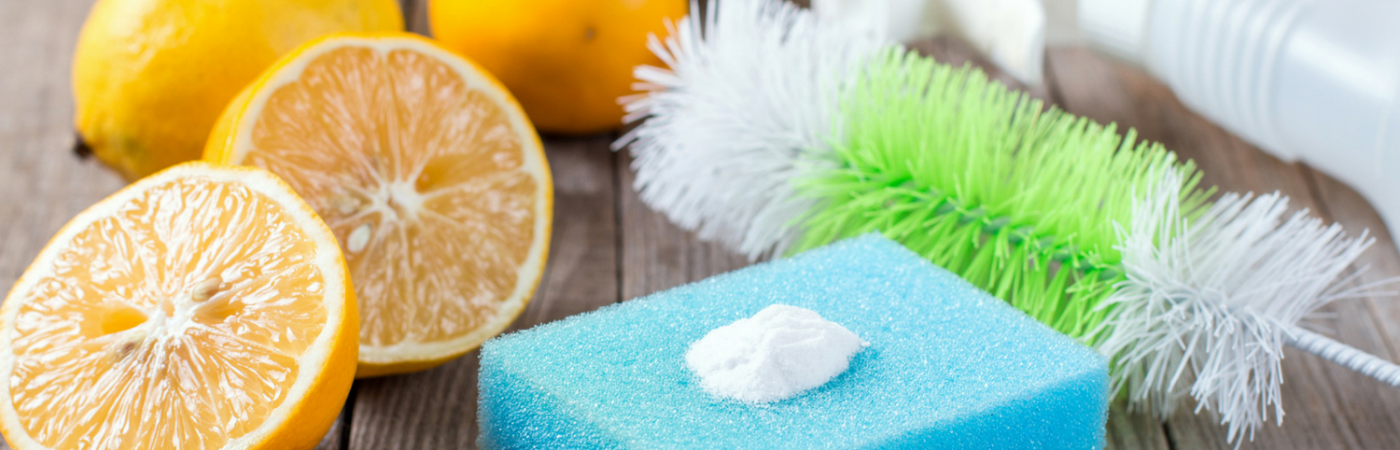
After a long winter, nothing feels better than having a clean and sparkling home. But, actually jumping into a deep clean is another story. Here are some simple tips to whip your home into shape without breaking a sweat:
#1 Wall Cleaning
A Magic Eraser is your best bet for tackling walls — it can spot clean anything from splatters to crayon marks. It’s tough enough to reach the cobwebs that collect in the corners of your walls and ceiling. You can also cover the bristles of a broom with a cloth or old T-shirt and use it to knock down any dusty spots.
#2 Carpets and Rugs
Take a little more time vacuuming the high-traffic areas of your house. (Make sure you don’t forget to spot treat any stubborn stains with a stain-removal product.) If your rug or carpet has lingering odors, sprinkle some baking soda over it and let it sit for a few hours. Vacuum up the baking soda and you’ll find the odors have disappeared.
#3 Mattress Ideas
Give your mattress cover a thorough cleaning in the washing machine — don’t forget to throw in a cup of white vinegar to boost the cleaning process. Sprinkle baking soda on your mattress while you’re washing the cover. You can vacuum it up later when you’re making the bed.
#4 Shower Care
Don’t knock yourself out trying to clean glass shower doors. Add a couple drops of water to your dryer sheets and use them to wipe down your shower doors. You can even let your showerhead clean itself overnight while you sleep. Simply tie a bag filled with white vinegar around your showerhead and let it soak overnight. Remove the bag in the morning for a non-clogged shower experience.
#5 Toilet Scrubbing
Have water stains built up in your toilet? Cola can help you attack these stains with little effort. Just pour some in the toilet, let it sit for several minutes, then flush.
#6 Oven Shine
If you have an oven with a self-cleaning feature, spring is a great time to finally run that cycle. Otherwise, mix baking soda with a bit of water and use it to quickly clean up grease and various other spills inside the oven.
#7 Clutter Solutions
When you don’t have time to clean but you need your house to look presentable, tackling clutter is the quickest way to create the illusion of a clean house. Zip through each room of the house and put anything that doesn’t belong into a basket. This strategy requires very little work and can make a big difference in your home’s appearance.
Conclusion
Although these tips won’t completely eliminate the effort involved in spring cleaning, they’ll make the job a whole lot easier. Spring is a time of new beginnings — if you use even a couple of these ideas, your home will enjoy a clean and fresh start to the upcoming season.
Source: CB Blue Matter Blog
The 2018 Home Upgrades for New Homeowners
The best way to personalize your space and give it a fresh, polished vibe is to make upgrades—big or small—that let your personality shine. Whether you’re ready to undertake a major remodeling project or only have the budget for a few modern touches, these DIY renovation ideas are a great place to start.
Welcome 2018 with an updated home that’s perfect for new beginnings and a lifetime of memories.
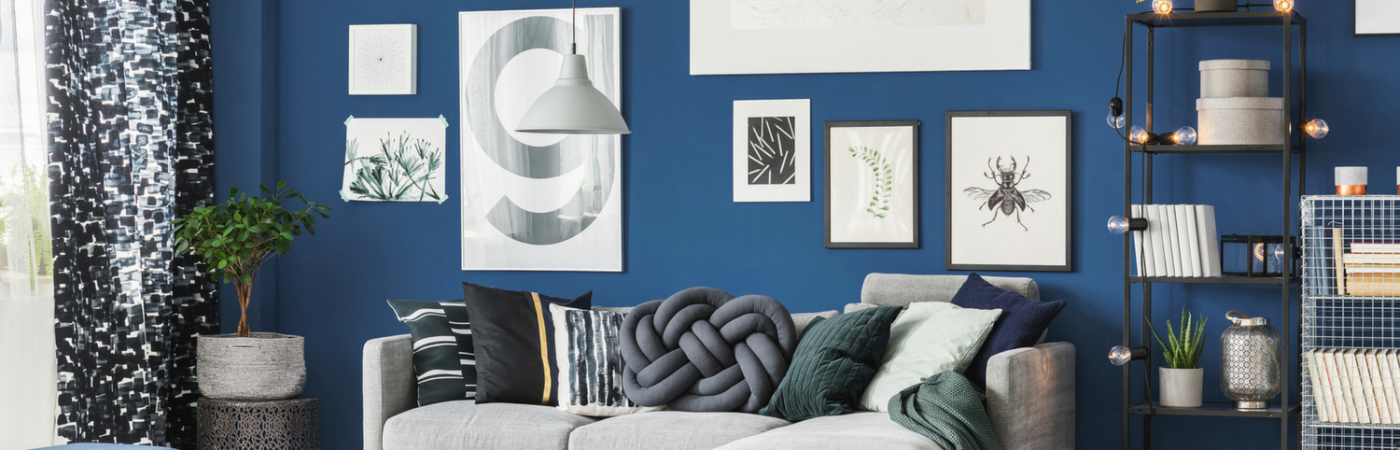
Make Your Kitchen Colorful
Gone is the popularity of a white, monochromatic kitchen. More homeowners are embracing bold accent colors on their countertops, backsplashes and cabinets, from vivid yellow and burnt orange to chic turquoise and dignified navy.
Another popular trend is juxtaposing the stainless steel appliances with warm, vibrant hues that make a space more inviting, while keeping that sleek look.
- Small budget: When repainting, choose a two-toned base. For example, “dark colors offset with lighter or brighter colors…offer visually entertaining and appealing levels of contrast,” advise the contemporary design experts at Interior Zine.
- Big budget: Replace all appliances with stainless steel; then do the painting.
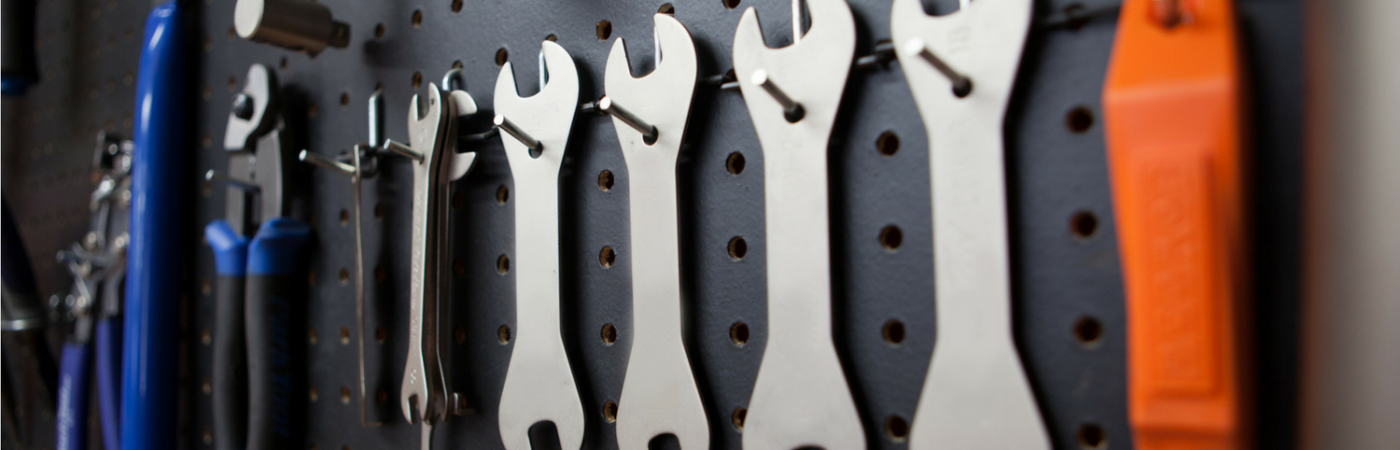
Upgrade Your Storage Space
Finding enough room to store seasonal decorations, filing papers, hardware tools, keepsake items, cleaning products and office supplies is a common struggle of homeownership. Luckily, there are a number of creative and resourceful hacks for increasing the amount of storage without reconfiguring your entire space.
- Small budget: You don’t have to find room in your home for more storage—head to the garage first. Take advantage of the walls by hanging DIY peg boards and adjustable wall panels: “With the help of hooks, you have the freedom of hanging your things anywhere and any way you want: in the center, horizontally, vertically, at the bottom, or top,” suggest garage experts. As you tackle inside storage, refer to 8 Space Savers for a Small Bedroom for inspiration.
- Big budget: Invest in new furniture pieces that double as decorative and functional, like an old chest that you can keep in the living room or a coffee table with a storage space below.
Give Your Walls More Texture
Textured walls is a fun way to infuse character into any room, whether you’re into exposed brick, wooden shiplap, geometric molding or smooth tile. Walls are a blank canvas for experimentation, so harness your inner designer and play around with different materials or wallpapers that mimic the feel of those materials.
Note that you can combine more than one texture in the same room to create a particularly unique and artistic ambiance. For instance, a “grungy” or “rustic” wall could be adjacent to a “wavy design on the accent wall,” says Kareen Liez, civil engineer and architecture enthusiast.
- Small budget: If you have unfinished drywall, use this to your advantage, with these ideas from Vintage Revivals or this idea from The Creativity in the Chaos.
- Big budget: Go in all the way with high quality wall paper that creates texture with patterns or invest in the laundry list of materials needed to create your own exposed brick wall, for example. If your budget is flexible, there are many ways to tackle this project.
Re-Do the Garage Flooring
The garage has become an extension of a home’s living space that should be both aesthetic and functional. To take your garage to the next level, and turn it into a space you actually enjoy being in, start with the boring concrete floor—replace it with an epoxy coating.
This material is “noted for its durability and longevity,” according to flooring professionals at Kwekel Epoxy Floors. They explain: “With epoxy, you’ll enjoy protection against [mold] growth, as it offers a protective layer against moisture damage.” Not to mention, epoxy is also stain resistant and the surface repels chemicals, so if something spills, it won’t seep into your concrete.
- Small budget: Take the DIY route and lay the epoxy flooring yourself. Use this tutorial from Family Handy Man to navigate through the process.
- Big budget: Hire an epoxy company to handle the work, which can be done in one weekend.
Make the Space Your Own
A house is an expression of the people who live inside, so give your new home a splash of personality in the New Year. You’ll fee great about the space and excited to show it off to your friends and family.
Source: CB Blue Matter Blog
How to Hide Unsightly Blemishes Around Your Home

What makes a house a home? It’s a hard question to answer, but a large part of it is the years of memories you’ve made in it. Oftentimes that includes the blemishes, flaws and dents on the walls and furniture that serve as lasting impressions of cherished moments and fun times. However, whether you’re selling your home or just making it presentable for guests, there are times you’ll want to camouflage them up. Read on for 10 clever ways to disguise your home’s flaws.

Create a Gallery Wall
Put your inner art connoisseur to work to blend random light switches or bulky thermostats into your design. Strategically place similarly sized artwork around switch plates, outlet covers and wall gadgets to distract the eye. If you want to cover it entirely, mount a canvas painting over it or hang art from a swing arm so you can reach behind it when necessary.
Hang Long Drapes
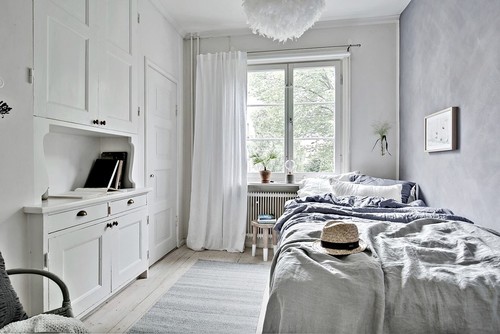
Window treatments are generally used for, you guessed it, windows, but they certainly aren’t restricted to other uses. Drape big and breezy curtains above to disguise unsightly wall features or awkward off-center windows. Off-white and cream shades are perfect to use now and throughout winter, such as the one seen in this Swedish bedroom that cleverly conceals the radiator and window when pulled closed.
Paint the Wall
This is probably one of the most obvious solutions to drywall chips and paint scratches, but here are some guidelines to help you get it right. Stick to one matte color for the walls, ceiling and trim to downplay the lines between and blend them together. Remember, the glossier the paint finish is, the more it will highlight imperfections.
Consider chalkboard paint for a non-glossy texture and an ever-changing wall feature. You can create your own design and erase it as your style evolves or use it to jot down lists and reminders.
Add wallpaper. Use wallpaper to inject personality and fun into any space. Choose from subtle designs to a dramatic mural or anywhere in between. Keep optical illusions in mind when picking patterns. For example, a striped design can make a small space look taller or wider.
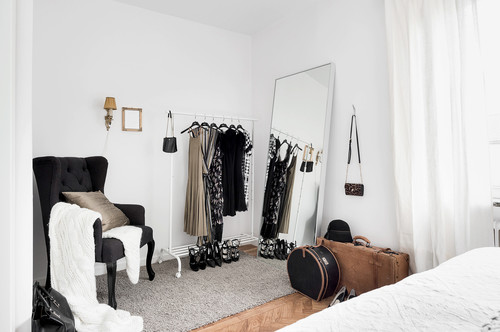
Cover it With Clothes
If you have a scratch on your bedroom wall that just won’t go away, play fashionista and move a shop-style clothing rack in front. Showcase some of your most stylish garments or everyday staples on the rack to lighten your closet’s load.
Lay Down a Rug
Roll out a gorgeous area rug over all the nicks and notches on your floor from moving furniture or dropping heavy items. Especially great for renters, rugs come in a variety of styles, colors and price points to fit your personal preferences without committing to a permanent change.
Rethink the Fifth Wall
This is a bit of a heavier project to take on, but perhaps most rewarding for those left with an infamous popcorn ceiling. Upgrade overhead stucco for a beautiful new feature with paint or paneling. Try white beadboard or wood slats for irresistible rustic charm.
Work Around Wall Vents
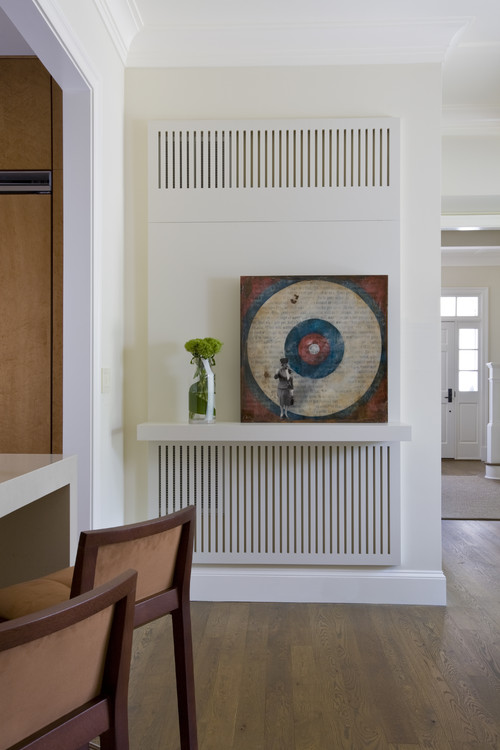
Air vents are necessary for cooling, heating and any other home circulation systems, but can be quite unattractive. Conceal them with slotted laser-cut screens that add texture and visual interest. In this D.C. living room, the revamped air return works double duty as a display shelf.
Choose Your Switches Wisely
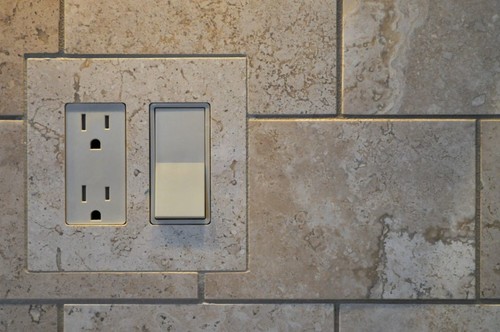
Light switches and power outlets are must-haves in every home and there’s often no easy way around them. Wherever possible, especially in the kitchen and bathroom, group your electrical outlets together and shop for new switch plates that complement the existing wall. You can blend them into an existing pattern, as seen here, or make them a fun feature with vibrant colors and textured materials.
Embrace imperfections. After all, they’re what makes your house so special. You can capitalize on the look and help them blend in by investing in distressed furnishings, such as rustic coffee tables or stained wood floors. You won’t have to worry too much about future drops or spills and they instantly add built-in age and character to any space.
Source: CB Blue Matter Blog
5 Ways to Start 2018 Right in Your Home

To get your home in tiptop shape for 2018, here are some important and efficient ways to get it ready.
Guest post by Andrea Davis
2018 is almost here! While you might consider making some New Year’s resolutions, you first need to think about your end of the year list. To get your home in tiptop shape for 2018, here are some important and efficient ways to get it ready.
1. Clean, clean, CLEAN!
If you haven’t taken care of the essential house cleaning chores, now is the time. You’ll want to quickly or deeply clean many areas of your home. These include:
- Windows
- Linens
- Floors
- Cabinets/countertops
- Appliances
- Gutters & downspouts
- Air vents
Not only does this give your home a refreshed look, it also keeps you financially savvy going into 2018. Without the proper cleaning, areas like the air vents and gutters can lead to expensive home repair bills.
2. Purge & Recycle
Nobody likes looking at a full closet, especially if you have holiday presents to add. So go through every bit of storage in your home – closets, attic, basement, garage, shed, etc. – and remove what you don’t need. You can either throw it away or recycle it by donating to a local secondhand shop. That way, you have tons of space for next year’s discoveries.
3. Increase Efficiency
If you’re going through bills and notice a marked increase in utility costs, now is the time to plan out an efficient home in 2018. This could be as simple as turning off the lights more often and conserving water. On the other hand, if you have some extra dollars, you might consider improvements like:
- Double or triple-paned windows
- Solar panel(s)
- Upgrade your faucets and water outlets
4. HVAC TLC
One of the most important – and expensive – parts of your home is the HVAC system. It keeps the house warm in the winter and cool in the summer. Because it does so much work, it needs some fine-tuning and maintenance at least every six months. To make sure you avoid an expensive bill in 2018, go through the system. Replace the filter, clean out the vents and make sure it’s all working smoothly. If you aren’t an HVAC pro, you can find plenty in the neighborhood to come for a quick checkup.
5. Review the Exterior
Roofing, landscaping, doors, siding – have you given them a thorough look? All of these are important to a beautiful appearance and optimal safety. You need to check for cracks, holes, overhanging branches and the like. You can always get a home inspector for a more in-depth review, but most of it you can do yourself. Doing a quick circle around the house with some spackle or caulk works at least in the short term.
Conclusion
Going into 2018 means letting go of 2017’s hassles. To feel free of any stress, you should take care of the essentials, including your home. Maintenance and some cheap upgrades could make all the difference personally and financially in the New Year. Don’t feel you have to go all out, or else you’ll be too tired for new tasks. Make sure there’s a nice balance of work and play so you get the best start to 2018.
Source: CB Blue Matter Blog
The Best and Worst Flooring Materials for Family & Pets
Is it possible to have children, pets, and beautiful flooring? Yes—but you’ve got spills, muddy feet and the occasional pet “accident” working against you. You just want to find flooring material that meets your needs, like:
- Durability – The floors should be able to withstand untrimmed dog nails, kneading cats, and sippy cup spills.
- Easy to clean – In a house full of kids and pets, messes are going to happen. What’s important is that your flooring material is easy to mop, sweep, and clean with your preferred products.
- Safety – The right flooring for your family is safe, soft and slip-resistant. You also want to check that it doesn’t contain harmful chemicals—such as lead and phthalate.
- Visual appeal – It’s your home—you should enjoy your space! That means picking out flooring that makes you happy. Choose an appealing color and texture that compliments your space.
- Price – According to HomeAdvisor, it costs an average of about $2,900 to install flooring in your home. Since new flooring is a big investment, it’s best to pick a material that’s cost effective and will last a few decades.
Here are materials that do and don’t meet these specifications.

The Best
Bamboo Flooring
Bamboo floors are kid, pet, and earth friendly. Bamboo’s surface is hard (on par with maple and oak flooring) and extremely durable. It’s also stain resistant and can be easily cleaned using a mop, broom, or vacuum. And, its attractive exterior should be able to withstand scratches from toys and claws, making it the ideal choice for families.
Linoleum
Linoleum flooring makes the list because it’s easy to clean, fairly water resistant, quiet, and hypoallergenic (a must with stray furs flying around). And, since its color and print design extends from the surface into the base, it’s harder to detect scratches.
Vinyl
Vinyl flooring is among the most resilient flooring materials. Its tough surface will resist scratches, tear, and wear and is incredibly water resistant. And, it takes minimal maintenance to keep clean. Spills and stray hairs can be mopped, swept, or vacuumed away in minutes time and won’t leave long-lasting stains. Just be sure not to skimp on the price—cheap vinyl won’t offer the same durability and softness as higher end brands.
Tile or Stone
Tile flooring is a great option for families and pet owners because it can stand up to almost any mess or accident. It’s water resistant, stain resistant, and incredibly durable. Terra cotta and natural stone are beautiful and will compliment almost any home. One drawback is the relative hardness of the flooring—what makes it so easy to clean is also what makes it uncomfortable to sit and play on. Counteract this by adding a soft play rug to rooms where animals and kids gather and keep the beautiful flooring for yourself.
Rethink Carpet
While this is one of the most popular types of flooring, it has many qualities that children and pets love—it’s soft, warm, and slip resistant. However, it does a terrible job hiding pet accidents, fur and stains. It can also trap foul smelling odors! Even worse, looped cut carpet can catch on animal claws and cause a lot of pain. If you must have carpet, choose either polyester, nylon, or eco-friendly, triexta fibers. These types are known for their durability and stain resistance.
Choose Flooring That Will Last
Choosing the right flooring for your family is important—the floor is where you gather, play, and roam. Why spend that time worrying about spills and messes? The right flooring for your family will stand up to the chaos and provide a space for fun first.
Katy Caballeros is a freelance writer who enjoys scheming eclectic home design ideas for her apartment. She can usually be found with book and bottle of ginger beer on the weekends.
References
- https://www.consumerreports.org/cro/2012/05/got-kids-find-the-best-flooring-for-your-family/index.htm
- http://www.homeadvisor.com/cost/flooring/install-flooring/
- https://www.thespruce.com/carpet-types-for-homes-with-children-4121003
- https://learn.livingdirect.com/flooring-for-pet-owners/
- https://www.homeflooringpros.com/blog-guides/best-flooring-dogs-pet-friendly-floors/
- http://www.diynetwork.com/how-to/rooms-and-spaces/floors/guide-to-selecting-flooring
Source: Coldwell Banker Blue Matter Blog
7 Things to Do Before Moving into Your New Home

The keys are yours, now what?
Congratulations! You’re a new homeowner. While you may not be able to wait to move in, there are a few things you should consider tackling before hanging those family photos on the walls.

1. Change the locks – For peace of mind, it’s a good idea to change out the locks on your exterior doors to ensure that anyone the previous owners may have given a key to can no longer access the property. According to Home Advisor, the average homeowner spends between $100-$300 hiring a locksmith.
2. Paint – Don’t love the lemon yellow the previous homeowners chose for the master bedroom? Painting your new home will be infinitely easier if you can do so before moving furniture into the space. Head to your local paint store to pick up a few samples to test before committing. Take your time and be sure to view the color swatches in different lights before committing. There are also handy online visualization tool like the Benjamin Moore Personal Color Viewer.

3. Take care of your floors – Like with painting, treating and refinishing floors is much easier without furniture in the way. Costs for this project will vary depending on the size of the job, but you can estimate roughly $200 for supplies and equipment. Check out this useful guide to refinishing wood floors from This Old House before heading to the hardware store.

4. Make any necessary repairs – Does the bathtub need to be re-caulked or the tile re-grouted? Do the floor boards creak? Make a list of priority repairs and tackle them one by one. You’ll be happy you did a few months from now when other projects crop up on the honey do list.
5. Clean from top to bottom – The only thing better than a new home is a clean new home. Now is the best time to give every nook and cranny of your home a deep clean. Scrub the inside of appliances like the refrigerator, oven, dishwasher and microwave. Wipe down walls and baseboards with a damp cloth. Looking for clever ways to banish grease and grime? Check out our Home Tip of the Day video series.

6. Set up your utilities – Call your electric, gas, cable and water utility providers to make sure service is transferred to you after closing. You’ll also want to research when trash and recycling pick-up are scheduled for your zone.
7. Change your Address – While you may want those mortgage bills to be sent elsewhere, it’s important to file a change of address with the US Postal Service to ensure that all mail is forwarded to your new address following your move. Also be sure to alert friends and family of your new address. They’ll need to know where to send that housewarming gift!
Now, the only thing left to do is celebrate! Looking for great housewarming party ideas? Try one of these backyard flings!
9 Must-Haves for Low-Maintenance Kitchen Cabinets
Save valuable elbow grease and time with these ideas for easy-to-maintain cabinets.
The heart of the home may also be the toughest room to keep clean. Every surface in your kitchen is susceptible to crumbs, dirt, stains and splatters. This is especially true of cabinets. Fortunately, there are practical ways to keep your cabinet maintenance on the lighter side. With ideas like choosing fewer decorative details and picking the right color, these nine tips will make your cabinets easier to maintain.
1. Choose a door style with minimal detail. Raised-panel door styles have nooks and crannies that are magnets for dust and dirt. Shaker-style and slab door fronts don’t, so you won’t have to spend time scrubbing every recess of your door fronts.
If you’re designing a traditional kitchen and want a more decorative door style, select a stain or paint that has a glaze. The glaze will fill the doors’ cracks and corners and better hide the dust and dirt that your cabinet doors will collect.
2. Opt for flush cabinet ends. You normally have two options for finishing the ends of your cabinets: flush ends or matching ends. Flush ends (above) are plywood ends that match the color of your cabinets. They are smooth and sleek, which means you can run a cloth over it with a few swipes. They can certainly speed up cleaning.
Matching ends feature a panel with the same style as the door fronts, and while they can bring elegance and character to your kitchen, you face the same maintenance issues with matching ends as you do with raised-panel doors. There’s simply more to scrub.

3. Cut the trimmings. Designer details like crown molding, corbels, decorative legs and light rail molding add more to love but also more to clean, especially ornate styles.
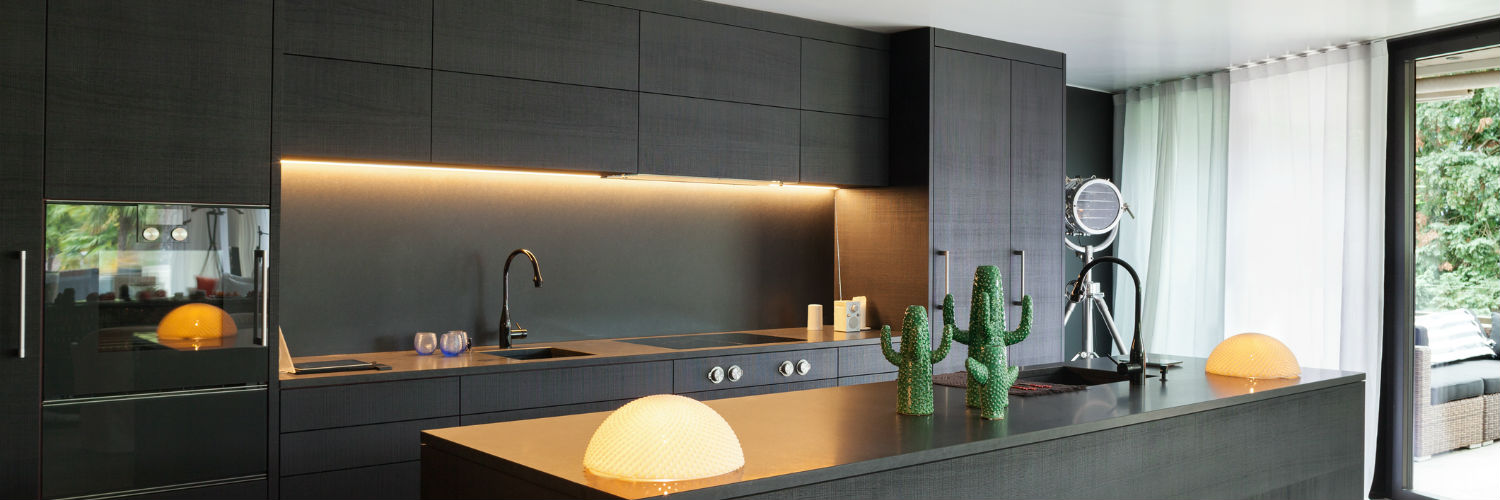
There are other designer touches you can use that require less maintenance. Try a colorful cabinet paint, eccentric lighting or colored bar stools, like in this modern kitchen.
4. Pick a stain instead of a paint. Stains and paints have pros and cons. They can both show crumbs and fingerprints, and paint definitely shows food stains and splatters.
That said, a stain is easier to touch up than paint. You can give a scratched cabinet stain a quick spruce-up with a matching permanent marker. It’s often harder with paint for two reasons. First, it’s hard to find a marker that closely matches a specific paint. Often a touch-up kit from the cabinet manufacturer is needed. Second, paint doesn’t take touch-ups the same way that stains do. You’re more likely to notice a touch-up on paint.
5. Go for a grain with a dark stain. If you’re set on a dark cabinet stain, select a wood species that features the grain, such as oak or hickory. Grains don’t show scratches, stains and crumbs as much as a clean wood species like maple does. It’s also harder to tell that a cabinet stain has been touched up when the surface has grains.
6. Invest in hardware. If you want fewer fingerprints and less wear and tear on your door fronts, purchase door pulls and knobs for all of your cabinets. They help preserve the integrity of your cabinets’ surfaces.
Steer clear of stainless steel and chrome hardware. They show fingerprints and water spots and are harder to clean. Oil-rubbed bronze, satin bronze, polished nickel, brushed nickel and white hardware are the cream of the crop as far as easy maintenance goes. Choose the look that best suits the style of your kitchen.
7. Avoid glass door fronts. They may be windows to your kitchen’s soul, but they’re also extra surfaces to clean. They manage to attract their fair share of dust, dirt and smudges. Dirt can build up easily on glass door fronts that feature mullions. You also have to keep whatever is behind those glass doors tidy.
One benefit to glass door fronts is how inviting they can make your kitchen space feel. Luckily, there’s more than one way to design a warm and welcoming kitchen. If you want a low-maintenance alternative to glass door fronts, stick with lighter cabinet stains like golden browns. They can make your guests feel just as cozy as glass door fronts do.
8. Reduce open shelving. Open shelving is a great canvas for displaying your favorite decor and cookware, whether it’s on a wall, on an island or at the end of cabinets. But it takes more time and effort to ensure that these spaces are dusted and organized. The upkeep can become overwhelming along with your daily tasks.
To shorten your to-do list, place your decor on necessary surfaces like dining tables and countertops instead of unnecessary cabinet shelves. You can also use pillows, chairs, bar stools and lighting as decorative touches.
9. Protect your sink cabinet from moisture. This is more of a preventative measure — it will help you avoid issues down the road. There are a couple of ways to help protect your sink cabinet from moisture. You can order the cabinet with an all-plywood construction (most semicustom and prefabricated cabinets are constructed of a mixture of pressed wood and plywood). An all-plywood construction makes the cabinet less penetrable. You can also purchase a cabinet mat, which looks like a tray and is placed at the base of the sink cabinet. It will serve as a moisture barrier and catch any liquid leaks or spills.
More Kitchen Confidential: 10 Ways to Promote Aging in Place | 7 Ways to Mix and Match Cabinet Colors | 11 Islands With Furniture Style | The Case for Corbels | All Good in the Hood
Related Reads:
Choose Shaker Cabinets for Style and Simplicity
Easy-to-Clean Corbels for the Kitchen
Decorate With Eye-Catching Kitchen Lighting
Source: Coldwell Banker Blue Matter Blog

")


